DxHtmlEditor Class
A WYSIWYG text editor.
Namespace: DevExpress.Blazor
Assembly: DevExpress.Blazor.v25.2.dll
NuGet Package: DevExpress.Blazor
Declaration
public class DxHtmlEditor :
    ClientComponentJSInterop,
    IModelProvider<ClientComponentCollectionModel<HtmlEditorMentionModel>>,
    IModelProvider<HtmlEditorVariablesModel>
Remarks
DevExpress Blazor HTML Editor (<DxHtmlEditor>) is a WYSIWYG (what you see is what you get) text editor that allows users to format text and add graphics. The editor stores its markup as HTML.

Add an HTML Editor to a Project
Follow the steps below to add an HTML Editor component to an application:
- Create a Blazor Server or Blazor WebAssembly application.
- Register the DevExpress.Blazor.Office namespace to access and modify toolbar settings.
@using DevExpress.Blazor.Office - Add the following markup to a
.razorfile:<DxHtmlEditor>…</DxHtmlEditor>. - Manage the editor markup.
- Optional. Configure other options (see the sections below).
DxHtmlEditor
API Reference
Refer to the following list for the component API reference: DxHtmlEditor Members.
Static Render Mode Specifics
Blazor HTML Editor does not support static render mode. Enable interactivity to use the component in your application. Refer to the following topic for more details: Enable Interactive Render Mode.
HTML Editor Markup
Use the Markup property to specify the HTML Editor’s markup.
<DxHtmlEditor Markup="Document content"
              Height="200px"
              Width="100%" />
You can also use the @bind attribute to bind the Markup property to a data field. Refer to the following topic for details: Two-Way Data Binding.
<DxHtmlEditor @bind-Markup="@markup"
              Height="200px"
              Width="100%" />

@code {
    string markup { get; set; } = "Document content";
}
When the Markup property is bound to a field, the editor applies the BindMarkupMode property. This property specifies how the editor updates its markup. The default mode is OnLostFocus.
When the Markup property value changes, the editor raises the MarkupChanged event.
Markup Type
The HTML Editor stores its markup in the Markup property in HTML format.

The editor can store the following formatting attributes:
- Bold, italic, strikethrough, underlined, subscript, and superscript text
- Font, font size, and text color
- Headings
- Text alignment
- Bullet and numbered lists
- Code blocks and quotes
- Hyperlinks, images, and tables
The Blazor HTML Editor does not include Markdown support. If Markdown is a project requirement, you can implement a custom converter (see the Incorporate Markdown Support section for guidance).
Input Validation
<DxHtmlEditor> allows you to validate user input. To specify validation rules, use the IsValid property.
When a user enters an invalid value, the focused editor displays a validation message at the specified position. You can also use the ShowValidationMessageOnFocus property to specify whether the editor hides a validation message after the editor’s focus is lost.
The following code snippet validates user input in the MarkupChanged event handler and configures validation settings as follows:
- Displays a validation message if the editor’s markup is empty.
- Sets the validation message text.
- Positions the validation message at the right editor edge.

<DxHtmlEditor Markup="@markup"
              IsValid="@isValid"
              ValidationMessage="Empty markup."
              ValidationMessagePosition="HtmlEditorValidationMessagePosition.Right"
              MarkupChanged="@OnMarkupChanged"
              Height="100px"
              Width="80%" />

@code {
    bool isValid;
    string markup { get; set; } = "";
    void OnMarkupChanged(string newValue) {
        markup = newValue;
        isValid = !string.IsNullOrEmpty(newValue);
    }
}
Mentions
<DxHtmlEditor> supports mentions that allow a user to reference other users in text or conversation threads. When a user types a predefined marker, the editor displays a drop-down list of available names. The component allows you to use multiple mention lists. To identify a mention list, use a unique marker.
Follow the steps below to create and configure a mention list:
- Add a
DxHtmlEditorMentionobject to the DxHtmlEditorMentions collection. - Use the DxHtmlEditorMention.Data property to specify a data source for mentions.
- Specify the DisplayFieldName property to obtain display values for mentions from data source fields.
- Assign a unique marker to the Marker property.
- Specify the SearchFieldNames property to enable search operations for mentions.
- Optional. Use SearchMinLength and SearchDelay properties to configure search settings.
The following code snippet implements mentions to emulate the functionality common to many collaboration tools:
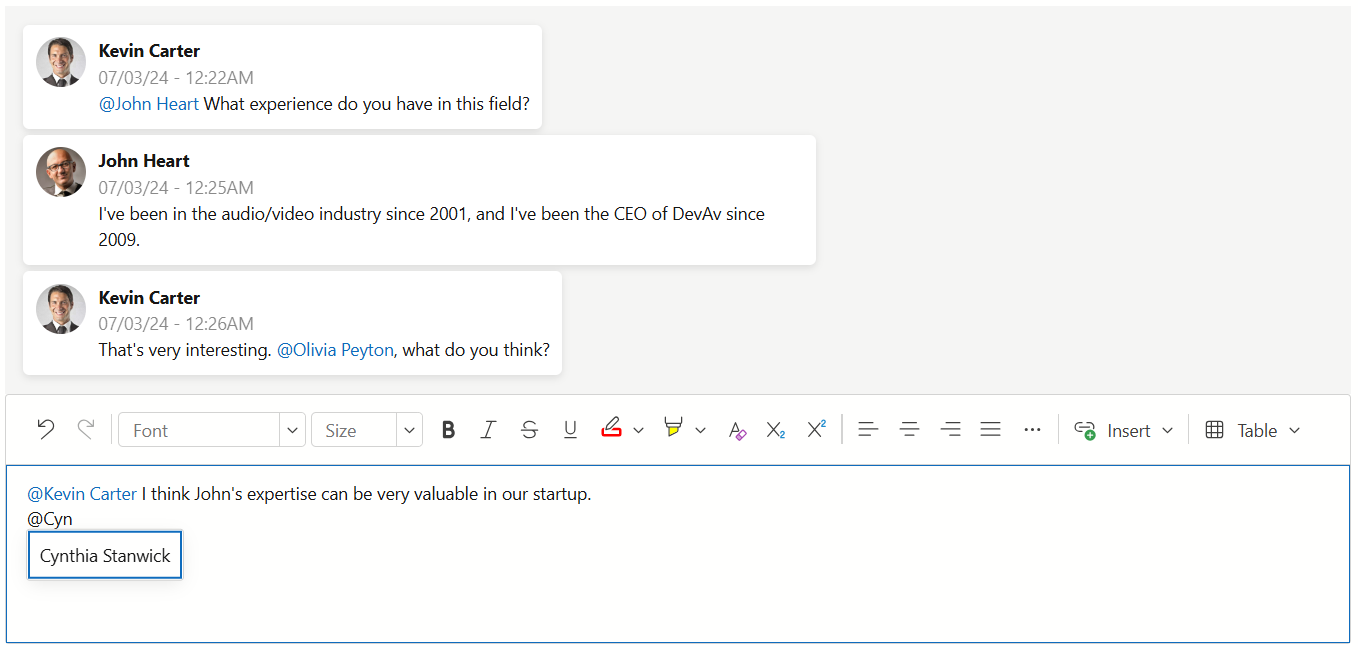
<DxHtmlEditor Markup="@Markup" Height="200px">
    <DxHtmlEditorMentions>
        <DxHtmlEditorMention Data="@EmployeesData"
                             DisplayFieldName="@nameof(MentionData.Name)"
                             SearchFieldNames="@SearchFieldNames" />
    </DxHtmlEditorMentions>
</DxHtmlEditor>

@code {
    string Markup = @"<p>
                      <span class='dx-mention' spellcheck='false' data-marker='@' data-mention-value='Kevin Carter'>
                        <span>
                            <span>@</span>
                            Kevin Carter
                        </span>
                      </span>
                      I think John's expertise can be very valuable in our startup.
                    </p>";
    string[] SearchFieldNames = { nameof(MentionData.Name) };

    class MentionData {
        public string Name { get; set; }
        public string Team { get; set; }
    }
    MentionData[] EmployeesData = {
        new MentionData() { Name = "John Heart", Team = "Engineering" },
        new MentionData() { Name = "Kevin Carter", Team = "Engineering" },
        new MentionData() { Name = "Olivia Peyton", Team = "Management" },
        new MentionData() { Name = "Robert Reagan", Team = "Management" },
        new MentionData() { Name = "Cynthia Stanwick", Team = "Engineering" },
        new MentionData() { Name = "Brett Wade", Team = "Analysis" },
        new MentionData() { Name = "Greta Sims", Team = "QA" },
    };
}
Placeholder Variables
<DxHtmlEditor> supports placeholder variables you can use to create templates for document generation. When a user clicks the toolbar’s Variable command, the component displays a drop-down list of available variables. The editor inserts the selected placeholder variable at the caret position in the document and encloses the variable between escape sequences.
Follow the steps below to create and configure variables:
- Add a
DxHtmlEditorVariablesobject to component markup. - Use the DxHtmlEditorVariables.Data property to store variables.
- Use the EscapeCharacters property to specify escape sequences that enclose placeholder variables in the document.
- Add the Variable group to the component’s toolbar in a CustomizeToolbar event handler to display the Variable command.
The following code snippet implements placeholder variables and adds the Variable command to the built-it toolbar:

@using DevExpress.Blazor.Office

<DxHtmlEditor Height="200px"
              CustomizeToolbar="@OnCustomizeToolbar">
    <DxHtmlEditorVariables Data=@Variables
                           EscapeCharacters="@escapeChar" />
</DxHtmlEditor>

@code {
    string[] Variables = new string[] { "FirstName", "LastName" };
    // Declare one string
    string escapeChar = "$";
    // Declare an array of strings
    string[] escapeChar = new string[] { "$", "$" };

    void OnCustomizeToolbar(IToolbar toolbar) {
        toolbar.Groups.Add(HtmlEditorToolbarGroupNames.Variable);
    }
}
Replace Variables
The following code snippet replaces variables with actual values:

@using DevExpress.Blazor.Office
@using HtmlAgilityPack

<DxHtmlEditor @bind-Markup="@simpleMarkup"
              CustomizeToolbar="@OnCustomizeToolbar" ... />
<DxButton Text="Replace variables" Click="@onButtonClick" />

@code{
    void OnCustomizeToolbar(IToolbar toolbar) {
        // ...
        toolbar.Groups.Add(HtmlEditorToolbarGroupNames.Variable);
        // ...
    }
    void onButtonClick() {
        simpleMarkup = ReplaceVariables("John", "Smith");
    }

    string ReplaceVariables(string firstName, string lastName) {
        HtmlDocument doc = new HtmlDocument();
        doc.LoadHtml(simpleMarkup);

        var nodes = doc.DocumentNode.SelectNodes("//span[@class='dx-variable']");

        if (nodes != null) {
            foreach (var node in nodes) {
                var varValue = node.GetAttributeValue("data-var-value", "");
                if (varValue == "FirstName") {
                    node.ParentNode.ReplaceChild(HtmlNode.CreateNode(firstName), node);
                }
                else if (varValue == "LastName") {
                    node.ParentNode.ReplaceChild(HtmlNode.CreateNode(lastName), node);
                }
            }
        }
        return doc.DocumentNode.OuterHtml;
    }

    string simpleMarkup = @"<p>Hello <span class='dx-variable' data-var-start-esc-char='{' data-var-end-esc-char='}' data-var-value='FirstName'>
                            <span contenteditable='false'>{FirstName}</span></span>
                            <span class='dx-variable' data-var-start-esc-char='{' data-var-end-esc-char='}' data-var-value='LastName'>
                            <span contenteditable='false'>{LastName}</span></span>! Nice to meet you!</p>";
}
Hyperlinks
<DxHtmlEditor> allows users to add hyperlinks to the document. When a user clicks the Hyperlink command in the toolbar’s Insert Element group, the editor invokes the Hyperlink dialog:

This dialog allows users to edit existing or create new links to web pages.
Images
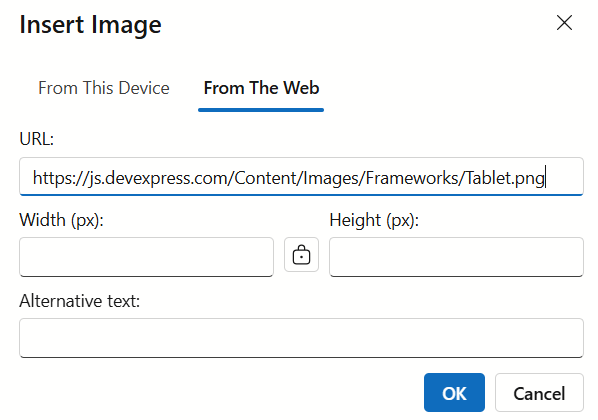
<DxHtmlEditor> allows users to add pictures to the document. Once a user clicks the Picture command in the toolbar’s Insert Element group, the editor invokes the Insert Image or Update Image dialog:

Users can upload a picture from the local file system or specify a URL.
Note
<DxHtmlEditor> stores image source information as binary data.
<DxHtmlEditor> allows users to resize images. To disable this functionality, set the MediaResizeEnabled property to false.
Tables
<DxHtmlEditor> supports table functionality: users can select commands in the toolbar’s Table group to add or delete tables or individual rows/columns.

Insert Table Dialog
Once a user clicks the toolbar’s Table command, the editor invokes the Insert Table dialog:

This dialog allows users to create a table with a specified number of rows and columns.
Table Resize
<DxHtmlEditor> allows you to specify whether users can resize tables. To enable resize operations, set the TableResizeEnabled property to true. You can also use TableColumnMinWidth and TableRowMinHeight properties to specify minimum column width and row height.
The following code snippet allows users to resize tables and configures the minimum column width and row height:
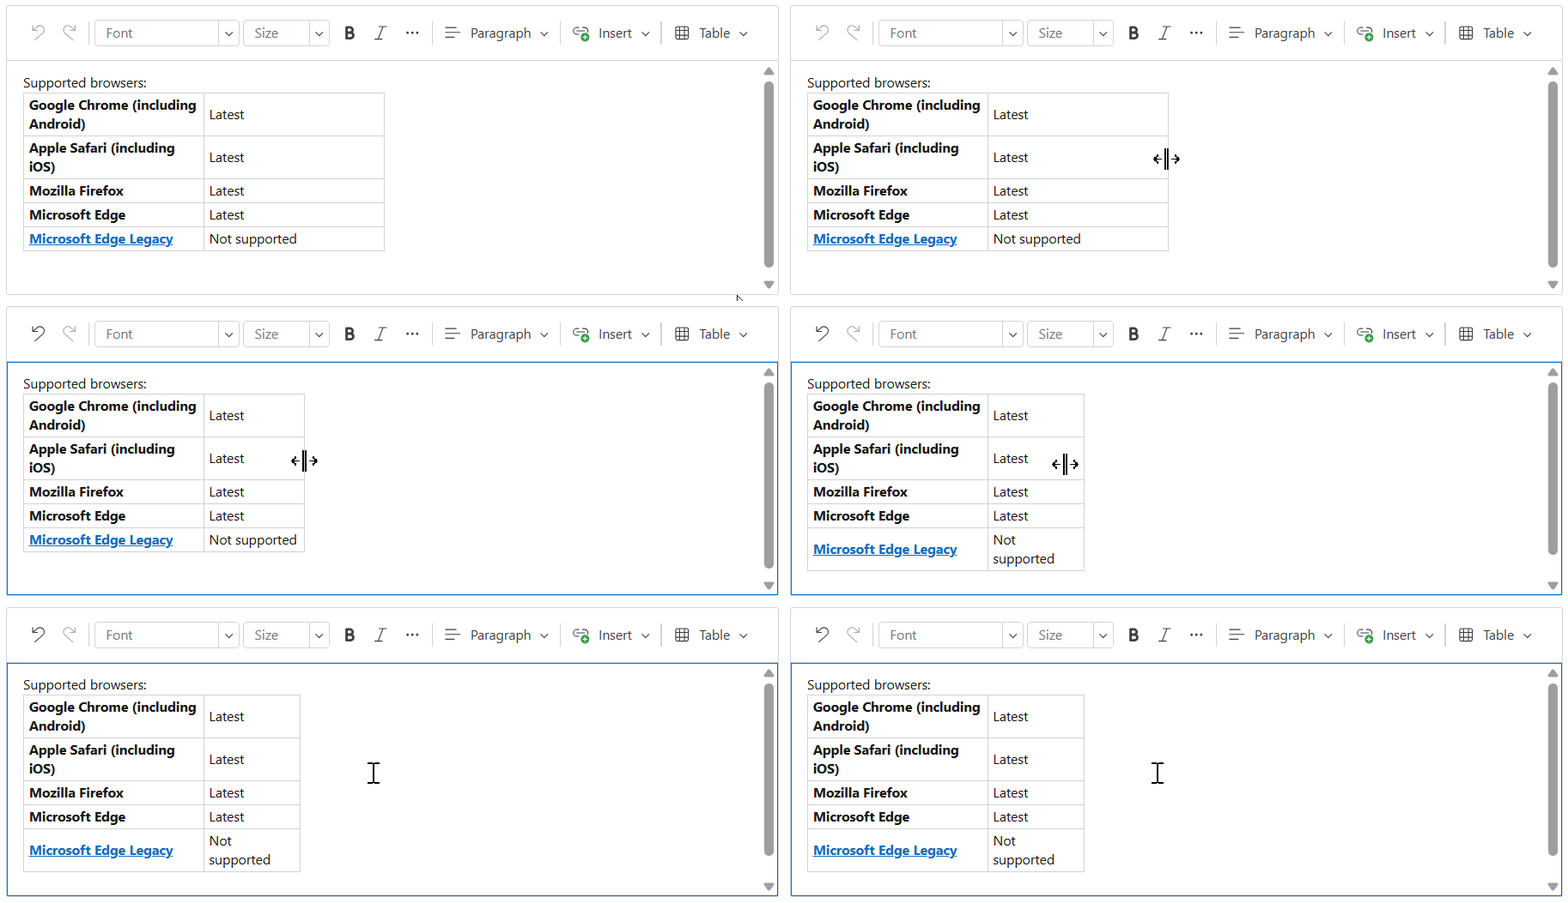
<DxHtmlEditor Markup="@markup"
              TableResizeEnabled="true"
              TableColumnMinWidth="100"
              TableRowMinHeight="50"
              Height="300px"
              Width="100%" />

@code {
    string markup = "";
    protected override void OnInitialized() {
        markup = GetData();
    }
}
Toolbar
The HTML Editor displays a built-in toolbar that consists of multiple groups with various items within a group. The toolbar supports adaptivity and customization.

Adaptivity
The HTML Editor’s toolbar supports adaptive mode. When you resize the browser window, the toolbar hides grouped items in drop-down menus starting from the right-most item. You can use the AdaptivePriority property to specify an item’s hiding order.
When component width changes, the toolbar also hides that group’s text and displays an icon only.

Customization
<DxHtmlEditor> allows you to access and modify the built-in toolbar. Handle the CustomizeToolbar event to perform the following operations:
- Access toolbar groups and items.
- Add predefined or custom groups to the toolbar’s group collection.
- Add predefined items to a group’s item collection.
- Remove groups or items from toolbar collections.
- Customize groups and items.
Note
To access and modify toolbar settings, register the DevExpress.Blazor.Office namespace:
@using DevExpress.Blazor.Office
Keyboard Navigation
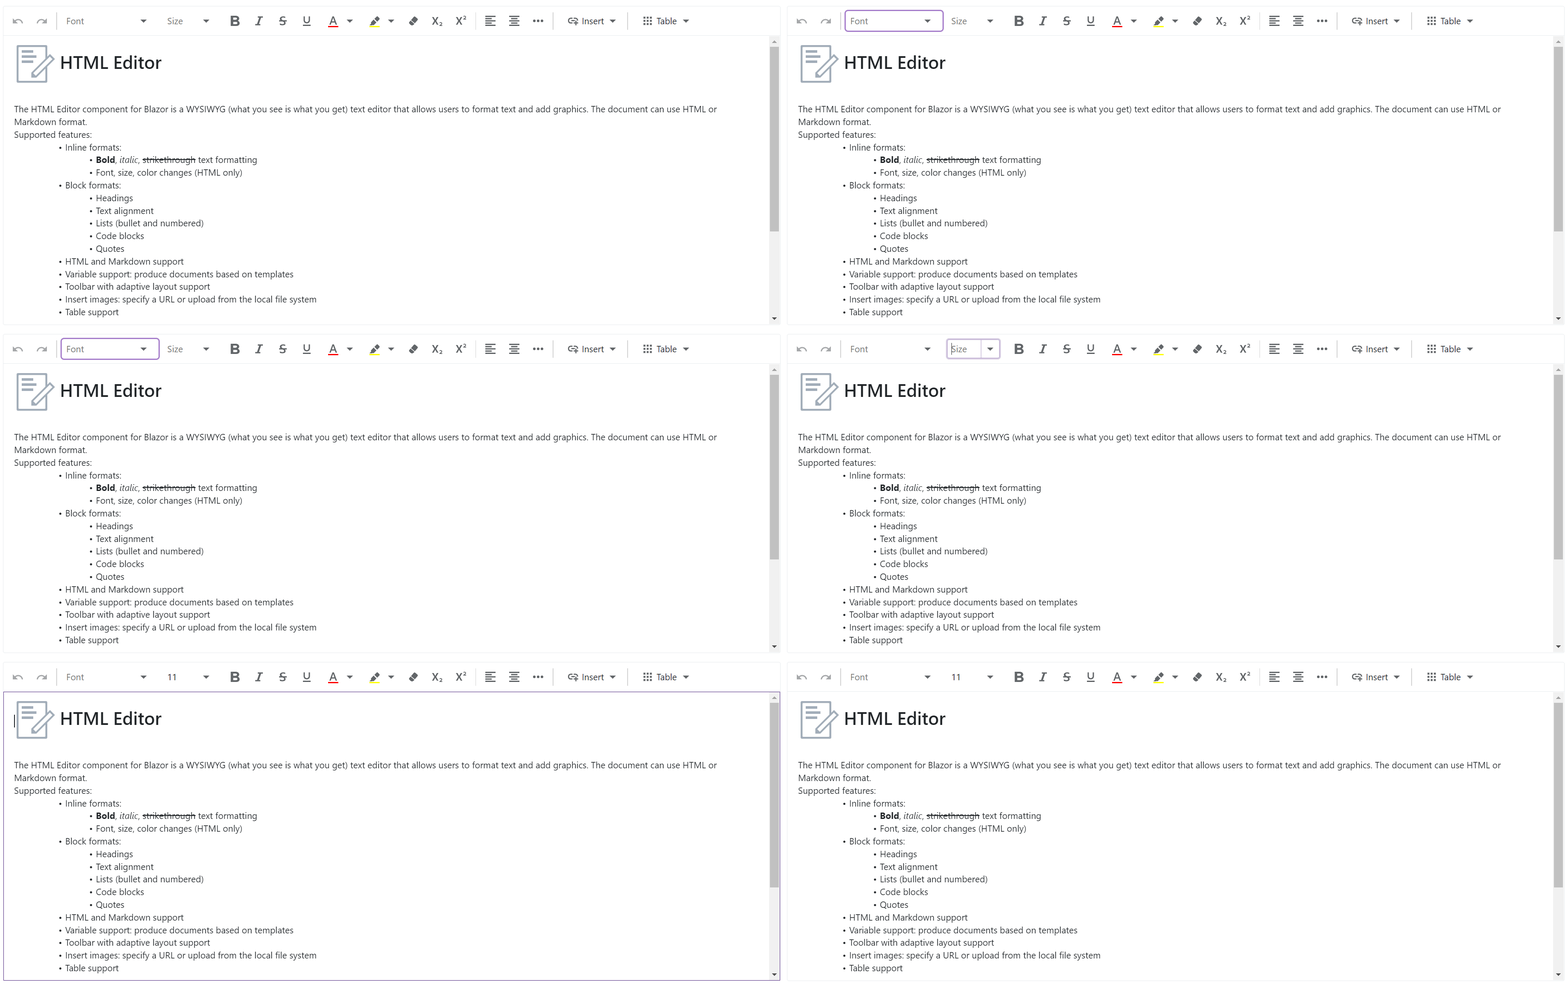
The DevExpress Blazor HTML Editor allows users to access every UI element and run all commands with a keyboard. Keyboard navigation is implemented on the client and server.
Note
Keyboard support allows users to interact with application content in cases they cannot use a mouse or they rely on assistive technologies (like screen readers or switch devices). Refer to the Accessibility help topic for information on other accessibility areas that we address.
Keyboard Shortcuts
The image below shows navigation areas available in the HTML Editor component:

Use the following shortcuts to navigate between these areas and elements within an area:
Shortcut Keys | Description |
|---|---|
Arrow keys | Move focus between elements within the toolbar. |
Tab | Moves focus to the next navigation area. |
Shift + Tab | Moves focus to the previous navigation area. |
You can use common shortcuts to work with document content. The built-in toolbar component includes its own navigation shortcuts.
Note
Keyboard support allows users to interact with application content in cases they cannot use a mouse or they rely on assistive technologies (like screen readers or switch devices). Refer to the Accessibility help topic for information on other accessibility areas that we address.
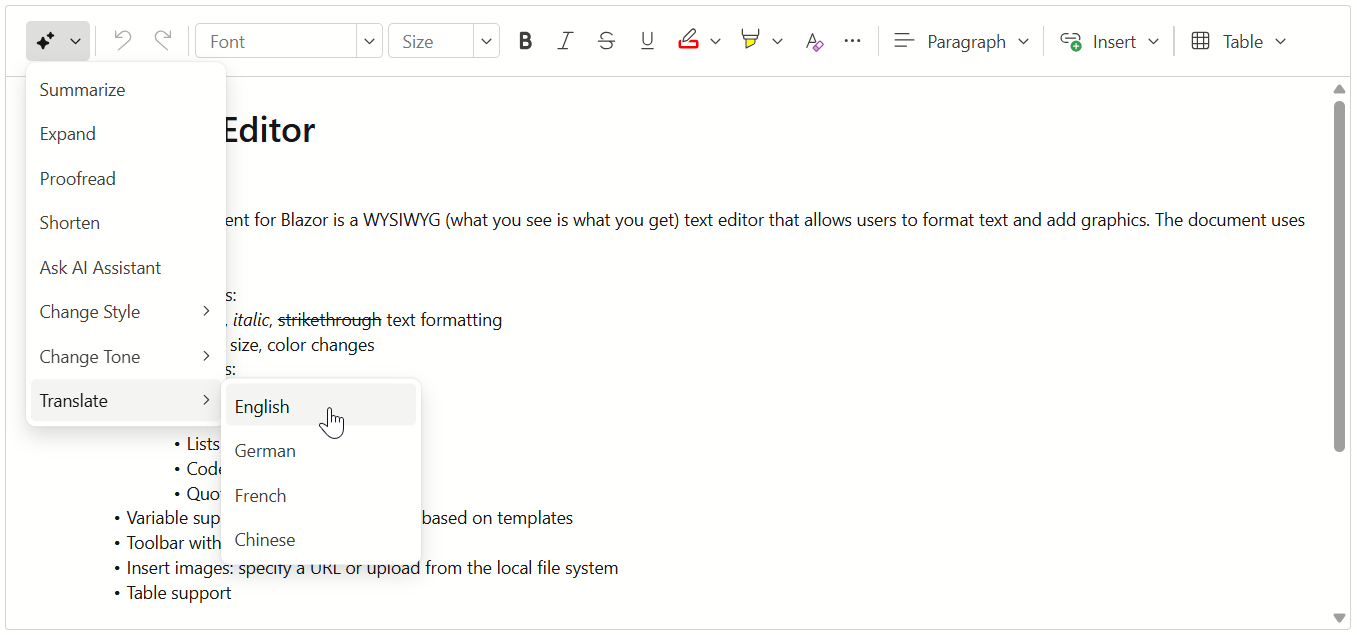
AI-powered Extension
DevExpress AI-powered extension for HTML Editor adds AI-related commands to the editor’s toolbar. The commands are designed to process text content.
Task-Based Examples
Incorporate Markdown Support
To enable Markdown support within the Blazor HTML Editor, manage HTML to Markdown and Markdown to HTML processes directly. This guidance includes general and specific conversion steps. You can use a converter of your choosing.
General Conversion Steps
- Create a separate JavaScript file.
Use the following interface to implement the converter:
interface Converter {
    toHtml(value: string): string;
    fromHtml(value: string): string;
}
Create a method to update the HTML editor with the new converter. There are instances when the DOM might not be fully rendered, so you may need to implement the MutationObserver interface to track the moment when the HTML Editor is rendered.
export function updateConverter() {
    const observer = new MutationObserver(() => {
        const container = document.querySelector(".dxbl-widget-container.dx-htmleditor");
        if (container) {
            observer.disconnect();
            const instance = container.dxInstance;
            instance.option('converter', converter);
        }
    });
    observer.observe(document.body, {childList: true, subtree: true});
}
Call your js method at the first render of the HTML Editor:
protected override async Task OnAfterRenderAsync(bool firstRender) {
    if (firstRender) {
      var module = await JSRuntime.InvokeAsync<IJSObjectReference>("import", "./js/file.js");
      await module.InvokeVoidAsync("updateConverter");
    }
}
Unified Converter
Import dependencies:
import {unified} from 'https://esm.sh/unified@11?bundle';
import remarkParse from 'https://esm.sh/remark-parse@11?bundle';
import remarkRehype from 'https://esm.sh/remark-rehype@11?bundle';
import rehypeStringify from 'https://esm.sh/rehype-stringify@10?bundle';
import rehypeParse from 'https://esm.sh/rehype-parse@9?bundle';
import rehypeRemark from 'https://esm.sh/rehype-remark@10?bundle';
import remarkStringify from 'https://esm.sh/remark-stringify@11?bundle';
Implement the converter:
const converter = {
    toHtml(value) {
        const result = unified()
            .use(remarkParse)
            .use(remarkRehype)
            .use(rehypeStringify)
            .processSync(value)
            .toString();
        return result;
    },

    fromHtml(value) {
        const result = unified()
            .use(rehypeParse)
            .use(rehypeRemark)
            .use(remarkStringify)
            .processSync(value)
            .toString();
        return result;
    }
};
Use the converter as described in the General Conversion Steps section of this guidance.
Showdown/Turndown Converter
Add dependencies to your project:
<script src="https://unpkg.com/turndown@7.1.2/dist/turndown.js"></script>
<script src="https://unpkg.com/showdown@2.1.0/dist/showdown.js"></script>
Implement the converter:
class Converter {
    constructor() {
        this.turndown = new TurndownService();
        this.turndown.addRule('emptyLine', {
            filter: (element) => element.nodeName.toLowerCase() === 'p' && element.innerHTML === '<br>',
            replacement() {
                return '<br>';
            },
        });
        this.turndown.keep(['table']);
        this.showdown = new showdown.Converter({
            simpleLineBreaks: true,
            strikethrough: true,
            tables: true,
        });
    }
    toHtml(value) {
        let markup = this.showdown.makeHtml(value);
        if (markup) {
            markup = markup.replace(new RegExp('\\r?\\n', 'g'), '');
        }
        return markup;
    }
    fromHtml(value) {
        const result = this.turndown.turndown(value || '');
        return result;
    }
}
const converter = new Converter();
Use the converter as described in the General Conversion Steps section of this guidance.
Security Considerations
When users insert an image into the HTML Editor From the Web dialog, treat the value as untrusted. Attackers may enter scriptable URLs (such as javascript: or data:) and/or targets that return HTML instead of an image.
To block stored or reflected XSS attack vectors:
- Validate each URL.
- Route image retrieval through a server-side proxy and check returned information.
- Clean document HTML during save operations.
- Render with a restrictive Content Security Policy (CSP).
Important
SVG format allows the use of scripts. Apply SVG-aware sanitization or rasterize images on the server before use.
Troubleshooting
If a Blazor application throws unexpected exceptions, refer to the following help topic: Troubleshooting.