DxFormLayout Class
A control container that allows you to create responsive data edit forms.
Namespace: DevExpress.Blazor
Assembly: DevExpress.Blazor.v26.1.dll
Declaration
public class DxFormLayout :
    DxComponentBase,
    IFormLayoutSmartPasteTarget,
    IFormLayout,
    IFormLayoutLevel
Remarks
The DevExpress Form Layout for Blazor (<DxFormLayout>) consists of data editors and allows you to create responsive edit forms that are automatically arranged.
Add a Form Layout to a Project
Follow the steps below to add the Form Layout component to an application:
- Create a Blazor Server or Blazor WebAssembly application.
- Add the
<DxFormLayout>…</DxFormLayout>markup to a.razorfile. - Add layout elements to the component’s markup.
- Bind the Form Layout component to data.
API Reference
Refer to the following list for the component API reference: DxFormLayout Members.
Static Render Mode Specifics
In static render mode, groups cannot be expanded or collapsed. Tabbed groups are not supported. If you need interactivity, enable interactive render mode. Refer to the following topic for more details: Enable Interactive Render Mode.
Layout Structure
The Form Layout component can contain items, groups, and tabs. You can place these layout elements between <DxFormLayout>...</DxFormLayout> tags or between <ChildContent>...</ChildContent> tags. If you add extensions to the Form Layout, you must define layout elemets betweeen <ChildContent>...</ChildContent> tags.
The component uses a responsive grid system based on the CSS flexible box layout to render items. Each layout item can occupy 1-12 columns. The following properties specify the item width for six different viewport sizes:
| Viewport Size | Extra Small | Small | Medium | Large | Extra Large | Extra Extra Large |
|---|---|---|---|---|---|---|
| Width in Pixels | Any | ≥576 | ≥768 | ≥992 | ≥1200 | ≥1400 |
| Property | ColSpanXs | ColSpanSm | ColSpanMd | ColSpanLg | ColSpanXl | ColSpanXxl |
<DxFormLayout>
    @* If the viewport width is less then 768px (medium), the item occupies 12 columns *@
    @* If the viewport width is from 768px (medium) to 1200px (extra large), the item occupies 6 columns *@
    @* If the viewport width exceeds 1200px (extra large), the item occupies 4 columns *@
    <DxFormLayoutItem Caption="Name" ColSpanXl="4" ColSpanMd="6">
        <DxTextBox />
    </DxFormLayoutItem>
</DxFormLayout>
An element moves to the next row if the current row does not have enough space to render it. Enable an element’s BeginRow property to always place the element in a new row.
<DxFormLayout>
    @* ... *@
    <DxFormLayoutItem Caption="Postal/ZIP Code" BeginRow="true" />
</DxFormLayout>
The common settings for all layout elements are listed below:
- BeginRow
- Specifies whether a Form Layout group, tab pages container, or item starts a new row.
- Caption
- Specifies a Form Layout group, tab, or item caption.
- CaptionPosition
- Specifies an item’s Caption position.
- Visible
- Specifies whether a Form Layout item, group, tab pages container, or tab is visible.
- CssClass
- Assigns a CSS class to the component.
- ReadOnly
- Specifies whether the Form Layout element (item, group, tab pages container, or tab) activates read-only mode for nested auto-generated editors.
- Enabled
- Specifies whether the auto-generated editors in the Form Layout are enabled.
Items
A layout item (DxFormLayoutItem) is a container that arranges nested Blazor components. An item can include a Caption displayed next to the corresponding component.
Note
Form Layout items should not contain layout hierarchy objects (groups, tabs, and other items).

<DxFormLayout>
    <DxFormLayoutItem Caption="Contact Name:">
        <DxTextBox @bind-Text="@Name" />
    </DxFormLayoutItem>
    <DxFormLayoutItem Caption="Birth Date:">
        <DxDateEdit @bind-Date="@BirthDate" />
    </DxFormLayoutItem>
    <DxFormLayoutItem Caption="E-mail:">
        <DxTextBox @bind-Text=@Email />
    </DxFormLayoutItem>
</DxFormLayout>

@code {
    string Name { get; set; } = "Nancy Davolio";
    DateTime BirthDate { get; set; } = DateTime.Now.AddYears(-20);
    string Email { get; set; } = "NancyDavolio@sample.com";
}
The item-related settings are listed below:
- DxFormLayoutItem.Field
- Specifies a data source field assigned to the current layout item.
- DxFormLayout.ItemCaptionAlignment
- Specifies how caption paddings are calculated in the Form Layout component.
- DxFormLayoutItem.CaptionCssClass
- Assigns a CSS class to the layout item’s caption.
Note that you can place all custom content between the <DxFormLayoutItem>...</DxFormLayoutItem> tags.
Groups
A layout group (DxFormLayoutGroup) is a built-in container that allows you to combine layout items, tabs, and other layout groups into panels.

<DxFormLayout>
    <DxFormLayoutGroup Caption="Personal Information" ColSpanMd="6">
        <DxFormLayoutItem Caption="First Name:" ColSpanMd="12">
            <DxTextBox @bind-Text="@FirstName" />
        </DxFormLayoutItem>
        <DxFormLayoutItem Caption="Last Name:" ColSpanMd="12">
            <DxTextBox @bind-Text="@LastName" />
        </DxFormLayoutItem>
        <DxFormLayoutItem Caption="Birth Date:" ColSpanMd="12">
            <DxDateEdit @bind-Date="@BirthDate" />
        </DxFormLayoutItem>
    </DxFormLayoutGroup>
    @* ... *@
</DxFormLayout>
Tabs
All tabs of the Form Layout are stored in the DxFormLayoutTabPages component. The DxFormLayoutTabPage component implements a single layout tab that serves as a container for layout items and groups. You can customize individual tabs. Refer to the following class description for additional information: DxFormLayoutTabPage.

To specify the active tab, use the ActiveTabIndex property:
<DxFormLayout>
    <DxFormLayoutTabPages @bind-ActiveTabIndex="@Index">
        @* ... *@
        <DxFormLayoutTabPage Caption="Work Information">
            <DxFormLayoutItem Caption="Position:">
                <DxTextBox @bind-Text="@Position" />
            </DxFormLayoutItem>
            <DxFormLayoutItem Caption="Hire Date:">
                <DxDateEdit @bind-Date="@HireDate" />
            </DxFormLayoutItem>
            <DxFormLayoutItem Caption="Notes:">
                <DxTextBox @bind-Text="@Notes" />
            </DxFormLayoutItem>
        </DxFormLayoutTabPage>
    </DxFormLayoutTabPages>
</DxFormLayout>

@code {
    int Index { get; set; } = 1;
}
Render Mode
Use the RenderMode property to specify how the DxFormLayoutTabPages component loads tab content. The following options are available:
- Default
- The component initially loads only content of an active tab. When a user selects another tab, its content replaces the content of the previously active tab in the DOM. Note the component does not keep the tab’s state.
- AllTabs
- The component renders the content of all tabs in the DOM and maintains the tab’s state. This mode speeds up navigation between tabs, but can increase memory consumption.
- OnDemand
- The component initially loads content of an active tab, then loads the content of other tabs when a user selects them. In this case, the component maintains the tab’s state. Use this mode to improve performance of your application.
The following code snippet demonstrates the OnDemand mode implementation:
<DxFormLayout CssClass="form-layout">
    <DxFormLayoutTabPages @bind-ActiveTabIndex="@ActiveTabIndex"
                          RenderMode="TabsRenderMode.OnDemand">
        <DxFormLayoutTabPage Caption="Personal Information">
            <DxFormLayoutItem Caption="First Name:">
                <DxTextBox @bind-Text="@FirstName" />
            </DxFormLayoutItem>
            <DxFormLayoutItem Caption="Last Name:">
                <DxTextBox @bind-Text="@LastName" />
            </DxFormLayoutItem>
        </DxFormLayoutTabPage>
         <DxFormLayoutTabPage Caption="Work Information">
            <DxFormLayoutItem Caption="Position:">
                <DxTextBox @bind-Text="@Position" />
            </DxFormLayoutItem>
            <DxFormLayoutItem Caption="Hire Date:">
                <DxDateEdit @bind-Date="@HireDate" />
            </DxFormLayoutItem>
        </DxFormLayoutTabPage>
        <DxFormLayoutTabPage Caption="Additional information">
            <DxFormLayoutItem Caption="Birth Date:">
                <DxDateEdit @bind-Date="@BirthDate" />
            </DxFormLayoutItem>
            <DxFormLayoutItem Caption="Notes:">
                <DxTextBox @bind-Text="@Notes" />
            </DxFormLayoutItem>
        </DxFormLayoutTabPage>
    </DxFormLayoutTabPages>
</DxFormLayout>

@code {
    int ActiveTabIndex { get; set; } = 1;
    string FirstName { get; set; } = "Nancy";
    string LastName { get; set; } = "Davolio";
    DateTime BirthDate { get; set; } = DateTime.Now.AddYears(-20);
    string Position { get; set; } = "Sales Representative";
    DateTime HireDate { get; set; } = DateTime.Now.AddYears(-20);
    string Notes { get; set; } = "Education includes a BA in psychology.";
}
Scroll Mode
Specify the ScrollMode property to define how users navigate between tabs when they do not fit into the container by width.
The following code snippet switches tabs to Swipe navigation mode:
<DxFormLayout>
    <DxFormLayoutTabPages ScrollMode="TabsScrollMode.Swipe">
        <DxFormLayoutTabPage Caption="Personal Information">
            <DxFormLayoutItem Caption="Contact Name:">
                <DxTextBox Text="Name" />
            </DxFormLayoutItem>
            @* ... *@
        </DxFormLayoutTabPage>
        @* ... *@
    </DxFormLayoutTabPages>
</DxFormLayout>
Bind to Data
<DxFormLayout> allows you to display and edit data from data source fields. Use the Data property to bind the control to a data source and specify target fields. To map a data source field to a layout item, use the item’s Field property.
Once a layout item is bound to a data source field, <DxFormLayout> tries to determine the corresponding data field type. If the component can determine the type, the corresponding editor appears in the layout item.
Field Data Type | Editor |
|---|---|
Boolean | |
Date | |
Numeric | |
String | |
Other |
When a user changes a layout item value, handle the ItemUpdating event to post all changes to the data source. When you use a custom editor in the Form Layout item, the component is not notified when a user changes data within an item’s custom editor. To inform the Form Layout about the change, call the OnChanged(Object) method when an editor value changes. To access a new editor value, use the Value property.
Note
When controls inside a DxFormLayoutItem use @bind-* syntax (@bind-Value, @bind-Text, and similar), Blazor assigns ValueChanged/TextChanged event handlers automatically. Because these handlers are already assigned, DxFormLayout does not attach its own OnChanged handler, so the ItemUpdating event is not raised.
To handle this scenario, process the control change event manually. Read the following help topic for details: DxFormLayout.ItemUpdating.
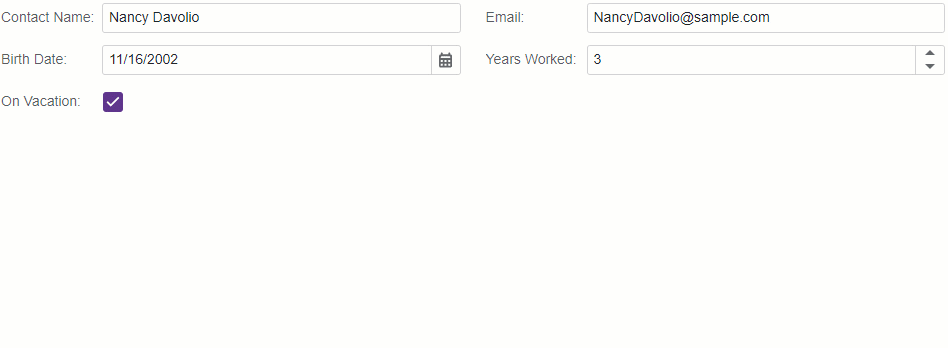
<DxFormLayout Data="@editFormData"
@* ... *@
              ItemUpdating="@((pair) => OnItemUpdating(pair.Key, pair.Value))"
              CssClass="w-100 demo-form-layout">
    <DxFormLayoutItem Field="@nameof(FormDataItem.Name)"
                      Caption="Contact Name:" />
    <DxFormLayoutItem Field="@nameof(FormDataItem.BirthDate)"
                      Caption="Birth Date:" />
    <DxFormLayoutItem Field="@nameof(FormDataItem.YearsWorked)"
                      Caption="Years Worked:" />
    <DxFormLayoutItem Field="@nameof(FormDataItem.Position)"
                      Caption="Position:">
        <DxComboBox Data="@(new List<string>() {
                                    "Sales Representative",
                                    "Designer" })"
                    Value="@(((string)((ValueEditContext)context).Value))"
                    ValueChanged="@((string value) =>
                            ((ValueEditContext)context).OnChanged(value))" />
    </DxFormLayoutItem>
    <DxFormLayoutItem Field="@nameof(FormDataItem.OnVacation)"
                      Caption="On Vacation:" />
</DxFormLayout>
Input Validation
You can add the Form Layout component to Blazor’s standard EditForm. This form validates user input based on data annotation attributes defined in a model and indicates errors.
For additional information, refer to the following help topic: Validate Input.

<EditForm Model="@starship" Context="EditFormContext">
    <DataAnnotationsValidator />
    <DxFormLayout>
        <DxFormLayoutItem Caption="Identifier:" >
            <DxTextBox @bind-Text="@starship.Identifier" />
        </DxFormLayoutItem >
        @*...*@
    </DxFormLayout>
</EditForm>

@code {
    private Starship starship=new Starship();
}
AI-powered Smart Paste
The DevExpress Blazor Form Layout component includes an AI-powered Smart Paste extension that simplifies data entry when information is copied from external sources. The extension parses unstructured text (such as email content or free-form notes) and automatically populates matching form fields with extracted values.

Troubleshooting
If a Blazor application throws unexpected exceptions, refer to the following help topic: Troubleshooting.