DxCheckBox<T> Class
A check box control that allows users to toggle between two or three states.
Namespace: DevExpress.Blazor
Assembly: DevExpress.Blazor.v26.1.dll
Declaration
public class DxCheckBox<T> :
    DxDataEditor<T>,
    IFocusableEditor,
    ICheckBoxInternalOwner,
    IRequireSelfCascading
Type Parameters
| Name | Description |
|---|---|
| T | The data type. |
Remarks
DevExpress CheckBox for Blazor (DxCheckBox) supports the checked, unchecked, and indeterminate (optional) states.
To switch the state, users can click the checkbox or press Space when the checkbox is focused.

Add a CheckBox to a Project
Follow the steps below to add the CheckBox component to an application:
- Create a Blazor Server or Blazor WebAssembly application.
- Add the
<DxCheckBox>…</DxCheckBox>markup to a.razorfile. - Configure the component: specify the checkbox’s state, handle state changes, customize appearance, and so on (see the sections below).
API Reference
Refer to the following list for the component API reference: DxCheckBox Members.
Static Render Mode Specifics
Blazor CheckBox does not support static render mode. Enable interactivity to use the component in your application. Refer to the following topic for more details: Enable Interactive Render Mode.
Checkbox States
The Checked property specifies a checkbox’s state. The Checked property’s type defines whether the checkbox supports the indeterminate state.
Data Type | Checked State | Unchecked State | Indeterminate State |
|---|---|---|---|
|
| (not supported) | |
|
|
| |
“true” | “false” |
| |
|
|
| |
|
|
| |
|
|
| |
Other Data Types | See Bind to Custom Data Types for additional information. | ||
Checked/Unchecked States
The following sample creates a checkbox with the checked and unchecked states. The Checked property is bound to a Boolean object. The default checkbox state is unchecked.
<DxCheckBox @bind-Checked="@Value">@GetText()</DxCheckBox>

@code{
    bool Value { get; set; }

    string GetText() {
        if (Value) return "Checked";
        else return "Unchecked";
    }
}

Indeterminate State
The following sample creates a checkbox with the indeterminate state. The Checked property is bound to a Nullable Boolean object.
Set the AllowIndeterminateStateByClick property to true to allow users to set the indeterminate state.
<DxCheckBox @bind-Checked="@Value" AllowIndeterminateStateByClick="true">@GetText()</DxCheckBox>

@code{
    bool? Value { get; set; }

    string GetText() {
        if (Value == true) return "Checked";
        if (Value == false) return "Unchecked";
        return "Indeterminate";
    }
}
The default checkbox state is indeterminate. Users can change the state in the following order: Indeterminate → Checked → Unchecked → Indeterminate, and so on.

If the AllowIndeterminateStateByClick is set to false, users can switch states in the following order: Indeterminate (default) → Checked → Unchecked → Checked → Unchecked, and so on.
Respond to State Changes
The CheckedChanged event occurs each time the Checked property value changes. The following example handles this event and use the current checkbox state to enable/disable other checkboxes (change the Enabled property value):
<DxCheckBox Checked="@Checked" CheckedChanged="@((bool value) => OnCheckedChanged(value))">Silent Mode</DxCheckBox>
<DxCheckBox @bind-Checked="@SubChecked1" Enabled="@Enabled">Enable sound</DxCheckBox>
<DxCheckBox @bind-Checked="@SubChecked2" Enabled="@Enabled">Enable vibration</DxCheckBox>

@code{
    bool Enabled { get; set; } = false;

    bool Checked { get; set; } = true;
    bool SubChecked1 { get; set; } = true;
    bool SubChecked2 { get; set; } = false;

    void OnCheckedChanged(bool value) {
        Checked = value;
        Enabled = !value;
    }
}

Bind to Custom Data Types
You can also bind <DxCheckBox>‘s state to a custom data type (Enum, Object, etc.) Use the following properties to explicitly specify how to consider type values:
- ValueChecked - Specifies a value that corresponds to the checked state.
- ValueUnchecked - Specifies a value that corresponds to the unchecked state.
- ValueIndeterminate - Specifies a value that corresponds to the indeterminate state.
If a value is not equal to the specified properties, it is considered as indeterminate.
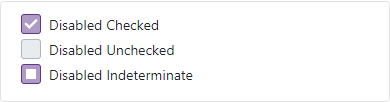
The following example binds the <DxCheckBox> to an Enum object:
<DxCheckBox Checked="Opinion.Yes" Enabled="false" ValueChecked="@Opinion.Yes"
            ValueUnchecked="@Opinion.No" ValueIndeterminate="@Opinion.Abstain">Disabled Checked</DxCheckBox>
<DxCheckBox Checked="Opinion.No" Enabled="false" ValueChecked="@Opinion.Yes"
            ValueUnchecked="@Opinion.No" ValueIndeterminate="@Opinion.Abstain">Disabled Unchecked</DxCheckBox>
<DxCheckBox Checked="Opinion.Abstain" Enabled="false" ValueChecked="@Opinion.Yes"
            ValueUnchecked="@Opinion.No" ValueIndeterminate="@Opinion.Abstain">Disabled Indeterminate</DxCheckBox>


@code{
    enum Opinion { Yes, No, Abstain }
}
Switch Mode
Set the CheckType property to Switch to display the <DxCheckBox> as a toggle switch.
<DxCheckBox CheckType="CheckType.Switch" Checked="@Checked"
            CheckedChanged="@((bool value) => CheckedChanged(value))">Silent Mode</DxCheckBox>
<DxCheckBox CheckType="CheckType.Switch" @bind-Checked="@SubChecked1" Enabled="@Enabled">Enable sound</DxCheckBox>
<DxCheckBox CheckType="CheckType.Switch" @bind-Checked="@SubChecked2" Enabled="@Enabled">Enable vibration</DxCheckBox>

@code{
    bool Enabled { get; set; } = false;

    bool Checked { get; set; } = true;
    bool SubChecked1 { get; set; } = true;
    bool SubChecked2 { get; set; } = false;

    void CheckedChanged(bool value) {
        Checked = value;
        Enabled = !value;
    }
}

Users can choose between the checked and unchecked states. The indeterminate state is not supported in this mode and is considered as unchecked.
Content Position
Use the Alignment and LabelPosition properties to align the checkbox’s child content (text label) and check mark relative to each other.
<div>
    <div>
        <DxCheckBox Checked="true"
                    LabelPosition="LabelPosition.Left"
                    Alignment="CheckBoxContentAlignment.Center">Multimedia</DxCheckBox>
    </div>
    <div>
        <DxCheckBox Checked="false"
                    LabelPosition="LabelPosition.Left"
                    Alignment="CheckBoxContentAlignment.Center">Air Conditioning</DxCheckBox>
    </div>
    @* ... *@
</div>

If the label is too long to fit the parent component’s width, you can use the LabelWrapMode property to specify how to treat the remaining part of the label.
<div class="my-container">
    <DxCheckBox @bind-Checked="@Value" LabelWrapMode="LabelWrapMode.NoWrap">Parking camera</DxCheckBox>
    <DxCheckBox @bind-Checked="@Value" LabelWrapMode="LabelWrapMode.WordWrap">Heated seats</DxCheckBox>
    <DxCheckBox @bind-Checked="@Value" LabelWrapMode="LabelWrapMode.Ellipsis">Air conditioning</DxCheckBox>
</div>

@code {
    bool Value { get; set; }
}

Custom Appearance
You can customize the appearance of the checkbox (or toggle switch). To do this, define the appearance between the <DxCheckBox> and </DxCheckBox> tags and set the DisableDefaultRender property to true to hide the check mark (toggle switch).
<DxCheckBox @bind-Checked="@Value" DisableDefaultRender="true">
   // Add child content here...
</DxCheckBox>

@code{
    bool? Value { get; set; } = true;
    // ...
}

Input Validation
You can add a standalone checkbox or the Form Layout component to Blazor’s standard EditForm. This form validates user input based on data annotation attributes defined in a model and indicates errors.
<EditForm Model="@model" Context="EditFormContext">
    <DataAnnotationsValidator />
    <DxFormLayout >
        <DxFormLayoutItem Caption="Checked:" ColSpanMd="6" >
            <Template >
                <DxCheckBox @bind-Checked="@model.Checked" />
            </Template>
        </DxFormLayoutItem>
        @*...*@
    </DxFormLayout>
</EditForm>

@code {
    private Model model = new Model();
}
For additional information, refer to the following help topic: Validate Input.
Troubleshooting
If a Blazor application throws unexpected exceptions, refer to the following help topic: Troubleshooting.