DxLayoutBreakpoint Class
A component that allows you to adapt page layout to different window sizes.
Namespace: DevExpress.Blazor
Assembly: DevExpress.Blazor.v25.2.dll
NuGet Package: DevExpress.Blazor
Declaration
public class DxLayoutBreakpoint :
    DxComponent,
    IModelWrapper<ILayoutBreakpointModel>
Remarks
<DxLayoutBreakpoint> allows you to adapt a page layout to different window sizes. For example, you can use breakpoints to create responsive DxGridLayout, DxStackLayout, or any other components.
Add a Layout Breakpoint to a Project
Follow the steps below to add the Layout Breakpoint component to an application:
- Create a Blazor Server or Blazor WebAssembly application.
- Add the
<DxLayoutBreakpoint />markup to a page. - Use the DeviceSize or MinWidth/MaxWidth property to specify the screen size when the breakpoint should be activated.
- Use the @bind attribute to bind the breakpoint’s IsActive property to a data field.
- Use this data field in components that should be adapted.
API Reference
Refer to the following list for the component API reference: DxLayoutBreakpoint Members.
Static Render Mode Specifics
Blazor Layout Breakpoint does not support static render mode. Enable interactivity to use the component in your application. Refer to the following topic for more details: Enable Interactive Render Mode.
Examples
Refer to the sections below for examples on how to use the Layout Breakpoint component in different scenarios.
Responsive Drawer
The following code snippet changes the Drawer‘s Mode based on the screen size:
<DxLayoutBreakpoint DeviceSize="DeviceSize.XSmall" IsActive="isXSmallScreen" IsActiveChanged="IsActiveChanged" />
<DxButton Click="OnClick" IconCssClass="tb-icon icon-hamburger" />

<DxDrawer IsOpen="IsOpen" PanelWidth="180px">
    ...
</DxDrawer>
@code {
    bool isXSmallScreen;
    bool? isOpen;
    bool IsOpen {
        // Hide the Drawer on small screens initially and display it on large screens
        get => isOpen ?? !isXSmallScreen;
        set => isOpen = value;
    }
    // Apply Overlap and Shrink modes on small and large screens, respectively
    DrawerMode Mode => isXSmallScreen ? DrawerMode.Overlap : DrawerMode.Shrink;

    void IsActiveChanged(bool isActive) {
        isXSmallScreen = isActive;
        isOpen = null;
    }
    void OnClick() {
        IsOpen = !IsOpen;
    }
}
Responsive Grid
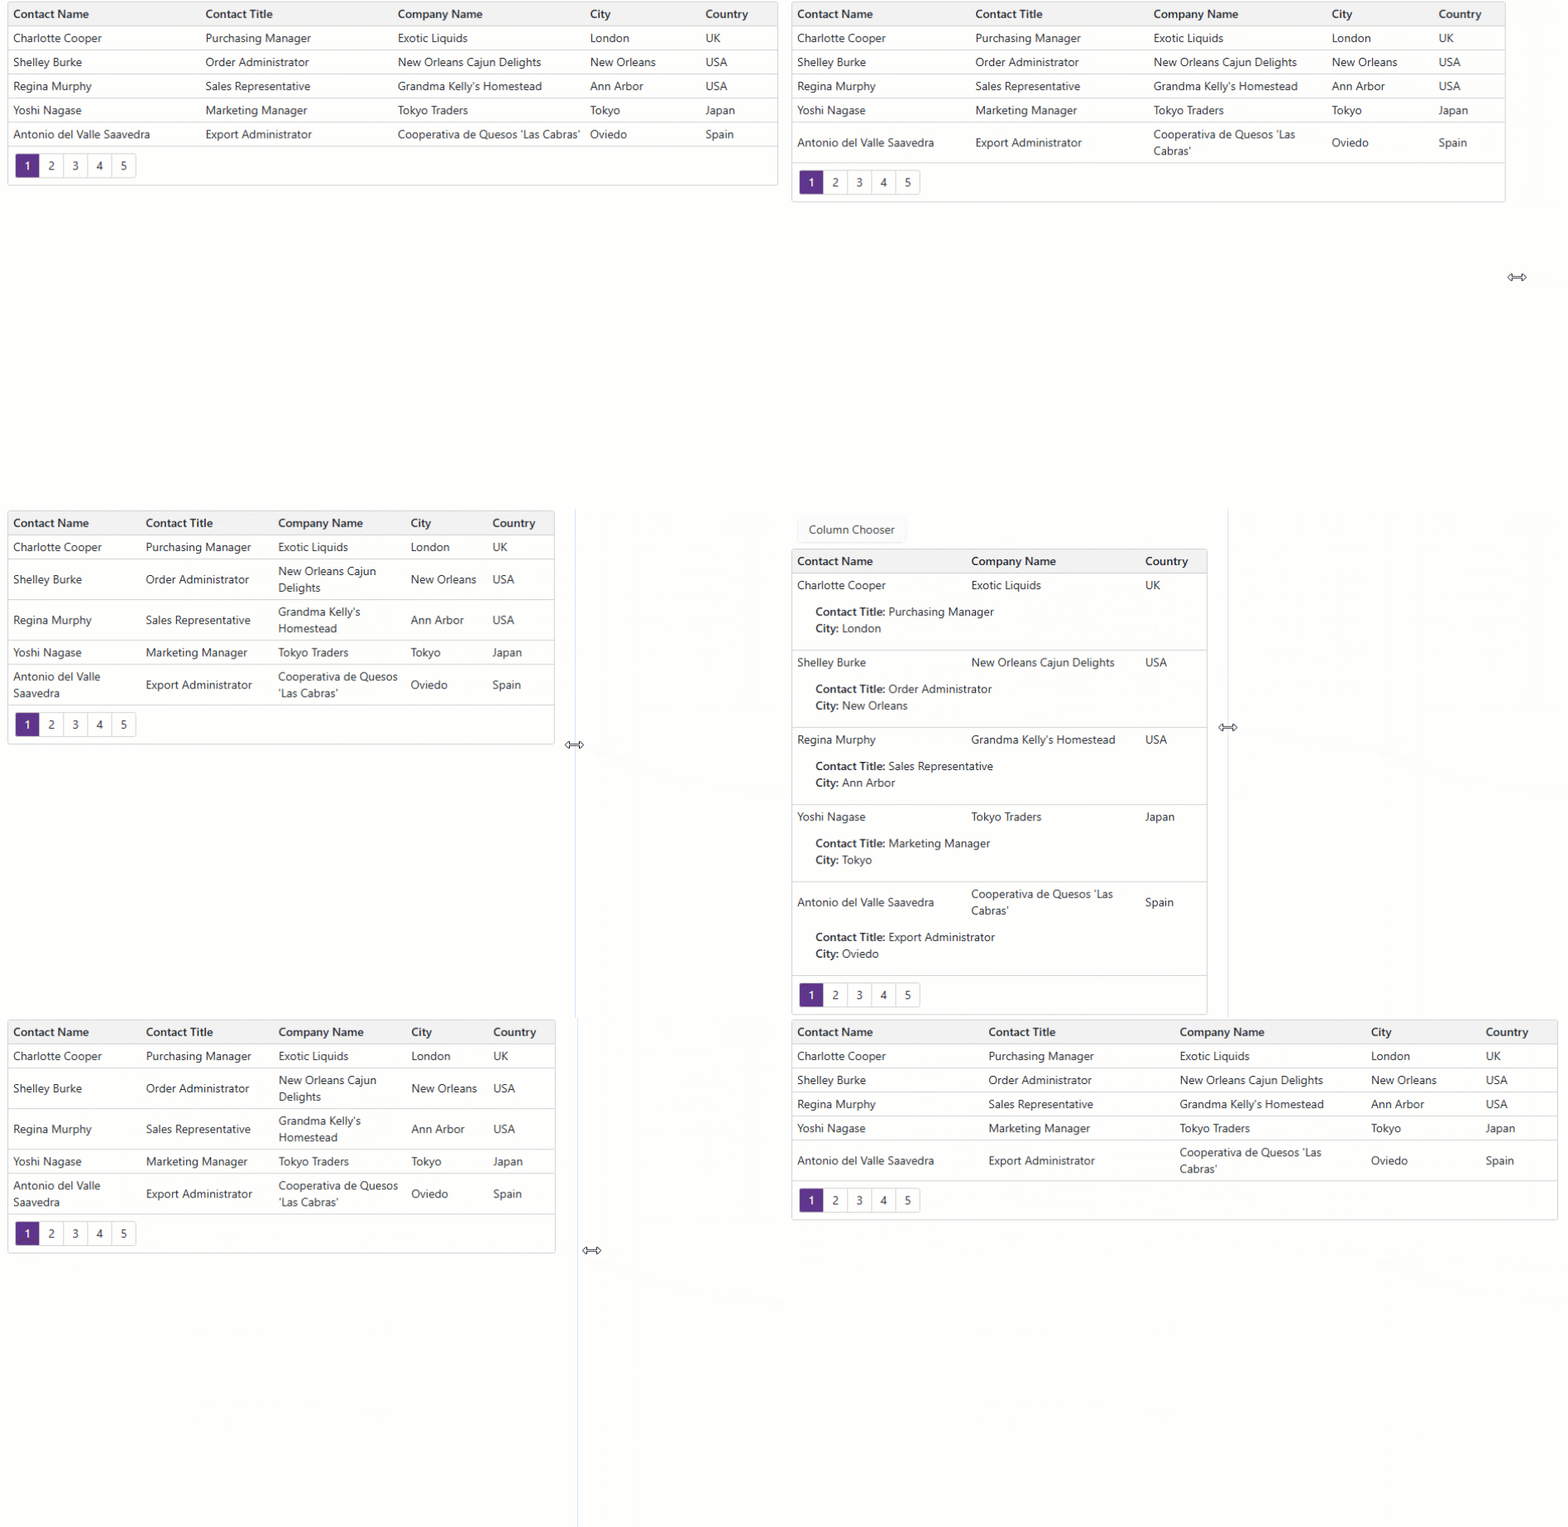
The following code snippet activates the breakpoint when the screen is extra small. The Grid component hides its Contact Title and City columns and displays their information in the detail row. All columns are available in the column chooser. You can use the same approach to manage TreeList columns with the Layout Breakpoint component.
<DxLayoutBreakpoint DeviceSize="DeviceSize.XSmall" @bind-IsActive="@isXSmallScreen" />

@if (isXSmallScreen) {
    <div class="align-self-start p-2">
        <DxButton Text="Column Chooser"
                  RenderStyle="ButtonRenderStyle.Secondary"
                  Click="ShowColumnChooser" />
    </div>
}

<DxGrid @ref="@Grid"
        Data="@Data"
        DetailRowDisplayMode="@GetGridDetailRowDisplayMode()"
        PageSize="5">
    <Columns>
        <DxGridDataColumn FieldName="ContactName" MinWidth="80" />
        <DxGridDataColumn FieldName="ContactTitle" MinWidth="100" Visible="@GetExtraColumnsVisible()" />
        <DxGridDataColumn FieldName="CompanyName" MinWidth="100" />
        <DxGridDataColumn FieldName="City" Width="15%" MinWidth="80" Visible="@GetExtraColumnsVisible()" />
        <DxGridDataColumn FieldName="Country" Width="10%" MinWidth="80" />
    </Columns>
    <DetailRowTemplate>
        @{
            var supplier = (Supplier)context.DataItem;
        }
        <b>Contact Title:</b> @supplier.ContactTitle <br />
        <b>City:</b> @supplier.City
    </DetailRowTemplate>
</DxGrid>

@code {
    bool isXSmallScreen;
    IGrid Grid { get; set; }
    IEnumerable<Supplier> Data { get; set; }
    bool GetExtraColumnsVisible() { return !isXSmallScreen; }
    GridDetailRowDisplayMode GetGridDetailRowDisplayMode() { return isXSmallScreen ? GridDetailRowDisplayMode.Always : GridDetailRowDisplayMode.Never; }

    void ShowColumnChooser() {
        Grid.ShowColumnChooser(new DialogDisplayOptions($".myGrid", HorizontalAlignment.Center, VerticalAlignment.Center));
    }
}

Adaptive Grid Layout
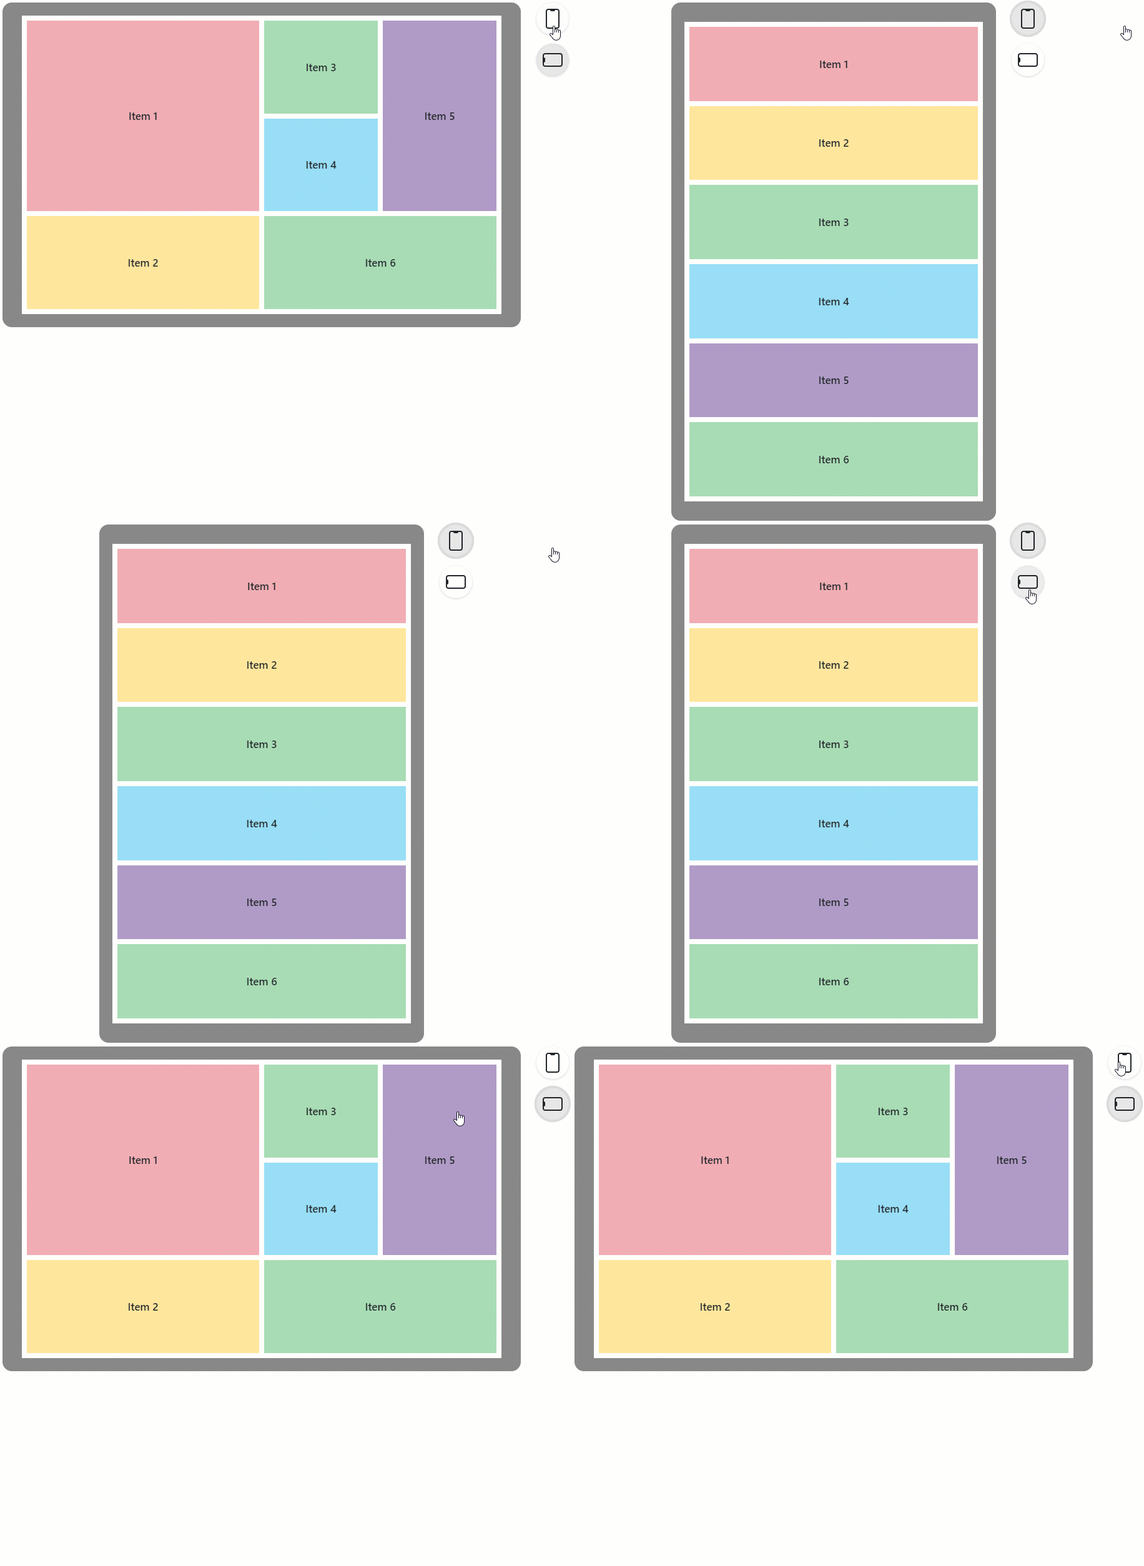
The following example uses a layout breakpoint to create an adaptive DxGridLayout:
<DxLayoutBreakpoint DeviceSize="DeviceSize.XSmall" @bind-IsActive="@isXSmallScreen" />

<DxGridLayout CssClass="h-100" ColumnSpacing="8px" RowSpacing="8px">
    <Rows>
        @if(isXSmallScreen) {
            <DxGridLayoutRow Areas="item1" />
            <DxGridLayoutRow Areas="item2" />
            <DxGridLayoutRow Areas="item3" />
            <DxGridLayoutRow Areas="item4" />
            <DxGridLayoutRow Areas="item5" />
            <DxGridLayoutRow Areas="item6" />
        } else {
            <DxGridLayoutRow Areas="item1 item3 item5" />
            <DxGridLayoutRow Areas="item1 item4 item5"/>
            <DxGridLayoutRow Areas="item2 item6 item6"/>
        }
    </Rows>
    <Columns>
        <DxGridLayoutColumn Width="2fr" />
        @if(!isXSmallScreen) {
            <DxGridLayoutColumn />
            <DxGridLayoutColumn />
        }
    </Columns>
    <Items>
        <DxGridLayoutItem Area="item1">
            <Template>
                <div class="gridlayout-header gridlayout-item">
                    Item 1
                </div>
            </Template>
        </DxGridLayoutItem>
        <DxGridLayoutItem Area="item2">
            <Template>
                <div class="gridlayout-content gridlayout-item">
                    Item 2
                </div>
            </Template>
        </DxGridLayoutItem>
        <DxGridLayoutItem Area="item3">
            <Template>
                <div class="gridlayout-left-side-bar gridlayout-item">
                    Item 3
                </div>
            </Template>
        </DxGridLayoutItem>
        <DxGridLayoutItem Area="item4">
            <Template>
                <div class="gridlayout-right-side-bar gridlayout-item">
                    Item 4
                </div>
            </Template>
        </DxGridLayoutItem>
        <DxGridLayoutItem Area="item5">
            <Template>
                <div class="gridlayout-footer gridlayout-item">
                    Item 5
                </div>
            </Template>
        </DxGridLayoutItem>
        <DxGridLayoutItem Area="item6">
            <Template>
                <div class="gridlayout-left-side-bar gridlayout-item">
                    Item 6
                </div>
            </Template>
        </DxGridLayoutItem>
    </Items>
</DxGridLayout>

@code {
    bool isXSmallScreen;
}
