DxRadioGroup<TData, TValue> Class
A component that generates a radio button group based on a bound collection.
Namespace: DevExpress.Blazor
Assembly: DevExpress.Blazor.v26.1.dll
NuGet Package: DevExpress.Blazor
Declaration
public class DxRadioGroup<TData, TValue> :
    DxDataEditor<TValue>
Type Parameters
| Name | Description |
|---|---|
| TData | The data item type. |
| TValue | The value type. |
Remarks
The DevExpress Radio Group for Blazor (<DxRadioGroup>) allows you to create a group of radio buttons. A user can select only one button in the group at a time.
Note
As an alternative, you can use the DevExpress Radio Button component (<DxRadio>). The Radio Button component allows you to create and customize radio buttons individually, while the Radio Group component allows you to generate a set of radio buttons based on a collection.
Add a Radio Group to a Project
Follow the steps below to add the Radio Group component to an application:
- Create a Blazor Server or Blazor WebAssembly application.
- Add the
<DxRadioRadio>…</DxRadioGroup>markup to a.razorfile. - Configure the component: bind it to a data collection and customize layout and appearance options as described below.
API Reference
Refer to the following list for the component API reference: DxRadioGroup Members.
Static/Interactive Render Modes
Blazor Radio Group does not support static render mode. Enable interactivity to use the component in your application. Refer to the following topic for more details: Enable Interactive Render Mode.
Bind to Data
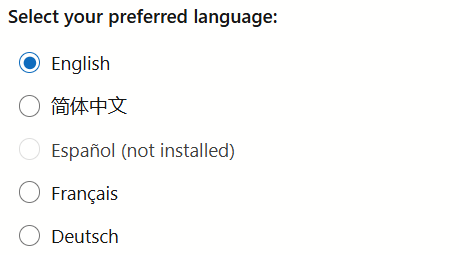
The Radio Group component generates and arranges radio items based on a collection (the Items property).
<DxRadioGroup Items="@Languages"
              @bind-Value="@PreferredLanguage"/>
<p>Preferred language:
    <strong>@PreferredLanguage</strong>
</p>


@code {
    string PreferredLanguage { get; set; } = "English";
    IEnumerable<string> Languages = new[] { "English", "简体中文", "Español", "Français", "Deutsch" };
}
Layout
Use the Layout property to specify whether the Radio Group component arranges items vertically or horizontally.
<DxRadioGroup Items="@Languages"
              @bind-Value="@PreferredLanguage"
              Layout="@RadioGroupLayout.Horizontal">
</DxRadioGroup>

@code {
    string PreferredLanguage { get; set; } = "English";
    IEnumerable<string> Languages = new[] { "English", "简体中文", "Español", "Français", "Deutsch" };
}

Content Position
Use the following properties to change content position:
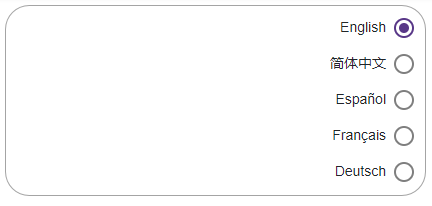
- ItemAlignment - Specifies the position of item labels relative to the container boundaries.
- ItemLabelPosition - Specifies the position of item labels relative to clickable circles.
<div class="w-400">
    <DxRadioGroup Items="@Languages"
                  @bind-Value="@PreferredLanguage"
                  ItemLabelPosition="LabelPosition.Left"
                  ItemAlignment="CheckBoxContentAlignment.Right">
    </DxRadioGroup>
</div>

@code {
    string PreferredLanguage { get; set; } = "English";
    IEnumerable<string> Languages = new[] { "English", "简体中文", "Español", "Français", "Deutsch" };
}
Item Template
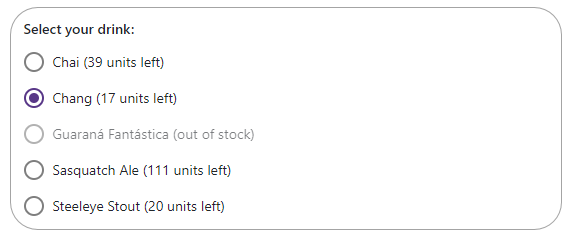
The Radio Group component contains the ItemTemplate property that allows you to customize item labels.
<label id="group-label">Select your drink:</label>
<DxRadioGroup Items="@Drinks"
              @bind-Value="@SelectedDrinkId"
              ValueFieldName="@nameof(Product.ProductId)"
              EnabledFieldName="@nameof(Product.InStock)"
              aria-labelledby="group-label">
    <ItemTemplate>@context.ProductName @GetDrinkState(context)</ItemTemplate>
</DxRadioGroup>
<p>
    You have selected:
    <strong>@GetDrinkName()</strong>
</p>

@code {
    int SelectedDrinkId { get; set; } = 2;
    IEnumerable<Product> Products { get; set; }
    IEnumerable<Product> drinks;

    IEnumerable<Product> Drinks {
        get => drinks;
        set {
            drinks = value;
            InvokeAsync(StateHasChanged);
        }
    }

    protected override async Task OnInitializedAsync() {
        Products = await NwindDataService.GetProductsAsync();
        Drinks = Products.Where(p => p.CategoryId == 1).Take(5).AsEnumerable();
    }

    string GetDrinkState(Product product) => product.InStock ? $"({product.UnitsInStock} units left)" : "(out of stock)";

    string GetDrinkName() => Drinks.First(p => p.ProductId == SelectedDrinkId).ProductName;
}
Disable Radio Buttons
The Radio Group component supports disabled mode. The EnabledFieldName property specifies the data source field that contains an enabled flag for component items. A user cannot focus or select disabled items.
Input Validation
You can add a standalone Radio Group component or Form Layout component to Blazor’s standard EditForm. This form validates user input based on data annotation attributes defined in a model and indicates errors.
<EditForm Model="@starship"
          OnValidSubmit="@HandleValidSubmit"
          OnInvalidSubmit="@HandleInvalidSubmit">
    <DataAnnotationsValidator />
    <label id="group-label">Engine Type:</label>
    <DxRadioGroup @bind-Value="@starship.Engine"
                  Items="@(Enum.GetValues(typeof(Engine)).Cast<Engine>())"
                  Layout="@RadioGroupLayout.Horizontal"
                  aria-labelledby="group-label"/>
    <ValidationMessage For="@(() => starship.Engine)" />
</EditForm>

@code {
    // ...
    Starship starship = new() {
        ProductionDate = DateTime.Now + TimeSpan.FromDays(1),
        Description = "Default description"
    };
}
For additional information, refer to the following help topic: Validate Input.