CustomDrawCrosshairEventArgs.CrosshairAxisLabelElements Property
Gets the settings of crosshair axis label elements to customize their appearance.
Namespace: DevExpress.XtraCharts
Assembly: DevExpress.XtraCharts.v25.2.dll
NuGet Package: DevExpress.Charts
Declaration
Property Value
| Type | Description |
|---|---|
| IEnumerable<CrosshairAxisLabelElement> | An object implementing the IEnumerable interface that represents the collection of the CrosshairAxisLabelElement. |
Remarks
Use the CrosshairAxisLabelElements property to get access to the settings of either the crosshair argument labels (the CrosshairOptions.SnapMode property is set to NearestArgument) or crosshair value labels (the CrosshairOptions.SnapMode property is set to NearestValue) when implementing the ChartControl.CustomDrawCrosshair event.
To learn more about a crosshair cursor, see Tooltip and Crosshair Cursor.
Example
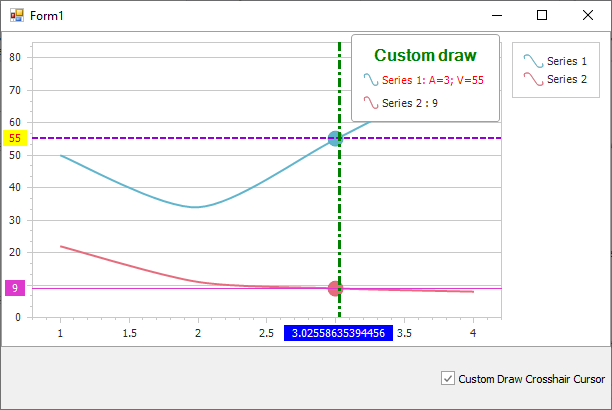
This example shows how to use the ChartControl.CustomDrawCrosshair event to create a custom appearance for the crosshair cursor. This event is invoked when you select the Custom Draw Crosshair Cursor check box.

If you wish to display crosshair axis lines and labels on a chart before custom drawing the crosshair cursor, set the CrosshairOptions.ShowArgumentLine, CrosshairOptions.ShowArgumentLabels, CrosshairOptions.ShowValueLabels and CrosshairOptions.ShowValueLine properties to true.
Note that the crosshair cursor customization is available for the CrosshairOptions.SnapMode property set to NearestArgument.
using System;
using System.Drawing;
using System.Windows.Forms;
using DevExpress.Drawing;
using DevExpress.XtraCharts;

namespace CustomDrawCrosshairCursor {
    public partial class Form1 : Form {
        public Form1() {
            InitializeComponent();
        }
        private void OnCheckEditCheckedChanged(object sender, EventArgs e) {
            if (checkEdit1.Checked)
                chartControl1.CustomDrawCrosshair += OnChartControlCustomDrawCrosshair;
            else
                chartControl1.CustomDrawCrosshair -= OnChartControlCustomDrawCrosshair;
        }

        private void OnChartControlCustomDrawCrosshair(object sender, CustomDrawCrosshairEventArgs e) {
            // Specify the crosshair argument line color, dash style and thickness.
            e.CrosshairLineElement.Color = Color.Green;
            e.CrosshairLineElement.LineStyle.DashStyle = DashStyle.DashDot;
            e.CrosshairLineElement.LineStyle.Thickness = 3;

            // Specify the back color for the crosshair argument axis label.
            foreach (CrosshairAxisLabelElement axisLabelElement in e.CrosshairAxisLabelElements)
                axisLabelElement.BackColor = Color.Blue;

            foreach (CrosshairElementGroup group in e.CrosshairElementGroups) {
                CrosshairGroupHeaderElement groupHeaderElement = group.HeaderElement;

                // Specify the text, text color and font for the crosshair group header element.
                groupHeaderElement.Text = "Custom draw";
                groupHeaderElement.TextColor = Color.Green;
                groupHeaderElement.DXFont = new DXFont("SegoeUI", 12, DXFontStyle.Bold);

                // Obtain the first series.
                CrosshairElement element = group.CrosshairElements[0];

                // Specify the color, dash style and thickness for the crosshair value lines.
                element.LineElement.Color = Color.DarkViolet;
                element.LineElement.LineStyle.DashStyle = DashStyle.Dash;
                element.LineElement.LineStyle.Thickness = 2;

                // Specify the text color and back color for the crosshair value labels.
                element.AxisLabelElement.TextColor = Color.Red;
                element.AxisLabelElement.BackColor = Color.Yellow;

                // Format the text shown for the series in the crosshair cursor label. Specify the text color and marker size.
                element.LabelElement.TextColor = Color.Red;
                element.LabelElement.MarkerSize = new Size(15, 15);
                element.LabelElement.Text = string.Format("{0}: A={1}; V={2}", element.Series.Name, element.SeriesPoint.Argument, element.SeriesPoint.Values[0]);
            }
        }
    }
}
Related GitHub Examples
The following code snippet (auto-collected from DevExpress Examples) contains a reference to the CrosshairAxisLabelElements property.
Note
The algorithm used to collect these code examples remains a work in progress. Accordingly, the links and snippets below may produce inaccurate results. If you encounter an issue with code examples below, please use the feedback form on this page to report the issue.