SuperToolTip Class
Represents a tooltip that supports multiple text and image regions.
Namespace: DevExpress.Utils
Assembly: DevExpress.Utils.v26.1.dll
Declaration
Remarks
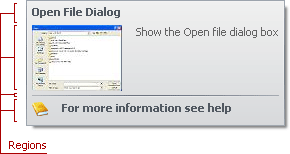
The SuperToolTip class represents a super tooltip. A super tooltip consists of multiple regions (items): title, content, separator, and footer. Items are arranged one under another. Each item can display an image and text. A tooltip can contain any combination of items.
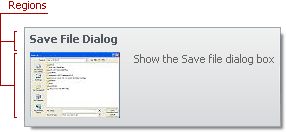
The following types specify tooltip items:
- ToolTipItem — the main region in a super tooltip that displays text and/or image.
- ToolTipTitleItem — a region displayed at the top (title) or bottom (footer) of a tooltip. This type differs from the regular type by its default appearance and indentation settings.
- ToolTipSeparatorItem — a horizontal line in a tooltip.

To create a tooltip, add tooltip items to the Items collection. Items are displayed according to their order in the collection.
The Setup(SuperToolTipSetupArgs) method allows you to create a super tooltip with three predefined regions: header, contents, and footer.
See Hints and Super Tooltips for more information.
Examples
The following examples demonstrate two different approaches to create a super tooltip ( SuperToolTip ) and assign in to a bar item. The super tooltip includes the title, main content, separator, and footer.

Example 1
using DevExpress.Utils;

private void Form1_Load(object sender, EventArgs e) {
  CreateSuperTooltip(barButtonItemChart);
}

void CreateSuperTooltip(BarItem barItem) {
  SuperToolTip superTip = new SuperToolTip();
  ToolTipItem item = new ToolTipItem();
  if(barItem.ImageOptions.SvgImage != null)
      item.ImageOptions.SvgImage = barItem.ImageOptions.SvgImage;
  item.Text = "Transform data to its most appropriate and readable visual representation. Insert bar charts, pie graphs, line graphs, or financial diagrams.";
  ToolTipItem footer = new ToolTipItem();
  superTip.AllowHtmlText = DefaultBoolean.True;
  footer.Text = "<a href=\"https://www.devexpress.com\">Learn more</a>";
  superTip.Items.AddTitle("Add a Chart");
  superTip.Items.Add(item);
  superTip.Items.AddSeparator();
  superTip.Items.Add(footer);
  barItem.SuperTip = superTip;
}
Example 2
Create the SuperToolTipSetupArgs object, customize its settings, and pass it to the SuperToolTip.Setup method.
using DevExpress.Utils;

private void Form1_Load(object sender, EventArgs e) {
  SetupSuperTooltip(barButtonItemChart);
}

void SetupSuperTooltip(BarItem barItem) {
  SuperToolTip superTip = new SuperToolTip();
  SuperToolTipSetupArgs args = new SuperToolTipSetupArgs();
  args.Title.Text = "Add a Chart";
  args.Contents.Text = "Transform data to its most appropriate and readable visual representation. Insert bar charts, pie graphs, line graphs, or financial diagrams.";
  if(barItem.ImageOptions.SvgImage != null)
      args.Contents.ImageOptions.SvgImage = barItem.ImageOptions.SvgImage;
  args.ShowFooterSeparator = true;
  args.Footer.Text = "<a href=\"https://www.devexpress.com\">Learn more</a>";
  superTip.Setup(args);
  superTip.AllowHtmlText = DefaultBoolean.True;
  barItem.SuperTip = superTip;
}
This example shows how to create a super tooltip with a hyperlink and assign it to a SimpleButton.
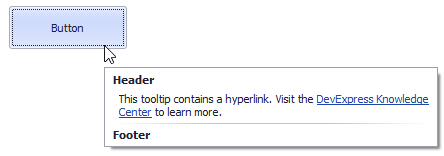
The button’s SuperTip property allows you to specify a super tooltip. Use the ToolTipController.AllowHtmlText, SuperToolTip.AllowHtmlText, or ToolTipItem.AllowHtmlText property to enable HTML tags. Handle the ToolTipController.HyperlinkClick event to respond to a click on the hyperlink.
The SuperToolTip Editor allows you to create super tooltips in the designer. To invoke the editor, click the SuperTip property’s ellipsis button in the Properties window.
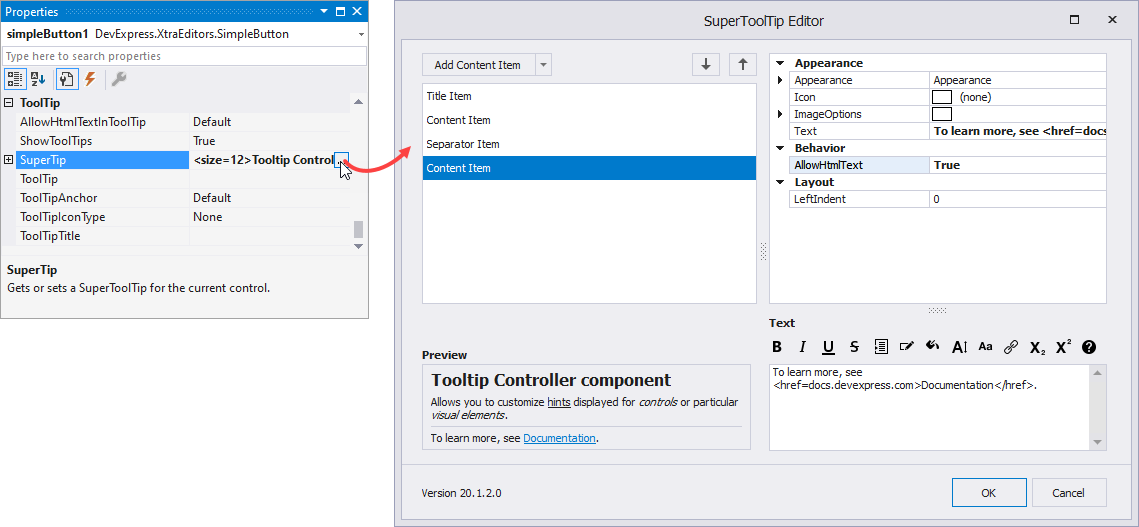
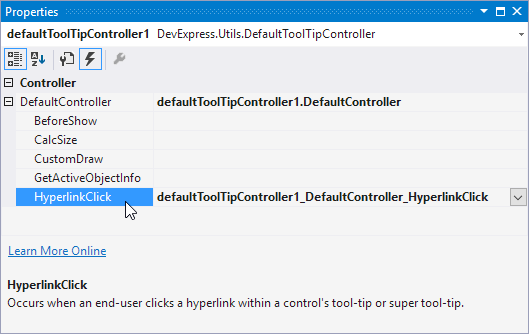
If you create a tooltip in the designer, you still need to handle the HyperlinkClick event in code. Use the Properties window to assign an event handler.
The example below shows how to create a super tooltip in code.
using DevExpress.Utils;
using System.Diagnostics;

private void Form1_Load(object sender, EventArgs e) {
    // Access the controller that manages tooltips for all controls:
    ToolTipController defaultTooltipController = DevExpress.Utils.ToolTipController.DefaultController;

    // Create and customize a SuperToolTip:
    SuperToolTip sTooltip = new SuperToolTip();
    SuperToolTipSetupArgs args = new SuperToolTipSetupArgs();
    args.Title.Text = "Header";
    args.Contents.Text = "This tooltip contains a hyperlink. Visit the <href=http://help.devexpress.com>DevExpress Knowledge Center</href> to learn more.";
    args.ShowFooterSeparator = true;
    args.Footer.Text = "Footer";
    sTooltip.Setup(args);
    // Enable HTML Text Formatting for the created SuperToolTip:
    sTooltip.AllowHtmlText = DefaultBoolean.True;
    //..or enable this feature for all tooltips:
    //defaultTooltipController.AllowHtmlText = true;

    // Respond to clicking hyperlinks in tooltips:
    defaultTooltipController.HyperlinkClick += defaultTooltipController_HyperlinkClick;

    // Assign a SuperToolTip to the button:
    simpleButton1.SuperTip = sTooltip;
}

void defaultTooltipController_HyperlinkClick(object sender, HyperlinkClickEventArgs e) {
    Process process = new Process();
    process.StartInfo.FileName = (e.Link);
    process.StartInfo.Verb = "open";
    process.StartInfo.WindowStyle = ProcessWindowStyle.Normal;
    try {
        process.Start();
    }
    catch { }
}