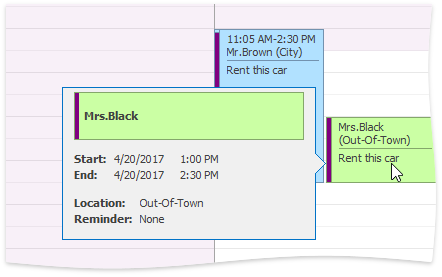
Appointment Flyout
- 2 minutes to read
An Appointment Flyout appears when you hover the mouse pointer over an appointment. A flyout can display the following content:
- A Microsoft Outlook-style flyout (default layout).
- A custom HTML-CSS template with any required data.
- A custom control.
Note
Flyouts have priority over tooltips, so the ToolTipController.BeforeShow event does not fire (the default setting). To display tooltips instead of flyouts, set the SchedulerOptionsCustomization.AllowDisplayAppointmentFlyout option to false and adjust the SchedulerOptionsView.ToolTipVisibility property as needed. Set it to ToolTipVisibility.Always to always show tooltips.
Default Outlook-Style Flyouts
Default flyouts display the following appointment properties as text:
- Appointment.Subject
- Appointment.Start
- Appointment.End
- Appointment.Location
- ReminderBase.TimeBeforeStart value of the Appointment.Reminder assigned to an appointment
A colored rectangle with a strip on the left side contains the appointment subject’s text (referred to as the Subject rectangle). This rectangle indicates the appointment Label and Status:
- The Appointment.StatusKey property specifies the appointment status. The AppointmentStatus.Brush paints the strip (status line) based on this status.
- The Appointment.LabelKey property specifies the appointment label. The AppointmentLabel.Color determines the rectangle’s color.

Set the SchedulerOptionsCustomization.AllowDisplayAppointmentFlyout property to false to hide appointment flyouts.
If the appointment’s subject text does not fit in the flyout subject box, it is clipped. To display subject lines completely regardless of their length, set the AppointmentFlyoutOptions.SubjectAutoHeight option to true.
You can handle the following events to customize the appointment flyout:
| Event | Description |
|---|---|
| SchedulerControl.CustomizeAppointmentFlyout | Shows/hides any of the appointment properties displayed in the flyout. You can also display arbitrary text, specify the background color, and set font characteristics. |
| SchedulerControl.CustomDrawAppointmentFlyoutSubject | Allows you to manually draw the visual elements that make up the Subject rectangle. |
Flyouts with Custom HTML Content
You can display custom HTML content within an appointment flyout in the following ways:
- Set the Scheduler’s OptionsFlyout.HtmlTempate property to an HTML template.
- Handle the AppointmentFlyoutShowing event and pass an HTML template to the event handler’s HtmlTemplate parameter.
The following events allow you to customize appointment flyouts:
| Event | Description |
|---|---|
| SchedulerControl.CustomizeAppointmentFlyoutTemplate | Allows you to dynamically customize elements of appointment flyout rendered from HTML-CSS templates. |
| SchedulerControl.CustomAppointmentFlyoutTemplateValue | Allows you to pass values to elements bound to an appointment flyout’s data fields. |
Custom Flyouts
To display a custom control within an appointment flyout, pass the control to the SchedulerControl.AppointmentFlyoutShowing event handler’s Control parameter.