HTML Templates in Scheduler
- 4 minutes to read
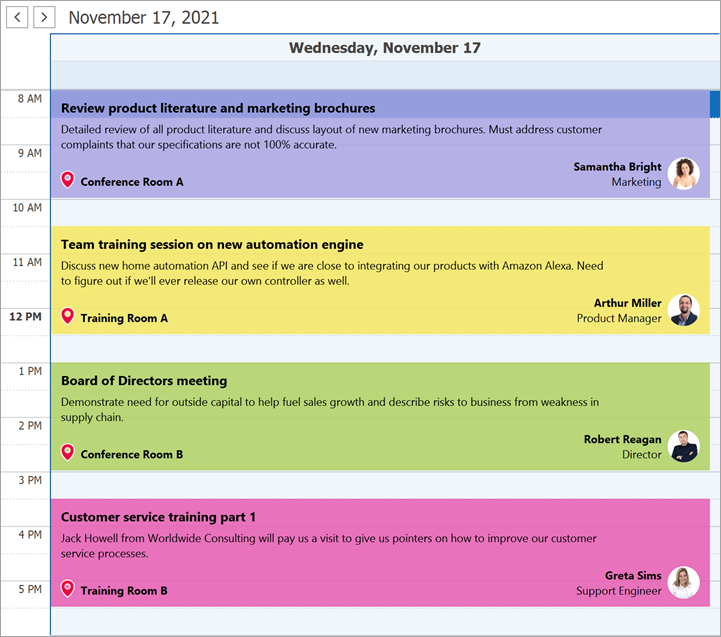
This topic explains how to use HTML/CSS templates to customize the appearance of Scheduler Control elements. For more information about web templates in DevExpress WinForms applications, see this documentation article: HTML and CSS-based Desktop UI.
Supported Elements
The Scheduler Control supports HTML/CSS templates for the following UI elements:
- Regular Appointments (
schedulerControl1.DayView.HtmlTemplates.Appointment) - All-day Events (
schedulerControl1.DayView.HtmlTemplates.AllDayAppointment) - Resource Headers (
schedulerControl1.OptionsView.ResourceHeaders.ResourceHeaderHtmlTemplate) - Flyout (
schedulerControl1.OptionsFlyout.HtmlTempate)
Create and Apply Templates
At Design Time
In the Visual Studio Property Grid, expand the HtmlTemplates section for a Scheduler View, and click the ellipsis button next to the property that corresponds to the UI element whose template you need to set up. For example, if you want to design all-day events in Day View, click the ellipsis button next to the SchedulerControl.Views.DayView.HtmlTemplates.AllDayAppointment property.
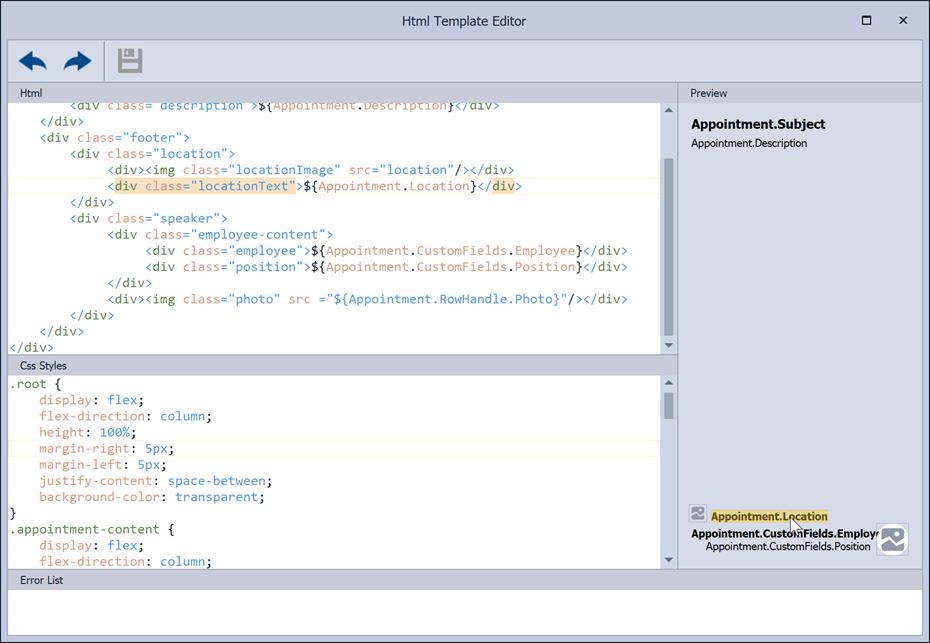
The ellipsis button invokes the HTML Template Editor where you can design custom element templates.
In Code
Assign the DevExpress.Utils.Html.HtmlTemplate class instance to the required property from the View.HtmlTemplates group.
var DayAppointmentTemplate1 = new DevExpress.Utils.Html.HtmlTemplate();

DayAppointmentTemplate1.Name = "DayViewAppointmentTemplate";
DayAppointmentTemplate1.Template = "<div class=\"task-progress\">${Appointment.Subject}</div>";
DayAppointmentTemplate1.Styles = ".task-progress {\r\n\tbackground-color: @Warning;}";

schedulerControl1.Views.DayView.HtmlTemplates.Appointment.Assign(DayAppointmentTemplate1);
Assign Templates to Individual Appointments
Handle the SchedulerControl.QueryAppointmentTemplate event and check its e.Appointment property to find appointments that should use unique templates. For example, the following code applies the “OffDutyTimeAppTemplate” for all regular Day View appointments that start at 5 p.m. or later.
private void SchedulerControl1_QueryAppointmentTemplate(object sender, QueryAppointmentTemplateEventArgs e) {
    SchedulerControl scheduler = sender as SchedulerControl;
    if (scheduler.ActiveViewType == SchedulerViewType.Day && e.Appointment.Type == AppointmentType.Normal &&
        e.Appointment.Start.Hour >= 17)
            e.Template.Assign(OffDutyTimeAppTemplate);
}
Modify Templates at Runtime
Handle the SchedulerControl.CustomizeAppointmentTemplate event to customize HTML templates at runtime. To obtain an HTML element, use the e.HtmlElement.FindElementById method.
For example, the following markup illustrates a template that contains an image (the <img> tag) with the "dinner_icon" ID:
...
<div class="image_container">
    <img id="dinner_icon" class="dinnerIconStyle" src="${bo_attention}">
</div>
...
.dinnerIconStyle {
    width:16px;
    height:16px;
}
This image should be visible only for appointments scheduled at off-duty dinner hours. The code below illustrates how to retrieve this image by its ID, and hide this element for appointments scheduled during working hours.
private void OnCustomizeAppointmentTemplate(object sender, CustomizeAppointmentTemplateEventArgs e) {
    var templateImage = e.HtmlElement.FindElementById("dinner_icon");
    if (templateImage != null && !(e.Appointment.Start.Hour >= 13 && e.Appointment.End.Hour <= 14))
        templateImage.Hidden = true;
}
The CustomizeAppointmentTemplate event also allows you to modify CSS styles. The following sample increases the size for the same "dinner_icon" image from 16x16 to 32x32:
private void OnCustomizeAppointmentTemplate(object sender, CustomizeAppointmentTemplateEventArgs e) {
    var templateImage = e.HtmlElement.FindElementById("icon");
    templateImage.Style.SetProperty("width", "32px");
    templateImage.Style.SetProperty("height", "32px");
}
Substitute Bound Values
Use the ${} syntax to bind HTML elements to data source or Appointment fields (for example, <img src="${DataSource.Photo}"> or <div>${Appointment.CustomFields.Position}</div>). You can handle the CustomAppointmentTemplateValue event to replace values retrieved by such data-bound elements.
The following sample assigns the “No Details” description to appointments that do not have any description.
...
<div>${Appointment.Description}</div>
...
private void OnCustomAppointmentTemplateValue(object sender, CustomAppointmentTemplateValueEventArgs e) {
    if (e.Appointment.Description == String.Empty && e.FieldName == "Appointment.Description")
        e.FieldValue = "No Details";
}