Data Binding
- 4 minutes to read
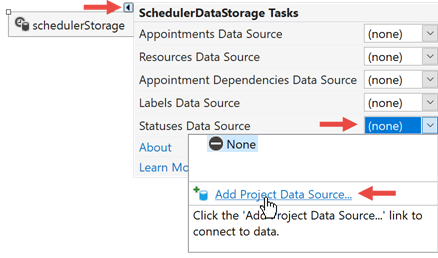
The Scheduler control supports all traditional data sources and technologies (ADO.NET, Entity Framework, XPO, etc.). With its integrated Data Source Configuration Wizard you can retrieve appointments including resources, statuses, and labels without a single line of code.
It ships with the Scheduler Data Storage component that supports Visual Studio .NET data objects and can be bound to XML data or any data object implementing the IList, IBindingList, and ITypedList interfaces. You can retrieve Scheduler appointments (including their reminders, statuses and labels) and resources from data sources.
Tip
Read the following step-by-step tutorial to get started in minutes: Create a Calendar Application.
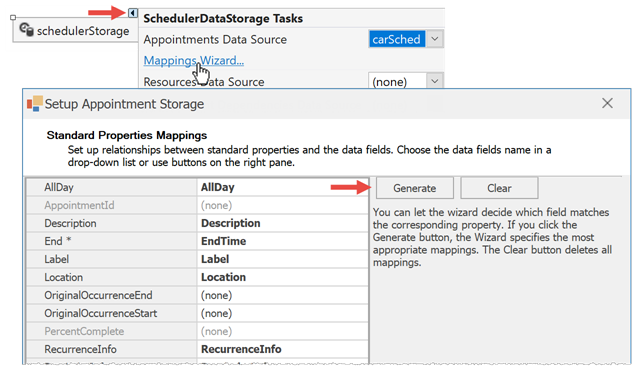
Mappings
Appointments, resources, labels, and other elements have required and optional data-bound properties. For instance, appointment start and end dates, ID, and type are required properties, whereas time zone ID, status, subject, reminder, etc. are optional.
Read the following topic for information and examples: Mappings.
Mappings Wizard
Use the Mappings Wizard to set up mappings at design time.
Set Up Mappings in Code
The following example shows how to set object mappings in code:
private void MapAppointmentData()
{
    //required mappings
    schedulerDataStorage1.Appointments.Mappings.End = "EndDate";
    schedulerDataStorage1.Appointments.Mappings.Start = "StartDate";
    //optional mappings
    schedulerDataStorage1.Appointments.Mappings.AllDay = "AllDay";
    //. . .
    schedulerDataStorage1.Appointments.Mappings.ResourceId = "ResourceIDs";
    //custom fields
    schedulerDataStorage1.Appointments.CustomFieldMappings.Add(
        new AppointmentCustomFieldMapping("MyNote", "CustomField1"));
}
Tip
You can map data source fields that are not used by the Scheduler control itself. Read the following topic for information and examples: Custom Fields.
Import Holidays from a Data Source
To import holidays, parse loaded data and populate the WorkDaysCollection with Holiday objects. See the “Holidays” Demo module for an example.
Note
Holiday cells have a different appearance than regular day cells but do not impose any user restrictions. If you want to block specific dates, create all-day TimeRegion objects.
Sample Data Sources
If you do not have a ready-to-use data source populated with data, you can generate a new source. Documents in the Data Sources section contain sample data sources of different types (SQL Server, Entity Framework, XML, etc.) you can use as references.
Unbound mode
Whether your Scheduler is bound to a data source or not, you can add new elements (appointments, resources, etc.) directly from code. To do that, call the SchedulerDataStorage‘s Create… methods.
- SchedulerDataStorage.CreateAppointment
- SchedulerDataStorage.CreateResource
- SchedulerDataStorage.CreateReminder
- SchedulerDataStorage.CreateAppointmentDependency
SchedulerDataStorage.Appointments.Labels.CreateNewLabelSchedulerDataStorage.Appointments.Statuses.CreateNewStatus
The code below adds a new status, a new label, and a new appointment that has this new status and label. The appointment lasts for 15 minutes, repeats five times, and occurs on every second day. Note that “Create…” methods initialize new objects, but do not add them to a storage; this is why you have to additionally call the Add method.
Appointment apt = schedulerDataStorage1.CreateAppointment(
    AppointmentType.Pattern,
    DateTime.Now,
    DateTime.Now.AddMinutes(15),
    "Appointment Created in Code");
apt.Location = "My Location";
apt.Description = "My Description";
apt.RecurrenceInfo.Type = RecurrenceType.Daily;
apt.RecurrenceInfo.Periodicity = 2;
apt.RecurrenceInfo.Start = apt.Start;
apt.RecurrenceInfo.Range = RecurrenceRange.OccurrenceCount;
apt.RecurrenceInfo.OccurrenceCount = 5;
schedulerDataStorage1.Appointments.Add(apt);

var lbl = schedulerDataStorage1.Appointments.Labels.CreateNewLabel("vi","Very Important");
lbl.SetColor(Color.IndianRed);
schedulerDataStorage1.Appointments.Labels.Add(lbl);

var status = schedulerDataStorage1.Appointments.Statuses.CreateNewStatus("vb", "Very Busy");
status.SetBrush(new HatchBrush(HatchStyle.ForwardDiagonal, Color.IndianRed, Color.White));
schedulerDataStorage1.Appointments.Statuses.Add(status);

apt.StatusKey = "vb";
apt.LabelKey = "vi";
How to Refresh Data
The Scheduler Control (or any other DevExpress data-aware control) is not connected to a database directly, and uses a data source layer instead. For this reason, the control does not automatically reflect database changes. You need to track these changes and call the SchedulerDataStorage.RefreshData() method. You can also use the standard Timer component to repeatedly refresh Scheduler data.
private void timer1_Tick(object sender, EventArgs e) {
    if (schedulerControl1.Services.SchedulerState.IsDataRefreshAllowed) {
        schedulerControl1.RefreshData();
    }
}
The RefreshData method triggers the SchedulerDataStorage.FetchAppointments event. Handle this event to load data in portions. See this example for more information: How to: Use the FetchAppointments Event for Faster Appointment Loading.