Data Binding
- 9 minutes to read
DevExpress data-aware controls are compatible with any data access technology (ADO.NET, Entity Framework, XPO, etc.) and can display data from any data source that implements the IList, IBindingList, or ITypedList interface. Refer to these help topics for more details: Traditional Data Binding Methods and Data Binding Common Concepts. Note that Server and Instant Feedback Modes impose certain restrictions on data binding.
Data Grid (or any other DevExpress data-aware control) shows data from its source as is. If you need to display initially filtered or sorted records, or merge multiple data sources into one, do so at the data source level before you bind a data-aware control to this source.
Create a New Data Source
The quickest way to set up a new data source is to utilize the Data Source Configuration Wizard.
Important
The DevExpress Data Source Wizard calls the standard Visual Studio Data Source Configuration Wizard that is not available in .NET projects. You should create datasets, binding sources, and table adapters manually (or you can generate them in a .NET Framework project and add to the .NET project).
Important Notes Related to Design-Time Customization in .NET Apps
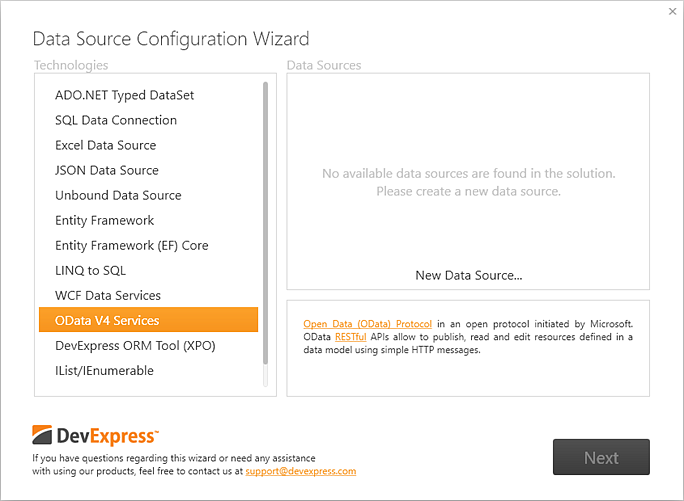
Click the Data Grid’s smart tag or click the icon in the Grid’s bottom left corner (see the image below).
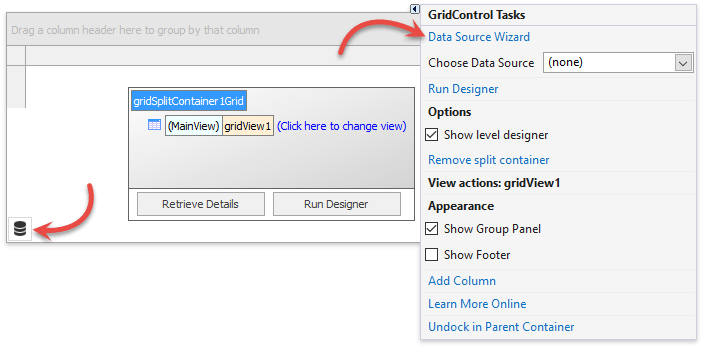
The Wizard allows you to bind a control to the following supported sources:
- ADO.NET Data
- SQL Data
- Excel workbooks and CSV files
- JSON Data
- Entity Framework
- Entity Framework Core
- LINQ to SQL Classes
- Windows Communication Foundation (WCF) services
- Open Data v4 Services
- DevExpress ORM Tool (XPO)
- Data Created at Runtime (IList, IEnumerable, etc.)
- XML Data
- Custom data with no strongly typed data set available
The UnboundSource component allows you to mix different data source types or add virtual rows to a bound Data Grid.
For code-first data sources, it is possible to mark data class properties with Data Annotation Attributes to pre-customize a Grid (for example, prevent a column from being generated for a specific data field or change the type of its in-place editor).
- Data Annotation Attributes
- Tutorial: Create and Manage Data in Code and Apply Data Annotation Attributes
Choose an Existing Data Source
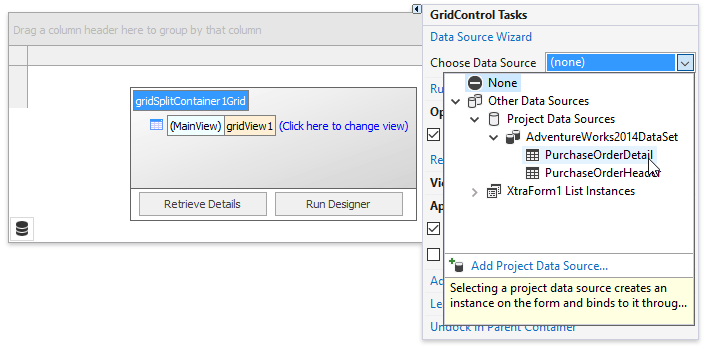
If you already have a data source ready, use the Data Grid smart tag to select this source in the “Choose Data Source” editor.
In code, assign a valid source to the GridControl.DataSource property.
using System.Data.OleDb;
// ...
// Create a connection object.
OleDbConnection connection = new OleDbConnection(
  "Provider=Microsoft.Jet.OLEDB.4.0;Data Source=E:\\DBs\\NWIND.MDB");

// Create a data adapter.
OleDbDataAdapter adapter = new OleDbDataAdapter("SELECT * FROM Products", connection);

// Create and fill a dataset.
DataSet sourceDataSet = new DataSet();
adapter.Fill(sourceDataSet);

// Specify the data source for the grid control.
gridControl1.DataSource = sourceDataSet.Tables[0];
Bind to BindingList Source
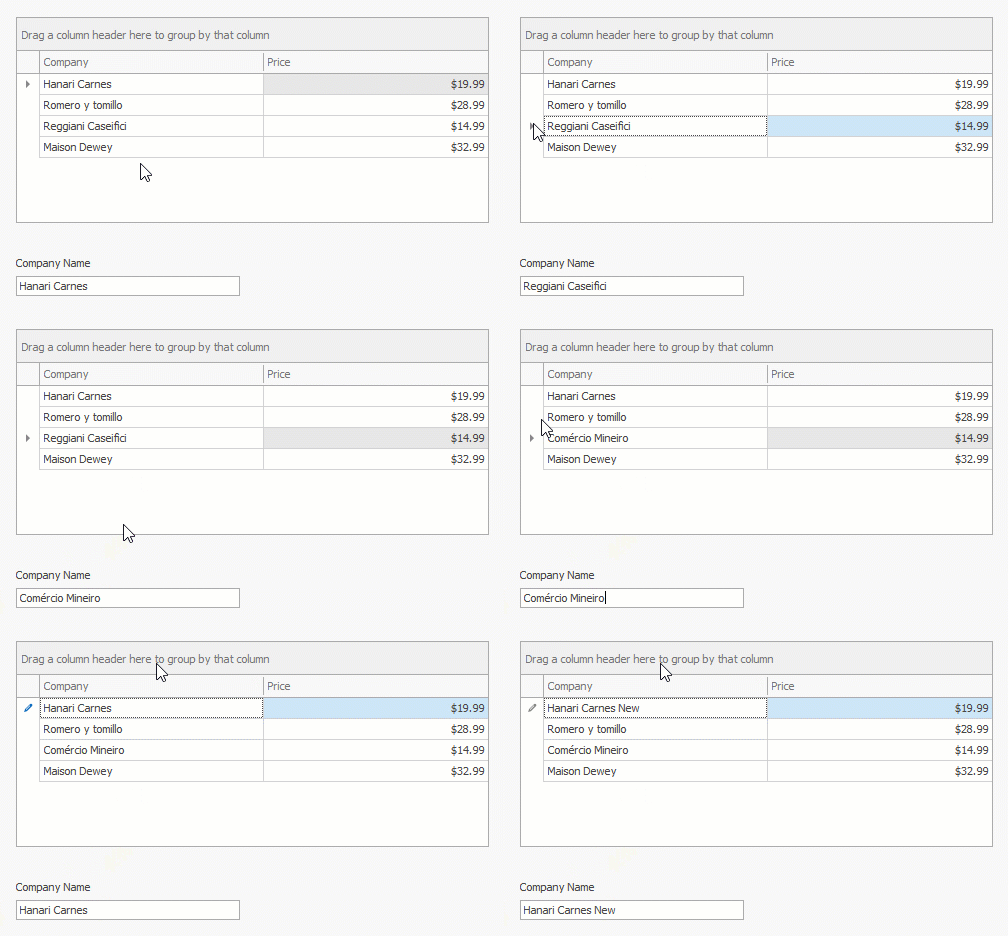
The following example demonstrates how to bind the Grid control to a BindingList source with Record objects. The Record class implements the INotifyPropertyChanged interface to notify the Grid control that a property value has changed.
Note
The WinForms Grid control can be bound to public properties only.
using System;
using System.Windows.Forms;
using System.ComponentModel;
using DevExpress.XtraEditors;
using System.Runtime.CompilerServices;
using System.ComponentModel.DataAnnotations;

namespace DXApplication1 {
    public partial class Form1 : XtraForm {
        BindingList<Record> records;
        public Form1() {
            InitializeComponent();
            records = new BindingList<Record>() {
                new Record(){ CompanyName = "Hanari Carnes", Price = 19.99 },
                new Record(){ CompanyName = "Romero y tomillo", Price = 28.99 },
                new Record(){ CompanyName = "Reggiani Caseifici", Price = 14.99 },
                new Record(){ CompanyName = "Maison Dewey", Price = 32.99 }
            };
            gridControl1.DataSource = records;
            textEdit1.DataBindings.Add(new Binding("EditValue", records, "CompanyName"));
            textEdit1.Properties.ValidateOnEnterKey = true;
        }
    }

    public class Record : INotifyPropertyChanged {
        private Guid idValue = Guid.NewGuid();
        [Display(Order = -1)]
        public Guid ID {
            get { return this.idValue; }
        }

        string text;
        [DisplayName("Company")]
        public string CompanyName {
            get { return text; }
            set {
                if (text != value) {
                    if (string.IsNullOrEmpty(value))
                        throw new Exception();
                    text = value;
                    OnPropertyChanged();
                }
            }
        }
        double? val;
        [DataType(DataType.Currency)]
        public double? Price {
            get { return val; }
            set {
                if (val != value) {
                    val = value;
                    OnPropertyChanged();
                }
            }
        }
        public event PropertyChangedEventHandler PropertyChanged;
        protected void OnPropertyChanged([CallerMemberName] string propertyName = "") {
            if (PropertyChanged != null)
                PropertyChanged(this, new PropertyChangedEventArgs(propertyName));
        }
    }
}
Switch to Another Data Source
Once you have chosen a data source for the first time, the Data Grid automatically generates all required columns. Should you choose another data source later, previously created columns remain. These columns should be updated manually. To do so, launch the Data Grid Designer, switch to the “Columns” tab, and click the “Retrieve Fields” button.
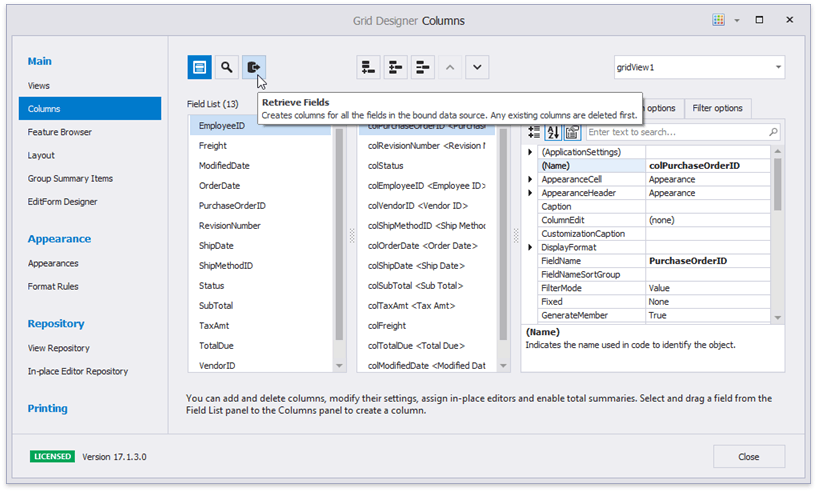
If you need to change a data source in code, reset the GridControl.DataSource property to null (Nothing in Visual Basic), and assign a new data source object to this property. It is recommended that you enclose this code within the BeginUpdate() and EndUpdate() method calls.
gridControl1.BeginUpdate();
try {
    gridView1.Columns.Clear();
    gridControl1.DataSource = null;
    gridControl1.DataSource = < newDataSource >;
}
finally {
    gridControl1.EndUpdate();
}
Post Changes to a Source
For most data source types, the Data Grid allows users to edit data at runtime, but these changes are not automatically saved to an underlying data source. Refer to the following topic to learn how to post changes to a data source: Post Data to an Underlying Data Source.
Clear the Grid
Set the GridControl.DataSource property to null (Nothing in VB.NET) and call the View’s Columns.Clear() method.
If you need to clear the Data Grid temporarily and restore its data later, switch the control to an empty View.
using DevExpress.XtraGrid.Views.Grid;

object ds;  // Data source

// Clear
ds = gridControl1.DataSource;
gridControl1.DataSource = null;
GridView view = new GridView(gridControl1);
view.OptionsView.ShowGroupPanel = false;
view.OptionsView.ShowColumnHeaders = false;
gridControl1.MainView = view;

// Restore
gridControl1.MainView = gridView1;
gridControl1.DataSource = ds;
Fluent API Support
The traditional way to customize grid columns or bind them to data assumes that you access columns by their string field names. If it is not possible to populate grid columns at runtime or you need custom logic to obtain column settings, you can use a fluent API instead. In Visual Studio, IntelliSense allows you to observe all data source properties and bind the required fields to grid columns.
This technique creates fail-safe code when you modify the data source structure (for example, remove a data source field) or when there is a typo in a field name (for instance, an attempt to access a field that does not exist). These actions immediately cause an exception that cannot be missed. The traditional technique can ignore such errors in certain cases, creating ‘dead’ code that is hard to detect.
To use this functionality, refer to the XtraGrid.Extension namespace from your code.
You can now call the ColumnView.With method to add and configure columns. The following code snippet illustrates an example:
gridView1.With<Customer>(settings => {
                settings.Columns
                    .Add(f => f.ContactName, col => {
                        col.Caption = "Contact";
                        col.SortOrder = DevExpress.Data.ColumnSortOrder.Descending;
                        col.SortIndex = 0;
                    })
                    .Add((f => f.Phone), c => { c.Caption = "Phone Number"; })
                    .Add(p => p.CompanyName)
                        .WithCaption("Company Name")
                        .WithGrouping()
                        .With(col => { });
 });
With a fluent API, you can use the ColumnView.GetColumnViewSettings method to obtain existing columns and modify their settings. For instance, the following code is the GridView.RowCellStyle event handler that identifies the column related to the row cell and fills it in red if the column is ‘Phone’:
void gridView1_RowCellStyle(object sender, DevExpress.XtraGrid.Views.Grid.RowCellStyleEventArgs e) {
    GridColumn col = (sender as ColumnView).GetColumnViewSettings<Customer>().Columns[c => c.Phone].AsColumn();
        if((col!=null) && (e.Column == col)) {
        e.Appearance.BackColor = Color.Red;
    }
}
Cheat Sheets and Best Practices
DevExpress WinForms UI controls share the same data binding techniques. Read the following quick-reference guides for detailed information and examples:
- Supported Data Access Technologies and Data Sources
- Display Data From a Large Database or Data Storage
- Show Values from External Sources. Calculated Field Values. Unbound Mode.
- Master-Detail Mode in WinForms Data Grid
- How to Update a Database
- Update and Load Data from non UI Threads. Deal with Frequently Updated Data
Troubleshooting
Data binding issues are not usually related to DevExpress UI components directly. Read the following article for information on how to fix known issues:
Data Binding - DevExpress WinForms Troubleshooting