Tutorial: Create and Manage Data in Code and Apply Data Annotation Attributes
- 13 minutes to read
This tutorial populates a GridControl with objects created in code and uses .NET Data Annotation Attributes to configure generated columns, editors, formatting, and validation. The tutorial addresses the following tasks:
- Create in-memory data.
- Switch between in-memory data sources.
- Refresh columns when the data source changes.
- Define field metadata directly in a data class or in a reusable metadata class.
Get Started
Create a Grid-based application with the DevExpress Template Kit:
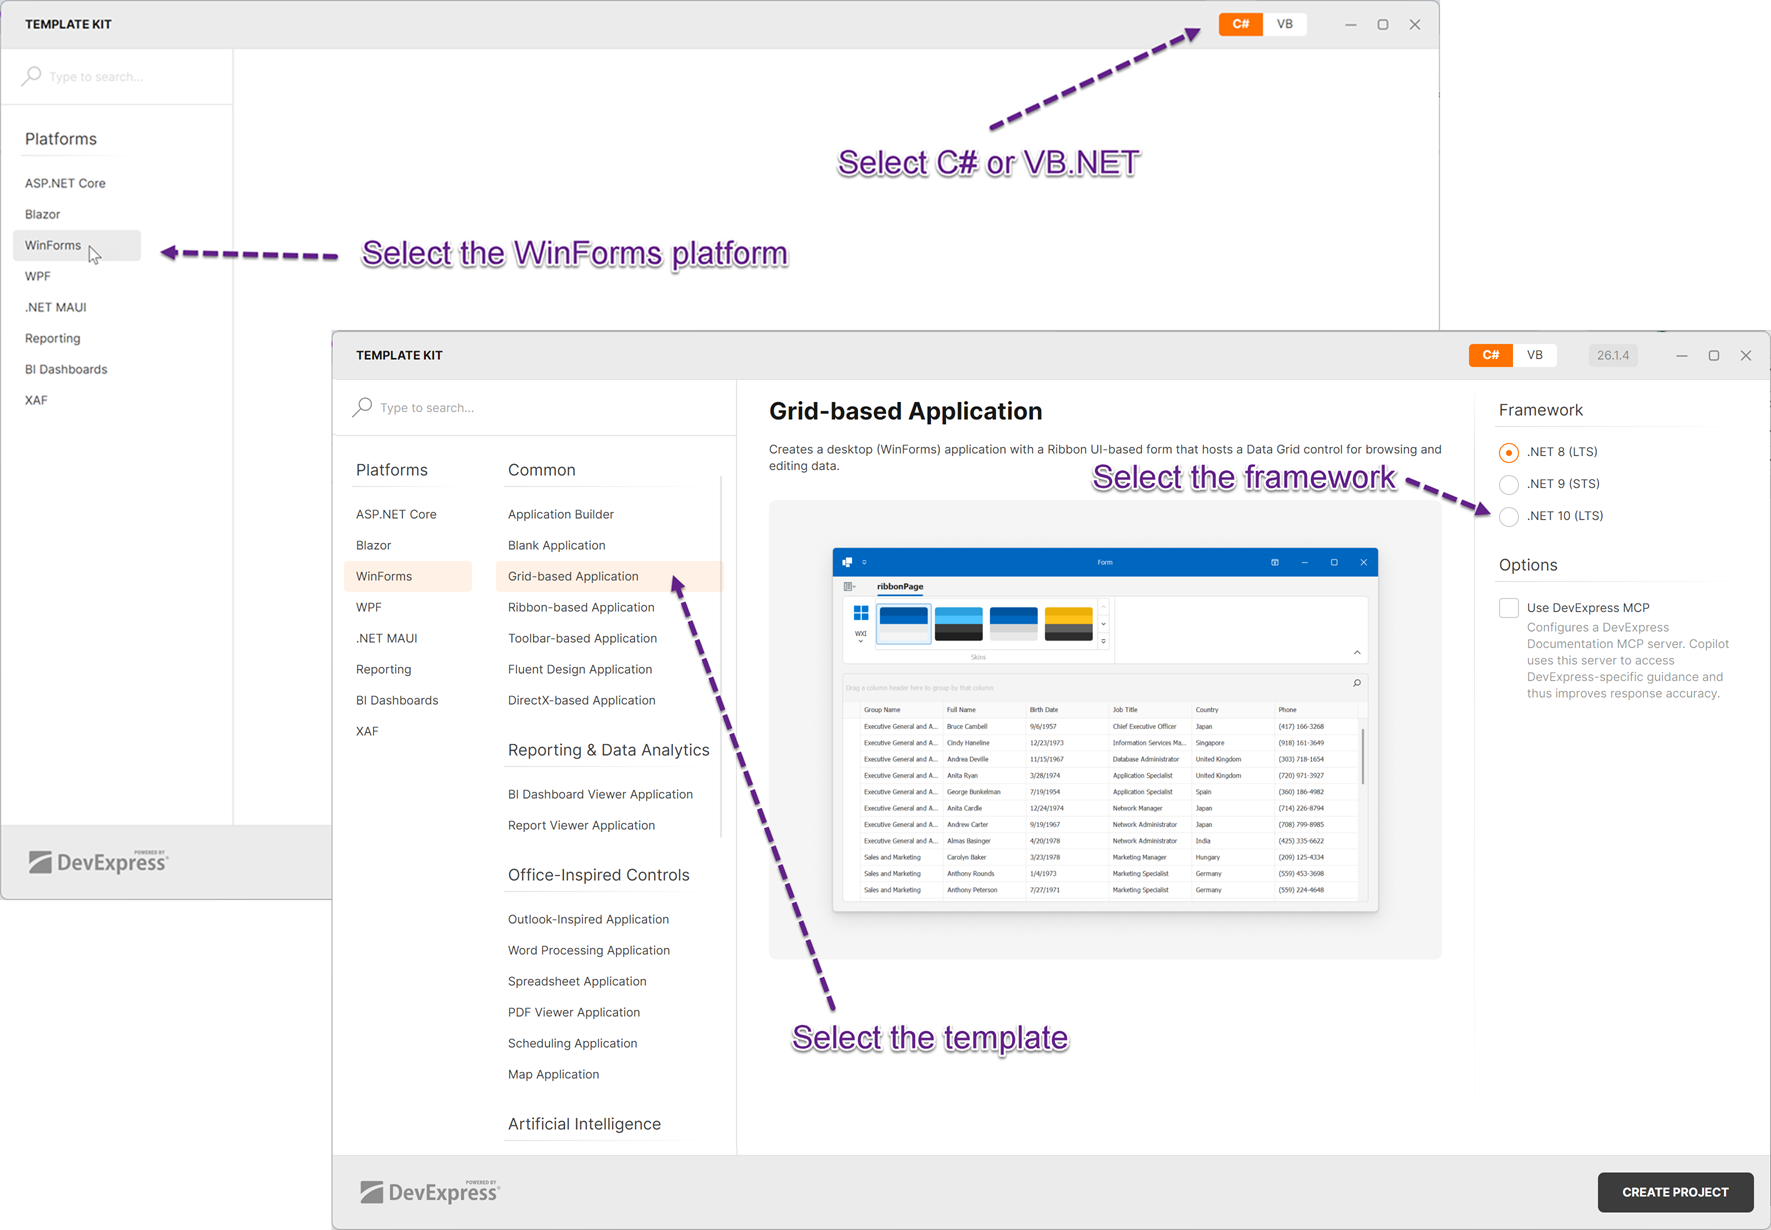
Step 1: Create In-memory Data
Create a class for data records. This tutorial defines data classes in a separate DataSource.cs file (see the next code snippet).
Create a collection of data records. This tutorial populates the data collection in the
GetCompanyPublicInfo()method of a separateGridSampleDataListclass.using System; using System.Collections.Generic; using System.Text; namespace dataAnnotationAttributes { // A class for data records public class CompanyPublicInfo { public string CompanyName { get; set; } public string Country { get; set; } public string City { get; set; } public string Url { get; set; } public string Email { get; set; } public string Phone { get; set; } public string AdditionalInfo { get; set; } } public class GridSampleDataList { // The following method returns a populated collection of data records static public List<CompanyPublicInfo> GetCompanyPublicInfo() { return new List<CompanyPublicInfo> { new CompanyPublicInfo() { AdditionalInfo = "Some Info", City = "Glendale", CompanyName = "Developer Express", Country = "USA", Email = "info@devexpress.com", Phone = "1234567890", Url = "www.devexpress.com", } }; } } }Assign the collection to the GridControl.DataSource property in the form constructor.
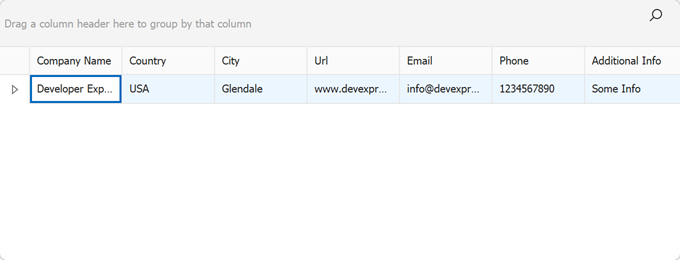
The grid generates columns for public properties of each record.
The following image shows the result at runtime:
Step 2: Switch Between Data Sources
Create additional record classes with different fields. This tutorial uses
CompanyPrivateInfo,CompanyPublicInfo, andProductclasses (see the next code snippet).Populate data collections for additional data classes. This tutorial populates record collections for each data class in
GetCompanyPublicInfo,GetCompanyPrivateInfo, andGetProductSamplemethods of theGridSampleDataListclass.using DevExpress.DataProcessing.InMemoryDataProcessor; using System; using System.Collections.Generic; using System.ComponentModel; using System.ComponentModel.DataAnnotations; using System.Text; namespace dataAnnotationAttributes { public class CompanyPublicInfo { public string CompanyName { get; set; } public string Country { get; set; } public string City { get; set; } public string Url { get; set; } public string Email { get; set; } public string Phone { get; set; } public string AdditionalInfo { get; set; } } public class CompanyPrivateInfo { public string Password { get; set; } public DateTime Date2 { get; set; } public double Sales { get; set; } public double Profit { get; set; } public double SalesVsTarget { get; set; } public double MarketShare { get; set; } public double CustomersSatisfaction { get; set; } } public class Product { public double UnitPrice { get; set; } public int Category { get; set; } public int Quantity { get; set; } public string Text { get; set; } public string MultilineText { get; set; } public int Currency { get; set; } public DateTime Date { get; set; } public DateTime Time { get; set; } } public class GridSampleDataList { static public List<CompanyPrivateInfo> GetCompanyPrivateInfo() { return new List<CompanyPrivateInfo> { new CompanyPrivateInfo() { CustomersSatisfaction = 3.1, Date2 = DateTime.Now, MarketShare = 42, Password = "123qwerty", Profit = 4951515, Sales = 311414134, SalesVsTarget = 0.0277, } }; } static public List<CompanyPublicInfo> GetCompanyPublicInfo() { return new List<CompanyPublicInfo> { new CompanyPublicInfo() { AdditionalInfo = "Some Info", City = "Glendale", CompanyName = "Developer Express", Country = "USA", Email = "info@devexpress.com", Phone = "1234567890", Url = "www.devexpress.com", } }; } static public List<Product> GetProductSample() { return new List<Product> { new Product() { Currency = 1000, Category = 2, Date = DateTime.Now, MultilineText = "Line1\r\nLine2\r\nLine3", Quantity = 321, Text = "Sample Text", Time = DateTime.Now, UnitPrice = 1800, } }; } } }Add a dropdown editor with items that correspond to available data sources. This tutorial uses a ComboBox BarItem:
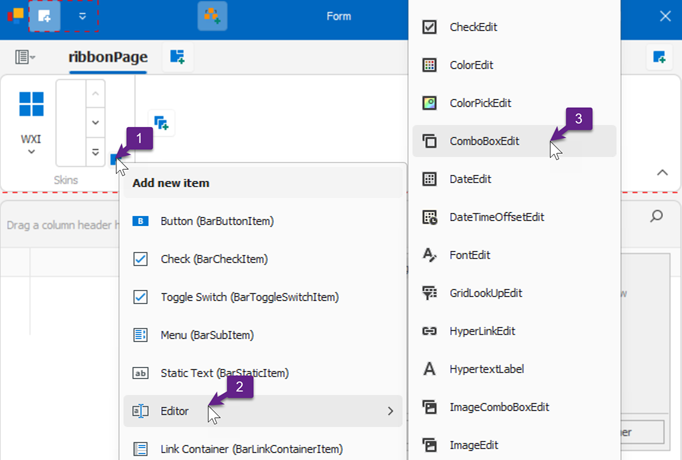
Handle the BarEditItem.EditValueChanged event to assign the selected data source to the GridControl.DataSource property (see the next code snippet).
Handle the GridControl.DataSourceChanged event and call ColumnView.PopulateColumns to recreate columns when the data source changes. You can also call
BestFitColumnsto adjust column widths.using DevExpress.XtraGrid; using DevExpress.XtraEditors; using DevExpress.XtraEditors.Repository; using System.ComponentModel; using DevExpress.XtraGrid.Views.Grid; namespace dataAnnotationAttributes { public partial class Form1 : RibbonForm { public Form1() { InitializeComponent(); gridControl.DataSource = GridSampleDataList.GetCompanyPublicInfo(); // Subscribe to events barEditItem1.EditValueChanged += BarEditItem1_EditValueChanged; gridControl.DataSourceChanged += GridControl_DataSourceChanged; } // Recreate columns when the data source changes private void GridControl_DataSourceChanged(object? sender, EventArgs e) { GridControl grid = sender as GridControl; if (grid == null) return; grid.MainView.PopulateColumns(); (grid.MainView as GridView).BestFitColumns(); } // Assign the selected data source to the grid private void BarEditItem1_EditValueChanged(object? sender, EventArgs e) { DevExpress.XtraBars.BarEditItem item = sender as DevExpress.XtraBars.BarEditItem; if (item == null) return; switch (item.EditValue as string) { case "Company public info": gridControl.DataSource = GridSampleDataList.GetCompanyPublicInfo(); break; case "Company private info": gridControl.DataSource = GridSampleDataList.GetCompanyPrivateInfo(); break; case "Product info": gridControl.DataSource = GridSampleDataList.GetProductSample(); break; } } } }
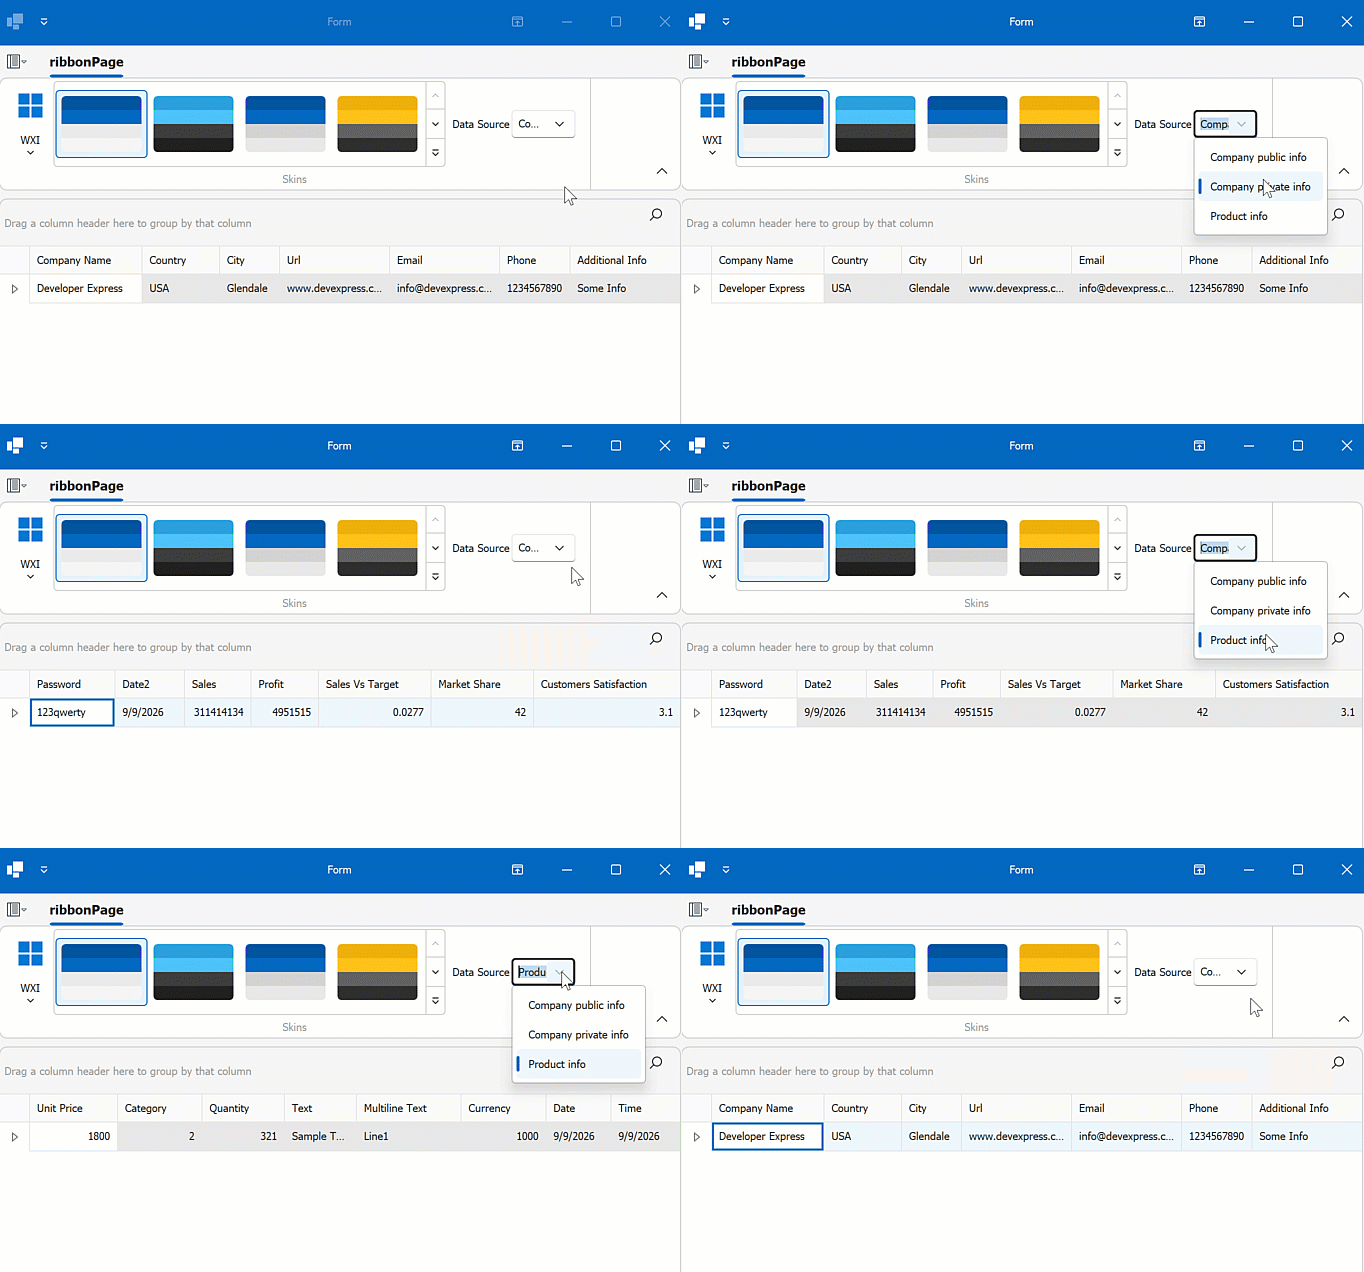
The following animation shows the result at runtime:
Step 3: Apply Data Annotation Attributes
Data annotation attributes allow the grid to select more appropriate editors, apply value formatting, control column generation, and validate input.
Reference the System.ComponentModel.DataAnnotations library to use these attributes.
Annotations are applied to data and can be reused when you bind the data to another supported data-aware control.
Apply Attributes Directly
You can apply attributes directly to properties when the metadata is specific to one class. The following code snippet specifies a read-only field, data types, display settings, and a numeric range for properties of the Product data class:
using System;
using System.ComponentModel;
using System.ComponentModel.DataAnnotations;

public class Product {
    [ReadOnly(true)]
    public double UnitPrice { get; set; }
    // The following line specifies a custom data type
    // A corresponding enum is defined below the Product class
    [EnumDataType(typeof(ProductCategory))]
    public int Category { get; set; }
    [Display(Description = "The amount of currently available product")]
    public int Quantity { get; set; }
    [DataType(DataType.Text), Display(Order = -1)]
    public string Text { get; set; }
    [DataType(DataType.MultilineText)]
    public string MultilineText { get; set; }
    [DataType(DataType.Currency), Range(200, 5000)]
    public int Currency { get; set; }
    [DataType(DataType.Date)]
    public DateTime Date { get; set; }
    [DataType(DataType.Time)]
    public DateTime Time { get; set; }
}
public enum ProductCategory {
    Beverages = 1,
    Fruit = 2,
    Vegetables = 3,
    Meat = 4,
    Condiments = 5,
    Confections = 6,
    DairyProducts = 7,
    GrainsCereals = 8,
    Seafood = 9
}
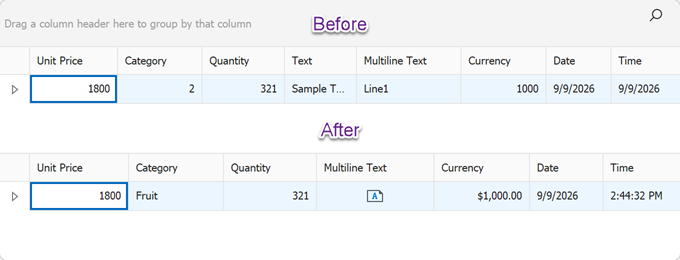
These attributes introduce the following changes:
- Unit price values cannot be changed.
- The Category column displays category enum values instead of numbers.
- The Quantity column displays a tooltip when the column header is hovered over.
- The Text column is hidden.
- The grid uses uses a MemoEdit editor for multiline text and a SpinEdit for time values.
- Currency column values are formatted as currency, and the column accepts only values in the range specified by the
Rangeattribute.
The following image shows the visual difference:
Use a Separate Metadata Class
Direct annotations are useful when a field belongs to one model or requires model-specific metadata. Use the MetadataType attribute when several classes share the same field metadata or when you want to separate annotations from model declarations.
The following code snippet creates a CompanyProductMetadata class with metadata settings for bothCompanyPublicInfo and CompanyPrivateInfo and applies these settings to both data classes.
using System;
using System.ComponentModel;
using System.ComponentModel.DataAnnotations;

[MetadataType(typeof(CompanyProductMetadata))]
public class CompanyPublicInfo {
    public string CompanyName { get; set; }
    public string Country { get; set; }
    public string City { get; set; }
    public string Url { get; set; }
    public string Email { get; set; }
    public string Phone { get; set; }
    public string AdditionalInfo { get; set; }
}

[MetadataType(typeof(CompanyProductMetadata))]
public class CompanyPrivateInfo {
    public string Password { get; set; }
    public DateTime Date2 { get; set; }
    public double Sales { get; set; }
    public double Profit { get; set; }
    public double SalesVsTarget { get; set; }
    public double MarketShare { get; set; }
    public double CustomersSatisfaction { get; set; }
}

public class CompanyProductMetadata {
    [Display(ShortName = "Company", Name = "Company Name", AutoGenerateFilter = false)]
    public object CompanyName;
    [Display(Order = 2)]
    public object Country;
    [Display(Order = 1), Editable(false)]
    public object City;
    [DataType(DataType.Url)]
    public object Url;
    [DataType(DataType.EmailAddress)]
    public object Email;
    [DataType(DataType.PhoneNumber), Required]
    public object Phone;
    [DataType(DataType.Text), Display(Order = -1)]
    public object Text;
    [Display(AutoGenerateField = false, Description = "This column isn't created")]
    public object AdditionalInfo;
    [DataType(DataType.Password), StringLength(20, MinimumLength = 3)]
    public object Password;
    [DisplayFormat(DataFormatString = "MMMM/yyyy"), Display(Name = "Date 2")]
    public object Date2;
    [DisplayFormat(DataFormatString = "#,##0,,M")]
    public object Sales;
    [DisplayFormat(DataFormatString = "#,##0,,M")]
    public object Profit;
    [DisplayFormat(DataFormatString = "p", ApplyFormatInEditMode = true), Display(Name = "Sales vs Target")]
    public object SalesVsTarget;
    [DisplayFormat(DataFormatString = "p0", ApplyFormatInEditMode = false)]
    public object MarketShare;
    [Display(Name = "Cust Satisfaction")]
    public object CustomersSatisfaction;
}
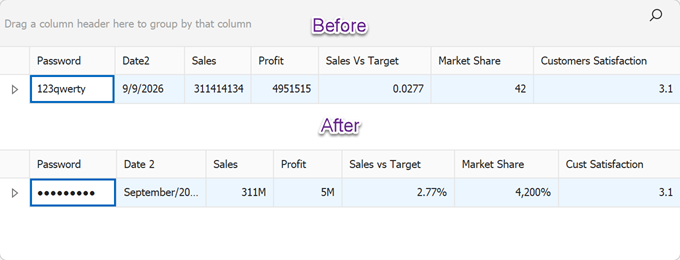
The following images show the visual difference after the attributes are apllied. For example, URLs are displayed as hyperlinks, phone numbers use masked input, and the AdditionalInfo field is excluded from automatically generated columns.
CompanyPublicInfodata: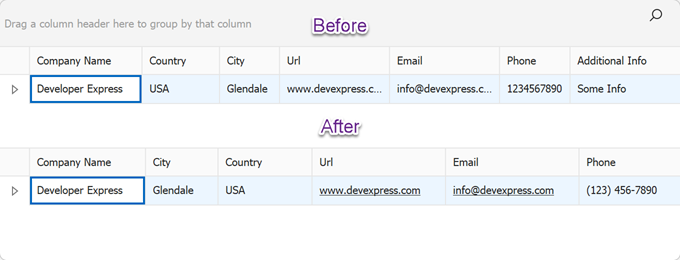
CompanyPrivateInfodata: