Items View
- 4 minutes to read
Note
We appreciate your feedback on how you build desktop UIs with HTML and CSS.
The ItemsView does not have default data representation. It renders items (records) using an HTML-CSS template that you can specify with a property, or dynamically with an event.

Note
The HTML and CSS-aware controls support a limited set of HTML tags and CSS styles, listed in the following topics:
Specify Default Template
Use the ItemsView.HtmlTemplate property to assign the default template to items. The HtmlTemplate object exposes two nested properties for this purpose:
- HtmlTemplate.Template — Specifies HTML code that defines the layout of UI elements.
- HtmlTemplate.Styles — Specifies CSS styles applied to the UI elements.
At design time, you can use the Html Template Editor to specify HTML and CSS code.

Main Features of HTML and CSS templates
- Data binding
- The
${FieldName}syntax in HTML markup inserts values of fields from the control’s data source. See Data Binding. - Images
- The
<img>HTML tag allows you to add images. - Buttons
- The HTML-CSS markup allows you to add elements to emulate buttons.
- Inplace Editors
- The
<input>tag allows you to embed in-place editors (Repository Items) into items to display and edit data source fields.
<input name="repositoryItemButtonEdit1" value="${Price}" class="editor"/>
Ensure the ColumnViewOptionsBehavior.Editable option is enabled to activate in-place editors on a mouse click.
At design time, you can use the “In-place Editor Repository” page in the Data Grid’s Designer to create and customize in-place editors:
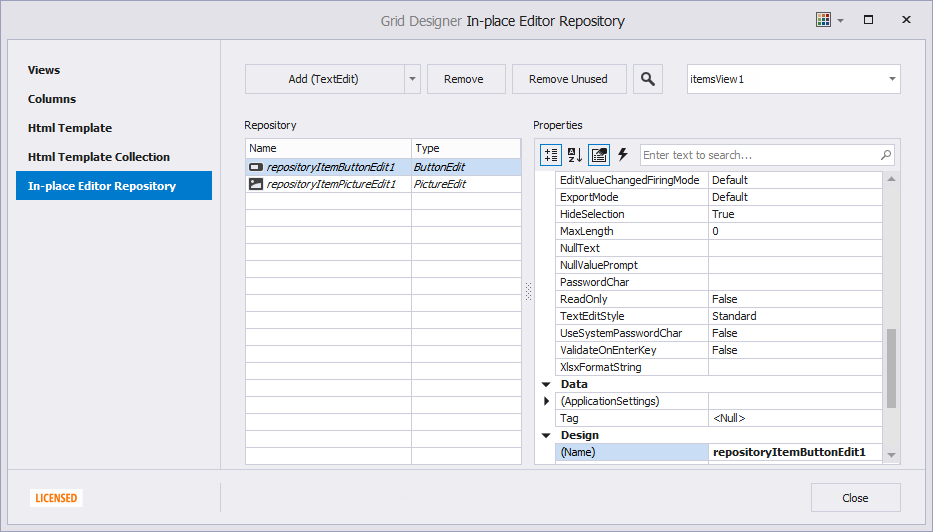
See the following topic for more information: HTML Tags - Input.
- Mouse actions
The Items View contains events to respond to mouse actions on HTML elements: ItemsView.ElementMouseClick, ItemsView.ElementMouseDown, and ItemsView.ElementMouseUp.
You can also subscribe to mouse events for elements in HTML markup, and when using Fluent API.
See the following topic for more information: HTML-CSS-based Desktop UI.
Specify Different Templates for Different Items
Handle the ItemsView.QueryItemTemplate event to assign custom templates to individual items. This event fires repeatedly for each item.
The following ItemsView.QueryItemTemplate event handler assigns different templates to different items based on an item’s type (IsOwnMessage setting).
You can find the complete code of this sample in the following demo: Chat Client.
void OnQueryItemTemplate(object sender, QueryItemTemplateEventArgs e) {
    var message = e.Row as DevAV.Chat.Model.Message;
    if(message == null)
        return;
    if(message.IsOwnMessage)
        Styles.MyMessage.Apply(e.Template);
    else
        Styles.Message.Apply(e.Template);
    //...
}
Customize Items Dynamically
When a specific item is about to be displayed onscreen, the Item View raises the ItemsView.CustomizeItem event. You can handle this event to customize the style and visibility of the item’s HTML elements dynamically.
Use the event’s Element property to access HTML elements of the currently processed item. The following methods allow you to retrieve HTML elements by tag, class, and ID:
- Element.FindElementsByTag — Returns a list of HTML elements that have the specified tag.
- Element.FindElementsByClass — Returns a list of HTML elements that are of the specified class.
- Element.FindElementById — Returns an HTML element with the specified ID.
The elements returned by these methods expose properties to change element display settings. The main properties include:
- element.Hidden — Allows you to hide (collapse) the element.
- element.Disabled — Allows you to disable the element.
- element.Style — Allows you to modify CSS style properties applied to the element. This object exposes the SetBackgroundColor, SetForeColor, SetVisibility (displays an empty region instead of the element), and SetProperty methods for this purpose.
The following example changes visibility of HTML elements according to custom logic.
You can find the complete code of this sample in the following demo: Chat Client.
//CustomizeItem event handler:
void OnCustomizeItem(object sender, CustomizeItemArgs e) {
    //...
    if(message.IsLiked) {
        var btnLike = e.Element.FindElementById("btnLike");
        var btnMore = e.Element.FindElementById("btnMore");
        if(btnLike != null && btnMore != null) {
            btnLike.Hidden = false;
            btnMore.Hidden = true;
        }
    }
    if(message.IsFirstMessageOfBlock)
        return;
    if(!message.IsOwnMessage) {
        var avatar = e.Element.FindElementById("avatar");
        if(avatar != null)
            //Display an empty region instead of the 'avatar' element.
            avatar.Style.SetVisibility(Utils.Html.Internal.CssVisibility.Hidden);
    }
//...
}