How to: Create Separate Command UI for the Rich Text Editor
- 3 minutes to read
This topic describes how to add a Word-inspired ribbon or bar UI to the WPF Rich Text Editor.

Note
The command UI generation mechanism described in this topic is outdated and retained for backward compatibility. The WPF Rich Text Editor ships with an integrated ribbon in v17.1 and higher. This makes the XAML markup compact and more readable. See the following help topics for more information on the integrated ribbon:
Create a Rich Text Editor Application
Create a new WPF Application project and open the MainWindow.xaml file in the Visual Studio designer.
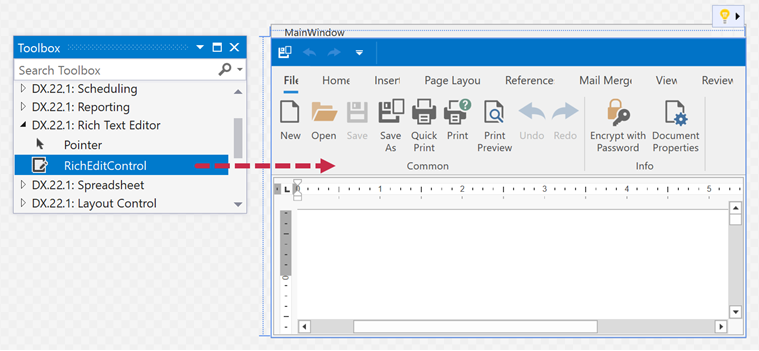
Add the RichEditControl object to your project. Drag the RichEditControl item from the DX.25.2: Rich Text Editor Toolbox tab onto the canvas.
Right-click the RichEditControl and select Layout | Reset All in the context menu to stretch the RichEditControl to fill the entire window.
Select the RichEditControl and invoke its Quick Actions. In the invoked menu, under Integrated Ribbon and Reviewing Pane, select Empty from the CommandBarStyle drop-down list to remove the integrated ribbon UI.

Create a Separate Ribbon UI
Create a BarManager around the RichEditControl as follows:
<dxb:BarManager>
    <dxre:RichEditControl x:Name="richEditControl"  />
</dxb:BarManager>
Invoke the RichEditControl’s Quick Actions menu to create individual ribbon pages. Under Create Separate Command Bars, select the ribbon page you wish to add to your application and click Create Ribbon Items. Select All to create all available ribbon pages. Refer to the following topic for more information on the WPF Ribbon Control: Ribbon.

Note
When you execute ribbon commands, these commands can throw unhandled exceptions (for example, when you attempt to save a document to a read-only or locked file). To prevent application failure, handle the RichEditControl.UnhandledException event and set the RichEditUnhandledExceptionEventArgs.Handled property to true.
Click the Window’s Quick Actions and select Convert to ThemedWindow to convert the Window to a ThemedWindow.

To change the Ribbon Style, click the RibbonControl’s Quick Actions and select Office2019 from the RibbonStyle drop-down list.

Create a Separate Bar UI
Invoke the RichEditControl’s Quick Actions menu to create individual bars. Under Create Separate Command Bars, select the bar you wish to add to your application and click Create Bars. Select All to create all available bars. Refer to the following topic for more information on WPF bars: Bars.

Note
When you execute bar commands, these commands can throw unhandled exceptions (for example, when you attempt to save a document to a read-only or locked file). To prevent application failure, handle the RichEditControl.UnhandledException event and set the RichEditUnhandledExceptionEventArgs.Handled property to true.
Click the Window’s Quick Actions and select Convert to ThemedWindow to convert the Window to a ThemedWindow.

Remove a Command UI Item
Note
This section is not applicable to the integrated Ribbon UI. Refer to the following topic for more information on how to manage the integrated ribbon elements: Customize the Integrated Ribbon UI.
To remove a command UI item in XAML, comment out or remove the bar item and bar item link (the BarItem and BarItemLink class descendants) that specify the command UI item. Refer to the following topic for the list of available bar items and links that are used to populate a bar and ribbon: The List of Bar Items and Links.
The following code sample specifies the Open button. You can remove or comment out this code to remove the Open button:
<dxb:BarButtonItem x:Name="biFileOpen" Command="{Binding FileOpen,
Mode=OneTime, Source={StaticResource commands}}"/>
<!--...-->
<dxb:BarButtonItemLink BarItemName="biFileOpen"/>
