How to: Customize Context Menus for the Rich Text Editor
- 5 minutes to read
This topic describes how to add, modify, or remove items from the WPF Rich Text Editor’s context menus.
Method 1. Use the Menu Customization Actions
To modify the Rich Text Editor’s context menus, add the required bar actions to the RichEditControl.MenuCustomizations collection. Use the RichEditMenuCustomization.MenuType property to specify the menu type you want to customize.
Add Items
To create a new menu item, add an InsertAction to the RichEditControl.MenuCustomizations collection.
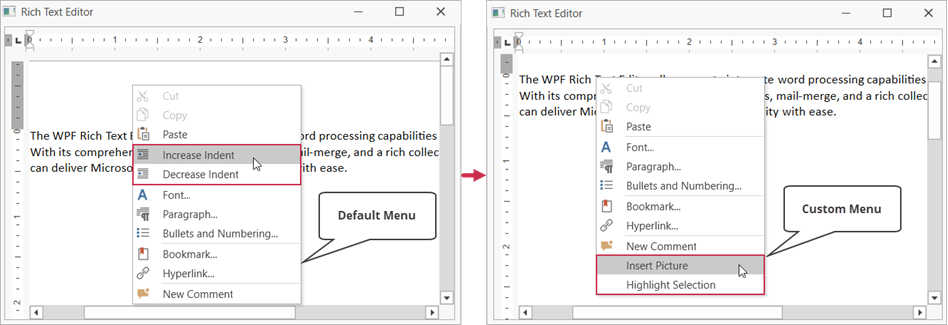
The code snippet below adds the following custom items to the Text context menu:
- A menu item separator
- A Highlight Selection item that highlights selected text in yellow
- An Insert Picture item that is bound to the Rich Text Editor’s
InsertFloatingPicturecommand

<!--Add the following namespace declarations:
xmlns:dxre="http://schemas.devexpress.com/winfx/2008/xaml/richedit"
xmlns:dxb="http://schemas.devexpress.com/winfx/2008/xaml/bars"-->

<dxre:RichEditControl Name="richTextEditor">
    <dxre:RichEditControl.MenuCustomizations>
        <dxre:RichEditMenuCustomization MenuType="Text">
            <!--Add a separator after the first three menu items.-->
            <dxb:InsertAction Index="4">
                <dxb:BarItemSeparator />
            </dxb:InsertAction>
            <!--Insert a custom menu item to highlight selected text.-->
            <dxb:InsertAction Index="5">
                <dxb:BarButtonItem Content="Highlight Selection"
                                   ItemClick="HighlightSelection_ItemClick" />
            </dxb:InsertAction>
            <!--Add a new item to the end of the context menu
            and bind this item to the Rich Text Editor's command.-->
            <dxb:BarButtonItem Command="{Binding RelativeSource={RelativeSource Self}, Mode=OneWay,
                Path=(dxre:RichEditControl.RichEdit).CommandProvider.InsertFloatingPicture}"
                Content="Insert Picture" />
        </dxre:RichEditMenuCustomization>
    </dxre:RichEditControl.MenuCustomizations>
</dxre:RichEditControl>
Handle the Highlight Selection item’s ItemClick event as shown below.
using DevExpress.XtraRichEdit.API.Native;
// ...

private void HighlightSelection_ItemClick(object sender, DevExpress.Xpf.Bars.ItemClickEventArgs e) {
    var selectedRanges = richTextEditor.Document.Selections;
    foreach (var range in selectedRanges) {
        var charProps = richTextEditor.Document.BeginUpdateCharacters(range);
        charProps.BackColor = System.Drawing.Color.Yellow;
        richTextEditor.Document.EndUpdateCharacters(charProps);
    }
}
Modify Items
To change an existing menu item, add an UpdateAction to the RichEditControl.MenuCustomizations collection. Specify the item name, the property you want to modify, and the new property value. Item names are the DevExpress.Xpf.RichEdit.DefaultBarItemNames class fields that start with “PopupMenuItem_”.
The following code snippet changes the New Comment item’s caption to Add Comment:
<!--Add the following namespace declarations:
xmlns:dxre="http://schemas.devexpress.com/winfx/2008/xaml/richedit"
xmlns:dxb="http://schemas.devexpress.com/winfx/2008/xaml/bars"-->

<dxre:RichEditControl Name="richTextEditor">
    <dxre:RichEditControl.MenuCustomizations>
        <dxre:RichEditMenuCustomization MenuType="Text">
            <!--Change the "New Comment" item's content.-->
            <dxb:UpdateAction ElementName="{x:Static dxre:DefaultBarItemNames.PopupMenuItem_NewComment}"
                              PropertyName="Content"
                              Value="Add Comment"/>
        </dxre:RichEditMenuCustomization>
    </dxre:RichEditControl.MenuCustomizations>
</dxre:RichEditControl>
Remove Items
To delete an item from the menu, add a RemoveAction to the RichEditControl.MenuCustomizations collection and specify the item name. Item names are the DevExpress.Xpf.RichEdit.DefaultBarItemNames class fields that start with “PopupMenuItem_”.
The following code snippet removes two items from the Text menu:
<!--Add the following namespace declarations:
xmlns:dxre="http://schemas.devexpress.com/winfx/2008/xaml/richedit"
xmlns:dxb="http://schemas.devexpress.com/winfx/2008/xaml/bars"-->

<dxre:RichEditControl Name="richTextEditor">
    <dxre:RichEditControl.MenuCustomizations>
        <dxre:RichEditMenuCustomization MenuType="Text">
            <!--Remove the "Increase Indent" item from the menu.-->
            <dxb:RemoveAction ElementName="{x:Static dxre:DefaultBarItemNames.PopupMenuItem_IncreaseIndent}"/>
            <!--Remove the "Decrease Indent" item from the menu.-->
            <dxb:RemoveAction ElementName="{x:Static dxre:DefaultBarItemNames.PopupMenuItem_DecreaseIndent}"/>
        </dxre:RichEditMenuCustomization>
    </dxre:RichEditControl.MenuCustomizations>
</dxre:RichEditControl>
Method 2. Handle the PopupMenuShowing Event
Handle the RichEditControl.PopupMenuShowing event to customize the Rich Text Editor’s context menus in code-behind. The PopupMenuShowingEventArgs.MenuType argument allows you to determine the menu type for which the event is raised.
Use the PopupMenuShowingEventArgs.Customizations property to add or remove menu items.
The example below customizes the Text context menu as follows:
- Creates new Highlight Selection and Insert Picture items
- Removes the Increase Indent and Decrease Indent items
<dxre:RichEditControl Name="richTextEditor"
                      PopupMenuShowing="richTextEditor_PopupMenuShowing">
using DevExpress.XtraRichEdit.API.Native;
using DevExpress.Xpf.RichEdit;
using DevExpress.Xpf.Bars;
using DevExpress.Xpf.RichEdit.Menu;
using DevExpress.XtraRichEdit.Commands;
// ...

private void richTextEditor_PopupMenuShowing(object sender, PopupMenuShowingEventArgs e) {
    // Check whether the event is raised for document text.
    if (e.MenuType == RichEditMenuType.Text) {
        // Create a menu item to insert a picture
        // and bind this item to the Rich Text Editor's command.
        e.Customizations.Add(new BarButtonItem() {
            Command = RichEditUICommand.InsertFloatingPicture,
            Content = "Insert Picture",
            CommandParameter = richTextEditor
        });

        // Create a custom menu item to highlight selected text.
        var menuItem = new BarButtonItem() {
            Name = "highlightSelectionItem",
            Content = "Highlight Selection"
        };
        menuItem.ItemClick += MenuItem_ItemClick; ;
        e.Customizations.Add(menuItem);
    }

    // Remove the "Increase Indent" item from the menu.
    e.Customizations.Add(new RemoveRichEditCommandAction() {
        Id = RichEditCommandId.IncreaseIndent
    });

    // Remove the "Decrease Indent" item from the menu.
    e.Customizations.Add(new RemoveRichEditCommandAction() {
        Id = RichEditCommandId.DecreaseIndent
    });
}

private void MenuItem_ItemClick(object sender, ItemClickEventArgs e) {
    var selectedRanges = richTextEditor.Document.Selections;
    foreach (var range in selectedRanges) {
        var charProps = richTextEditor.Document.BeginUpdateCharacters(range);
        charProps.BackColor = System.Drawing.Color.Yellow;
        richTextEditor.Document.EndUpdateCharacters(charProps);
    }
}