Ribbon Application Menu
- 5 minutes to read
The Ribbon Application Button located at the top-left corner of the application window provides access to the Ribbon Application Menu. This menu contains the most common application commands.

The Ribbon Application Menu provides three style options:
Office 2019/Office 2016/Office 2016 Tablet/Office 2013 Application Menu (also called Office 2019/2016/2013 Backstage View);
Office 2010 Application Menu (also called Office 2010 Backstage View);
Office 2007 Application Menu.
These styles are described in detail below.
Office 2019/2016/2013 Backstage View
This menu style complements the Office 2019 Ribbon, Office 2016 Ribbon, Office 2016 Tablet Ribbon, and Office 2013 Ribbon styles.
To apply this Application Menu style, set a Ribbon control’s Style property to rsOffice365, rs2019, rs2016, rs2016Tablet, or rs2013 and link the TdxRibbonBackstageView component to the Ribbon control’s ApplicationButton.Menu property.
Office 2010 Backstage View
This menu style complements the Office 2010 Ribbon style.

To apply this Application Menu style, set a Ribbon control’s Style property to rs2010 and link the TdxRibbonBackstageView component (![]() ) to the Ribbon’s ApplicationButton.Menu property.
) to the Ribbon’s ApplicationButton.Menu property.
Office 2007 Application Menu
This menu style complements the Office 2007 Ribbon and Windows Scenic Ribbon styles.
To apply this Application Menu style, link the TdxBarApplicationMenu component ( ) to the Ribbon’s ApplicationButton.Menu property.
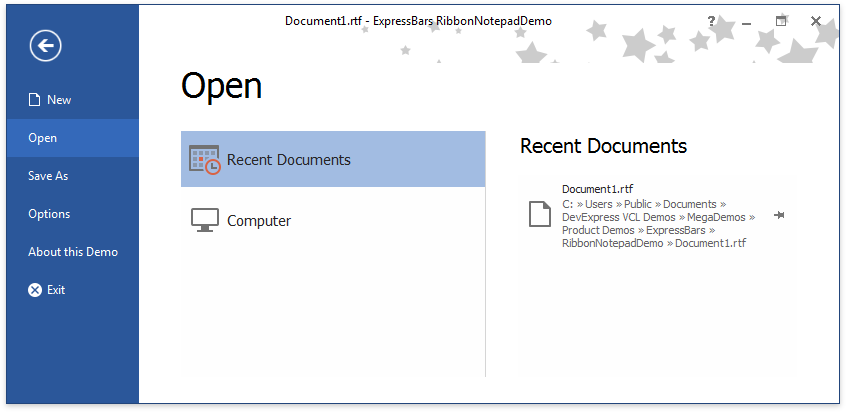
Visually, any of these Application Menus are divided into two panes:
The main menu (left pane).
The extra pane (right panel) that contains a list of controls or shortcuts, such as recently used files.
Office 2019/2016/2013/2010 Main Menu Customization
To build a new Office 2019, Office 2016, Office 2016 Tablet, Office 2013, or Office 2010 menu, do the following:
1.Make certain that the bar manager and Ribbon control – the TdxBarManager (![]() ) and TdxRibbon (
) and TdxRibbon ( ) components – are on a form, and the required menu items are created as commands in the bar manager. For details, see the Customization Form topic.
2.Drop the Office 2019/2016/2013/2010 Ribbon Application Menu – the TdxRibbonBackstageView (![]() ) component – from the Component Palette’s ExpressBars page onto the form. The Ribbon control residing on the form will be automatically linked to the menu’s Ribbon property, while the bar manager will be referenced via the Ribbon.BarManager property.
) component – from the Component Palette’s ExpressBars page onto the form. The Ribbon control residing on the form will be automatically linked to the menu’s Ribbon property, while the bar manager will be referenced via the Ribbon.BarManager property.
- The main menu can include any number of tabs and buttons. Tabs provide access to individual pages, which are containers for the controls to be displayed within the menu’s extra pane, while buttons execute specific bar button commands.
You can create as many tabs (i.e., pages) as required, using the Ribbon Application menu’s context menu. To accomplish this, select the Ribbon Application menu on the form, invoke the menu’s context menu, and click Add Tab or Delete Tab.

To create buttons, switch to the Object Inspector and click the ellipsis button next to the menu’s Buttons property. In the collection editor, select a button to display its properties within the Object Inspector. With the properties, link the button to a specific item and adjust the button’s position within the main menu.

- Select the Ribbon control and bind the newly created menu to the Ribbon Application Button via the Ribbon’s ApplicationButton.Menu property.
Office 2007 Main Menu Customization
To build a new Office 2007 menu, do the following:
Make certain that the bar manager
 component is on a form, and the required menu items are defined. For details, see the Customization Form topic.
Drop the Ribbon Application Menu – TdxBarApplicationMenu (
) or TdxRibbonBackstageView ( ) component – from the Component Palette’s ExpressBars page onto the form. The bar manager will be automatically linked to the menu’s BarManager property. The Ribbon property of the TdxRibbonBackstageView menu will be automatically linked to the Ribbon control residing on the form.
In the Object Inspector, click the ellipsis button next to the menu’s ItemLinks property to invoke the Customization Form and the menu designer. Drag menu items from the Customization Form into the menu designer.

- Select the Ribbon control and bind the newly created menu to the Ribbon Application Button via the Ribbon’s ApplicationButton.Menu property.
Extra Pane Customization
Depending on the menu component used (TdxRibbonBackstageView or TdxBarApplicationMenu), you can customize its extra pane as follows:
In the TdxRibbonBackstageView menu, the extra pane displays the content of the currently active tab page. A page is a tabbed container for other controls. You can create any number of tab pages and populate them with visual controls, such as buttons, editors from the ExpressEditors Library, other container controls, etc. In addition, you can add one or more Backstage View galleries (TdxRibbonBackstageViewGalleryControl components) to create extra panes similar to those found in Microsoft Office 2010 (or later) Backstage View. To respond to control clicks within the TdxRibbonBackstageView menu, handle the corresponding control events and the Backstage View gallery’s OnItemClick event.
In the TdxBarApplicationMenu menu, the extra pane is populated via the menu’s ExtraPane.Items collection property. To inform end-users about this collection’s purpose, provide it with a header using the menu’s ExtraPane.Header property. To respond to collection item clicks, handle the menu’s ExtraPane.OnItemClick event.
Refer to the RibbonNotepadDemo shipped with the ExpressBars Suite for examples on how to create Ribbon Application Menus and populate them with items.