Reviewing Pane
- 3 minutes to read
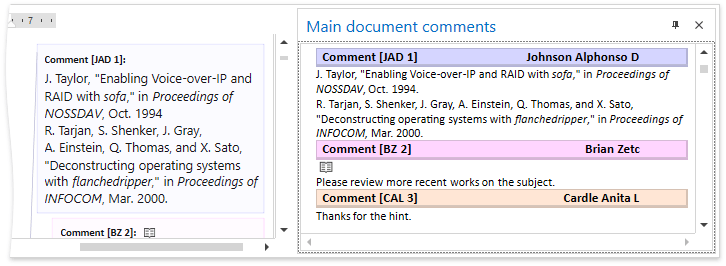
The Reviewing Pane displays all comments contained in the document and allows end users to navigate throughout the comments as well as modify them.

Clicking the Reviewing Pane button on the Review ribbon tab invokes the Reviewing Pane. To learn how to provide the application with the Ribbon Command UI, refer to the Lesson 5 - Create Separate Ribbon Pages for a Rich Text Editor topic.

End users can hide the pane leaving its header visible or close it by clicking AutoHide or Close
 button. Clicking the Reviewing Pane button re-opens the pane.
Double-clicking the pane header undocks it from the current position. End users can move the Reviewing Pane to the desired position by drag-and-dropping it to the target location.
Create a Reviewing Pane
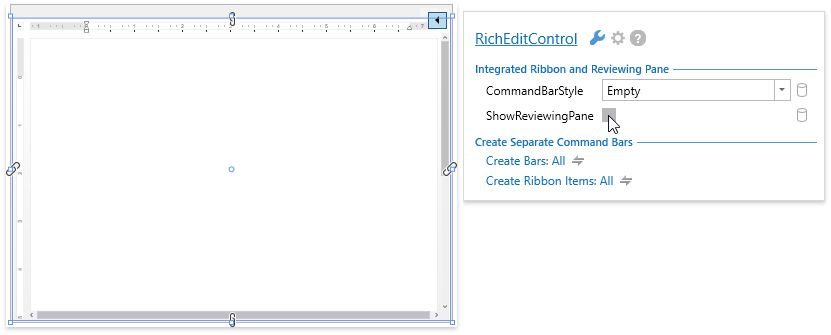
To provide the application with the built-in Reviewing Pane, in the designer mode, click the RichEditControl’s smart tag and check ShowReviewingPane box. As a result, an integrated Reviewing Pane is shown when running the application.

To create a separate Reviewing Pane, right-click the RichEditControl on the form and select Create Reviewing Pane. After that, your XAML code should look like the following (if it does not, you can overwrite your code):
<dxdo:DockLayoutManager x:Name="dockLayoutManager1">
      <dxdo:LayoutGroup Orientation="Horizontal">
          <dxdo:LayoutPanel
                    x:Name="layoutPanel1"
                    Caption="Main document comments"
                    MaxWidth="350"
                    MinWidth="100">
              <dxre:RichEditCommentControl
                       x:Name="richEditCommentControl1"
                       DockLayoutManager="{Binding ElementName=dockLayoutManager1, Mode=OneTime}"
                       HorizontalAlignment="Stretch"
                       LayoutPanel="{Binding ElementName=layoutPanel1, Mode=OneTime}"
                       MinWidth="100"
                       RichEditControl="{Binding ElementName=richEditControl1, Mode=OneTime}"
                       VerticalAlignment="Stretch"/>
          </dxdo:LayoutPanel>
          <dxdo:DocumentPanel x:Name="documentPanel1">
              <dxre:RichEditControl
                       x:Name="richEditControl1"
                       HorizontalAlignment="Stretch"
                       Margin="0" ShowBorder="False"
                       VerticalAlignment="Stretch"
                       ShowReviewingPane="True"
                       CommandBarStyle="Ribbon"
                       Loaded="DXRibbonWindow_Loaded"/>
          </dxdo:DocumentPanel>
      </dxdo:LayoutGroup>
</dxdo:DockLayoutManager>
Note
To avoid overlapping the custom Reviewing Pane with a built-in one, set the RichEditControl.UseBuiltInReviewingPane property to false.
Customize the Reviewing Pane
Reviewing Pane is represented by the DockPanel with the RichEditCommentControl on it. To change the pane display settings, access the DockLayoutManager containing the Reviewing Pane by its name using the FrameworkElement.FindName method. The DockLayoutManager name can be accessed using the RichEditControl.DockLayoutManagerName property. The code sample below shows how to dock the reviewing pane to the right and auto-hide it.
//Access the DockLayoutManager in the template:
string name = RichEditControl.DockLayoutManagerName;
DockLayoutManager manager = (DockLayoutManager)richEdit.Template.FindName(name, richEdit);

//Retireve the Reviewing Pane
LayoutPanel commentPanel = manager.LayoutRoot.Items[0] as LayoutPanel;
DocumentPanel documentPanel = manager.LayoutRoot.Items[1] as DocumentPanel;

//Dock panel to the right
manager.DockController.Dock(commentPanel, documentPanel, DockType.Right);

//Hide the pane to the tab
commentPanel.AutoHidden = true;

//Disable floating
commentPanel.AllowFloat = false;