DxUpload Class
An Upload component.
Namespace: DevExpress.Blazor
Assembly: DevExpress.Blazor.v21.1.dll
NuGet Package: DevExpress.Blazor
Declaration
public class DxUpload :
    DxComponentBase<UploadJSInteropProxy>,
    IUploadJSInteropProxyServer,
    IJSCallback,
    IUploadViewOwner,
    IRequireSelfCascading
Remarks
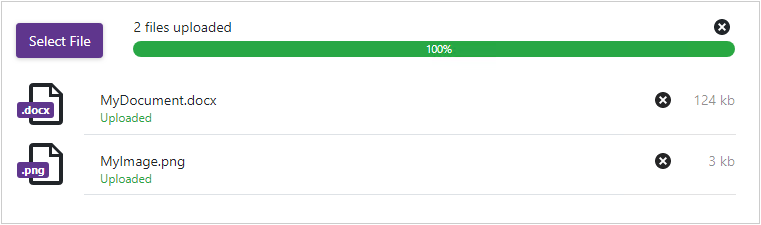
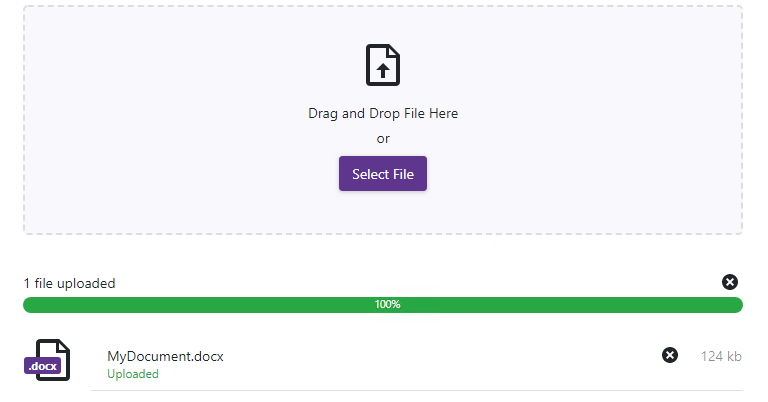
The DevExpress Upload for Blazor (<DxUpload>) allows users to upload files to the server. Users can select files in the open file dialog or drag and drop files to the drop zone.
Add an Upload to a Project
Follow the steps below to add the Upload component to an application:
- Use a DevExpress Project Template to create a new Blazor Server or Blazor WebAssembly application. If you use a Microsoft project template or already have a Blazor project, configure your project to incorporate DevExpress Blazor components.
- Add the
<DxUpload>...</DxUpload>markup to your application. - Connect the Upload to the server.
- Create a controller on the server.
- Specify other Upload options (see the sections below).
How File Upload Works
Once a user selected a file, the Upload packs the file into an Ajax request and sends this request to the server (the upload controller).
The controller’s upload action processes this file and sends a response to the Upload. The Upload displays the response result, for instance, shows the Uploaded text if the file was uploaded successfully.
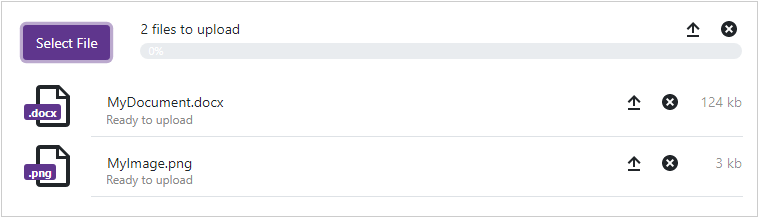
Users can click the cancel button to interrupt file upload and remove files from the list. To hide the cancel button, set the AllowCancel property to false.
The SelectedFilesChanged event occur each time the file list is changed. You can also handle other events to respond to file upload. Set the ShowFileList property to false to hide the file list.
Connect the Upload to the Server
- Specify the Upload’s Name property. Its value is required to access uploaded files on the server.
- Set the UploadUrl property to a path of a server-side controller’s action that processes upload requests.
<DxUpload Name="myFile" UploadUrl="https://localhost:10000/api/Upload/UploadFile/">
</DxUpload>
Create an Upload Controller on the Server
Follow the steps from the table below to create an Upload controller based on the application type and file system location.
Application/ File System | Steps |
|---|---|
Blazor Server application |
|
Blazor WebAssembly application (with an ASP.NET Core backend). |
|
Remote file system on another server or Blazor WebAssembly application (without backend) |
|
Implement a Controller Action
Create a controller action that accepts the file, checks it, and saves to the target location. You can access the file in one of the following ways:
Create an action with a parameter whose name matches the Upload’s Name property value.
public ActionResult UploadFile(IFormFile myFile) {
    // ...
}
Use the Name property value to get the uploaded file from form variables.
public ActionResult UploadFile() {
    // ...
    var myFile = Request.Form.Files["myFile"];
    // ...
}
The following example demonstrates how to implement the upload controller:
using System.IO;
using Microsoft.AspNetCore.Hosting;
using Microsoft.AspNetCore.Http;
using Microsoft.AspNetCore.Mvc;

[Route("api/[controller]")]
public class UploadController : ControllerBase {
    private readonly IWebHostEnvironment _hostingEnvironment;

    public UploadController(IWebHostEnvironment hostingEnvironment) {
        _hostingEnvironment = hostingEnvironment;
    }

    [HttpPost]
    [Route("UploadFile")]
    // "myFile" is the value of the Upload's "Name" property.
    public ActionResult UploadFile(IFormFile myFile) {
        try {
            // Specify the target location for the uploaded files.
            var path = Path.Combine(_hostingEnvironment.WebRootPath, "uploads");
            // Check whether the target directory exists; otherwise, create it.
            if (!Directory.Exists(path))
                Directory.CreateDirectory(path);
            using (var fileStream = System.IO.File.Create(Path.Combine(path, myFile.FileName))) {
                // Check the file here (its extension, safity, and so on).
                // If all checks are passed, save the file.
                myFile.CopyTo(fileStream);
            }
        } catch {
            Response.StatusCode = 400;
        }

        return new EmptyResult();
    }
}
Configure Routing for a Blazor Server Application
Configure routing to the controller action in the Startup.cs file as shown below.
using Microsoft.AspNetCore.Builder;
using Microsoft.AspNetCore.Hosting;
using Microsoft.AspNetCore.Mvc;
using Microsoft.Extensions.DependencyInjection;
using Microsoft.Extensions.Hosting;
// ...
public class Startup {

    public void ConfigureServices(IServiceCollection services) {
        // ...
        services.AddMvc(options => options.EnableEndpointRouting = false)
            .SetCompatibilityVersion(CompatibilityVersion.Version_3_0);
        // ...
    }

    public void Configure(IApplicationBuilder app, IWebHostEnvironment env, ILoggerFactory loggerFactory) {
        // ...
        app.UseRouting();
        app.UseMvcWithDefaultRoute();
        app.UseEndpoints(endpoints => {
            endpoints.MapBlazorHub();
            endpoints.MapFallbackToPage("/_Host");
        });
        // ...
    }
}
Enable CORS for a Web API Application
For security reasons, browsers do not allow web pages to send requests to different domains (the same-origin policy). The Upload component and the Web API application cannot communicate because they have different domains.
To enable cross-origin requests, configure the Web API application as follows:
In the Startup.cs file, specify the CORS policy name and call the AddCors method to apply this policy. Call the UseCors method between the UseRouting and UseAuthorization method calls to add the CORS middleware.
using Microsoft.AspNetCore.Builder;
using Microsoft.AspNetCore.Hosting;
using Microsoft.Extensions.DependencyInjection;
using Microsoft.Extensions.Hosting;
// ...
public class Startup {
    readonly string MyAllowSpecificOrigins = "_myAllowSpecificOrigins";

    public void ConfigureServices(IServiceCollection services) {
        // ...
        services.AddCors(options => {
                options.AddPolicy(MyAllowSpecificOrigins,
                builder => {
                    builder.AllowAnyOrigin();
                });
            });
    }

    public void Configure(IApplicationBuilder app, IWebHostEnvironment env,
        ILoggerFactory loggerFactory) {
        // ...
        app.UseRouting();
        app.UseCors(MyAllowSpecificOrigins);
        app.UseAuthorization();
        // ...
    }
}
Apply the EnableCors attribute to the Upload controller with the policy name specified above.
[ApiController]
[EnableCors("_myAllowSpecificOrigins")]
[Route("api/[controller]")]
public class UploadController : ControllerBase {
    // ...
}
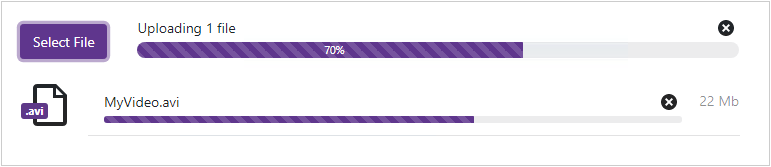
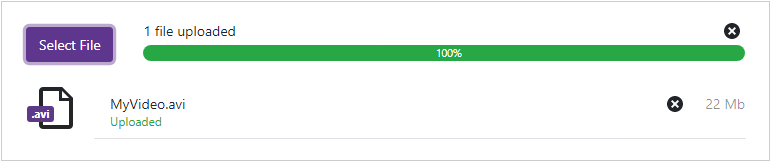
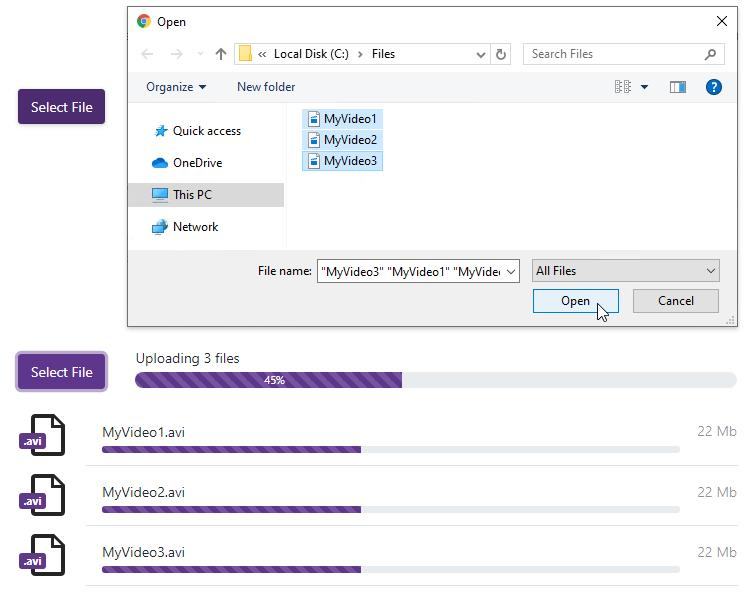
Chunk Upload for Large Files
The Upload can split large files into small packets and send them to the server in multiple requests (one by one). To enable chunk upload, set the ChunkSize property to a positive value that specifies the packet size in bytes.
<DxUpload Name="myFile" UploadUrl="https://localhost:10000/api/Upload/UploadFile/"
          ChunkSize="1000000">
</DxUpload>
You should configure your upload controller to process file chunks. To access the uploaded file, use the Upload’s Name property value. To get information about the file chunk, use chunk metadata serialized to a JSON object (see the CnunkMetadata class in the example below).
To access file and chunk metadata, use the following ways:
Create an action with two parameters. The first parameter’s name should match the Name property value. The second parameter should be a string that defines chunk metadata serialized to JSON.
public ActionResult UploadFile(IFormFile myFile, string chunkMetadata) {
    // ...
    var metaDataObject = JsonConvert.DeserializeObject<ChunkMetadata>(chunkMetadata);
    // ...
}
Get the uploaded file and chunk metadata from form variables.
public ActionResult UploadFile() {
    // ...
    var myFile = Request.Form.Files["myFile"];
    var chunkMetadata = Request.Form["chunkMetadata"];
    var metaDataObject = JsonConvert.DeserializeObject<ChunkMetadata>(chunkMetadata);
    // ...
}
In the upload action, merge chunks and save the resulting file to the target location.
using System;
using System.IO;
using System.Linq;
using System.Text.Json;
using Microsoft.AspNetCore.Hosting;
using Microsoft.AspNetCore.Http;
using Microsoft.AspNetCore.Mvc;

// Declare a class that stores chunk details.
public class ChunkMetadata {
    public int Index { get; set; }
    public int TotalCount { get; set; }
    public int FileSize { get; set; }
    public string FileName { get; set; }
    public string FileType { get; set; }
    public string FileGuid { get; set; }
}

[Route("api/[controller]")]
public class UploadController : ControllerBase {
    private readonly IWebHostEnvironment _hostingEnvironment;

    public UploadController(IWebHostEnvironment hostingEnvironment) {
        _hostingEnvironment = hostingEnvironment;
    }

    [HttpPost]
    // "myFile" is the value of the Upload's "Name" property.
    public ActionResult UploadChunkFile(IFormFile myFile, string chunkMetadata) {
        // Specify the location for temporary files.
        var tempPath = Path.Combine(_hostingEnvironment.WebRootPath, "uploads");
        // Remove temporary files.
        RemoveTempFilesAfterDelay(tempPath, new TimeSpan(0, 5, 0));

        try {
            if (!string.IsNullOrEmpty(chunkMetadata)) {
                // Get chunk details.
                var metaDataObject = JsonConvert.DeserializeObject<ChunkMetadata>(chunkMetadata);
                // Specify the full path for temporary files (inluding the file name).
                var tempFilePath = Path.Combine(tempPath, metaDataObject.FileGuid + ".tmp");
                // Check whether the target directory exists; otherwise, create it.
                if (!Directory.Exists(tempPath))
                    Directory.CreateDirectory(tempPath);
                // Append the chunk to the file.
                AppendChunkToFile(tempFilePath, myFile);
                // Save the file if all chunks are received.
                if (metaDataObject.Index == (metaDataObject.TotalCount - 1))
                    SaveUploadedFile(tempFilePath, metaDataObject.FileName);
            }
        } catch {
            return BadRequest();
        }
        return Ok();
    }
    void AppendChunkToFile(string path, IFormFile content) {
        using(var stream = new FileStream(path, FileMode.Append, FileAccess.Write)) {
            content.CopyTo(stream);
        }
    }
    void SaveUploadedFile(string tempFilePath, string fileName) {
        var path = Path.Combine(_hostingEnvironment.WebRootPath, "uploads");
        System.IO.File.Copy(tempFilePath, Path.Combine(path, fileName));
    }
    void RemoveTempFilesAfterDelay(string path, TimeSpan delay) {
        var dir = new DirectoryInfo(path);
        if(dir.Exists)
            foreach(var file in dir.GetFiles("*.tmp").Where(f => f.LastWriteTimeUtc.Add(delay) < DateTime.UtcNow))
                file.Delete();
    }
}
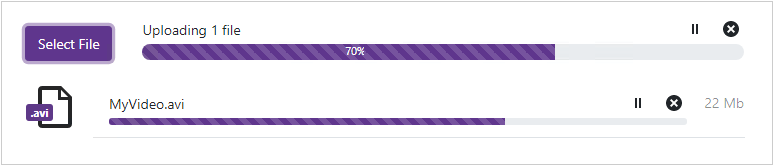
Users can pause and cancel file upload. To hide the pause and cancel buttons, set the AllowPause and AllowCancel properties to false.
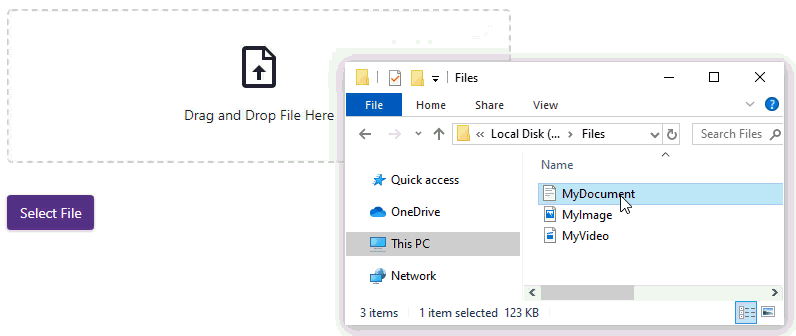
Drag and Drop
To enable drag and drop in the Upload, implement an external zone where users can drop a file to upload. Use the following properties to define the drop zone UI:
- ExternalDropZoneCssSelector - Specifies the CSS selector of a container or HTML element where to drop the files.
- ExternalDropZoneDragOverCssClass - Specifies the CSS class of the drop zone when users drag files over it.
<div id="overviewDemoDropZone" class="card custom-drop-zone jumbotron">
    <svg class="drop-file-icon mb-3" role="img" style="width: 42px; height: 42px;"><use href="#drop-file-icon"></use></svg>
    <span>Drag and Drop File Here</span>
</div>
<DxUpload Name="myFile" UploadUrl="https://localhost:10000/api/Upload/UploadFile/"
          ExternalDropZoneCssSelector="#overviewDemoDropZone"
          ExternalDropZoneDragOverCssClass="custom-drag-over border-light text-white">
</DxUpload>
Multiple File Upload
Set the AllowMultiFileUpload property to true to enable users to upload multiple files at once (asynchronously).
<DxUpload Name="myFile" UploadUrl="https://localhost:10000/api/Upload/UploadFile/"
          AllowMultiFileUpload="true">
</DxUpload>
Upload Modes
The Upload uploads files after a user selects or drops them (UploadMode.Instant). Set the UploadMode property to UploadMode.OnButtonClick to upload files after the user clicks the upload button.
<DxUpload Name="myFile" UploadUrl="https://localhost:10000/api/Upload/UploadFile/"
          UploadMode="UploadMode.OnButtonClick">
</DxUpload>
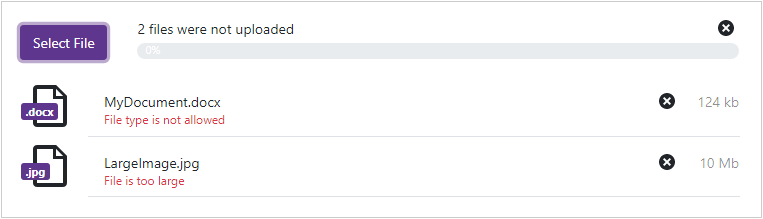
Validation
Client-Side Validation
Use the following Upload properties to validate uploaded files on the client:
- MaxFileSize/MinFileSize - Specifies the maximum/minimum allowed file size in bytes.
- AcceptedFileTypes - Lists allowed MIME file types.
- AllowedFileExtensions - Lists allowed file extensions.
<DxUpload Name="myFile" UploadUrl="https://localhost:10000/api/Upload/UploadFile/"
          AllowedFileExtensions="@(new List<string> { ".jpg", ".jpeg", ".gif", ".png" })"
          MaxFileSize="4000000">
</DxUpload>
If validation fails, the Upload displays an error message.
Server-Side Validation
You can also validate uploaded files on the server side (in the controller action). The following example shows how to check file extensions:
using System.IO;
using System.Linq;
using Microsoft.AspNetCore.Hosting;
using Microsoft.AspNetCore.Http;
using Microsoft.AspNetCore.Mvc;

[Route("api/[controller]")]
public class UploadController : ControllerBase {
    private readonly IWebHostEnvironment _hostingEnvironment;

    public UploadController(IWebHostEnvironment hostingEnvironment) {
        _hostingEnvironment = hostingEnvironment;
    }

    [HttpPost]
    // "myFile" is the value of the Upload's "Name" property.
    public ActionResult UploadImage(IFormFile myFile) {
        try {
            // Specify the allowed file extensions.
            string[] imageExtensions = { ".jpg", ".jpeg", ".gif", ".png" };
            // Check the accepted file's extension.
            var fileName = myFile.FileName.ToLower();
            var isValidExtenstion = imageExtensions.Any(ext => {
                return fileName.LastIndexOf(ext) > -1;
            });
            // Save the file if it passed validation.
            if(isValidExtenstion) {
                var path = Path.Combine(_hostingEnvironment.WebRootPath, "uploads");
                if(!Directory.Exists(path))
                    Directory.CreateDirectory(path);
                using(var fileStream = System.IO.File.Create(Path.Combine(path, myFile.FileName))) {
                    myFile.CopyTo(fileStream);
                }
            }
        } catch {
            Response.StatusCode = 400;
        }

        return new EmptyResult();
    }
}
Select Button Customization
Use the SelectButtonText property to change the Select File button’s text.
<DxUpload Name="myFile" UploadUrl="https://localhost:10000/api/Upload/UploadFile/"
          SelectButtonText="Select My File">
</DxUpload>

To hide the select button, set the ShowSelectButton property to false.
You can also implement an external select button that invokes the open file dialog. Use the ExternalSelectButtonCssSelector to specify the CSS selector of a button or another HTML element.
The following example demonstrates how to implement the external Select File button and drop zone container. Handle the SelectedFilesChanged event and use the Visible property to hide the Upload when the file list is empty.
<div id="overviewDemoDropZone" class="card custom-drop-zone jumbotron">
    <svg class="drop-file-icon mb-3" role="img" style="width: 42px; height: 42px;"><use href="#drop-file-icon"></use></svg>
    <span>Drag and Drop File Here</span><span class="m-1">or</span>
    <button id="overviewDemoSelectButton" class="btn border-primary btn-primary m-1">Select File</button>
</div>
<DxUpload Name="myFile" UploadUrl="https://localhost:10000/api/Upload/UploadFile/"
          Visible="@UploadVisible"
          ExternalSelectButtonCssSelector="#overviewDemoSelectButton"
          ExternalDropZoneCssSelector="#overviewDemoDropZone"
          ExternalDropZoneDragOverCssClass="custom-drag-over border-light text-white"
          SelectedFilesChanged="@SelectedFilesChanged">
</DxUpload>

@code {
    bool UploadVisible { get; set; } = false;

    protected void SelectedFilesChanged(IEnumerable<UploadFileInfo> files) {
        UploadVisible = files.ToList().Count > 0;
        InvokeAsync(StateHasChanged);
    }
}
Respond to File Upload
Handle the following events to respond to file upload process:
Event | Description |
|---|---|
Fires when file upload is about to start. | |
Fires when file upload starts. | |
Fires when a file is uploaded successfully. | |
Fires when file upload is aborted. | |
Fires when file upload is paused. | |
Fires when an error occurs during file upload. | |
Fires when a file is reloaded. | |
Fires when the upload progress changes. |