DxFormLayoutItem Class
A layout item that can display a nested control.
Namespace: DevExpress.Blazor
Assembly: DevExpress.Blazor.v21.1.dll
NuGet Package: DevExpress.Blazor
Declaration
public class DxFormLayoutItem :
    ComponentBase,
    IFormLayoutItem,
    IDisposable,
    IFieldNameAccessor
Remarks
Use DxFormLayoutItem instances to organize data editors within the Form Layout component.
To create a layout item, add the <DxFormLayoutItem>...</DxFormLayoutItem> markup to the <DxFormLayout> component’s root or combine items in groups or tabs.
Bind to Data
You can bind the Form Layout to a data source. Use the item’s Field property to bind a layout item to a data source field. After that, the Form Layout tries to determine the corresponding data field’s type. If the component can determine the type, it auto-generates and displays the corresponding editor within the layout item. Otherwise, the item displays the Text Box component.
<DxFormLayout Data="@editFormData"
              ItemUpdating="@((pair) => OnItemUpdating(pair.Key, pair.Value))">
    <DxFormLayoutItem Field="@nameof(FormDataItem.Name)" Caption="Contact Name:" />
    <DxFormLayoutItem Field="@nameof(FormDataItem.BirthDate)" Caption="Birth Date:" />
    <DxFormLayoutItem Field="@nameof(FormDataItem.YearsWorked)" Caption="Years Worked:" />
    <DxFormLayoutItem Field="@nameof(FormDataItem.Position)" Caption="Position:" />
    <DxFormLayoutItem Field="@nameof(FormDataItem.OnVacation)" Caption="On Vacation:" ColSpanMd="6" />
</DxFormLayout>

@code {
    FormDataItem editFormData = new FormDataItem() {
        Name = "Nancy Davolio",
        BirthDate = DateTime.Now.AddYears(-30),
        YearsWorked = 3,
        Position = "Sales Representative"
    };
}
Customize Layout
To create a layout item with a custom data editor, add this editor to the layout item’s template. The Template tag can be omitted.
<DxFormLayout>
    // These two items are equal
    <DxFormLayoutItem Caption="Position:" ColSpanMd="12">
        <DxComboBox Data="@(new List<string>() { "Sales Representative", "Designer" })"
                        Value="@(((string)((ValueEditContext)context).Value))"
                        ValueChanged="@((string value) => ((ValueEditContext)context).OnChanged(value))">
        </DxComboBox>
    </DxFormLayoutItem>
    <DxFormLayoutItem Caption="Position:" ColSpanMd="12">
        <Template>
            <DxComboBox Data="@(new List<string>() { "Sales Representative", "Designer" })"
                            Value="@(((string)((ValueEditContext)context).Value))"
                            ValueChanged="@((string value) => ((ValueEditContext)context).OnChanged(value))">
            </DxComboBox>
        <Template>
    </DxFormLayoutItem>
</DxFormLayout>
Specify a Caption
To specify the item caption, use the Caption property. The CaptionPosition property allows you to place the caption above an item (Vertical) or at its left (Horizontal):
<DxFormLayout>
    <DxFormLayoutItem Caption="Full Name:">
        <DxTextBox></DxTextBox>
    </DxFormLayoutItem>
    <DxFormLayoutItem Caption="Phone Number:">
        <DxMaskedInput @bind-Value="@Telephone" Mask="(999)000-0000" />
    </DxFormLayoutItem>
    <DxFormLayoutItem ColSpanMd="12" Caption="Feedback:" CaptionPosition="CaptionPosition.Vertical">
        <DxMemo NullText="Leave your feedback here..."></DxMemo>
    </DxFormLayoutItem>
</DxFormLayout>

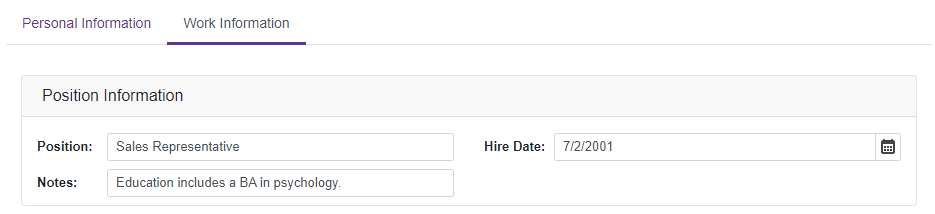
Organize Items into Groups and Tabs
Use the DxFormLayoutGroup and DxTabPage classes to organize layout items in groups and tabs.
<DxFormLayout>
    <DxFormLayoutTabPages>
        <DxFormLayoutTabPage Caption="Personal Information">
            // ...
        </DxFormLayoutTabPage>
        <DxFormLayoutTabPage Caption="Work Information">
            <DxFormLayoutGroup Caption="Position Information">
                <DxFormLayoutItem Caption="Position:">
                    <DxTextBox @bind-Text="@Position" Enabled="!Unemployed" />
                </DxFormLayoutItem>
                <DxFormLayoutItem Caption="Hire Date:">
                    <DxDateEdit @bind-Date="@HireDate" Enabled="!Unemployed" />
                </DxFormLayoutItem>
                <DxFormLayoutItem Caption="Notes:">
                    <DxTextBox @bind-Text="@Notes" Enabled="!Unemployed" />
                </DxFormLayoutItem>
            </DxFormLayoutGroup>
        </DxFormLayoutTabPage>
    </DxFormLayoutTabPages>
</DxFormLayout>
Disabled and Read-Only Modes
Use the Enabled and ReadOnly properties to disable and mark auto-generated editors as read-only.
<DxFormLayout Data="forecast">
    <DxFormLayoutGroup Caption="Weather Forecast">
        <DxFormLayoutItem Caption="Date" Field="@nameof(WeatherForecast.Date)" ReadOnly="true" />
        <DxFormLayoutItem Caption="Temperature" Field="@nameof(WeatherForecast.TemperatureC)" Enabled="false" />
    </DxFormLayoutGroup>
</DxFormLayout>

@code{
    public class WeatherForecast
    {
        public DateTime Date { get; set; }
        public int TemperatureC { get; set; }
        public double Precipitation { get; set; }
    }
    WeatherForecast forecast = new WeatherForecast() { Date = new DateTime(2020, 05, 11), TemperatureC = 20, Precipitation = 5};
}
