Create a Table Report Using the Report Wizard
- 7 minutes to read
This tutorial creates a new application, sets up an in-memory data source, adds a TdxReport component, and uses the Report Wizard dialog to set up a table report based on available data.
Step 1 — Create & Configure a RAD Studio Project
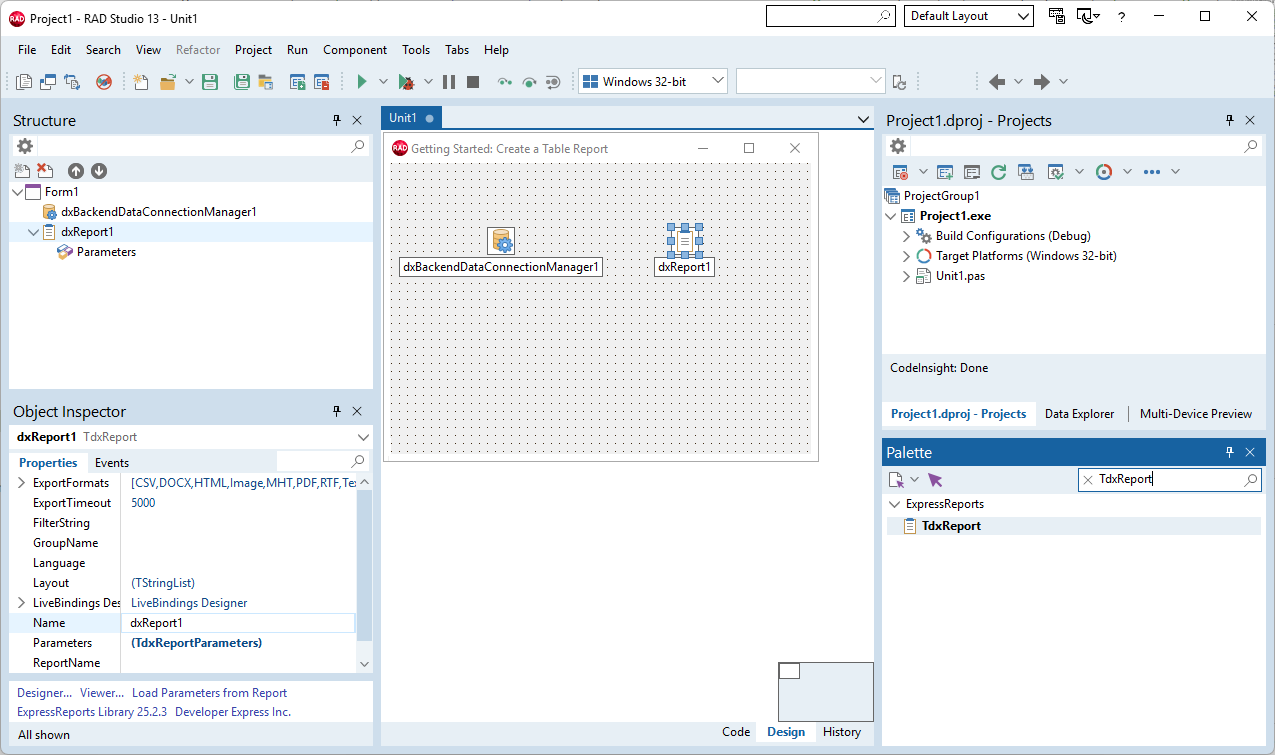
Create a new Delphi or C++Builder project. Place two components on the form (Tool Palette Category – DevExpress):
- TdxBackendDataConnectionManager
- Manages data sources for all reports in your application.
- TdxReport
- Manages report document layouts, end-user dialogs, and related settings.
Create & Configure a JSON Data Source
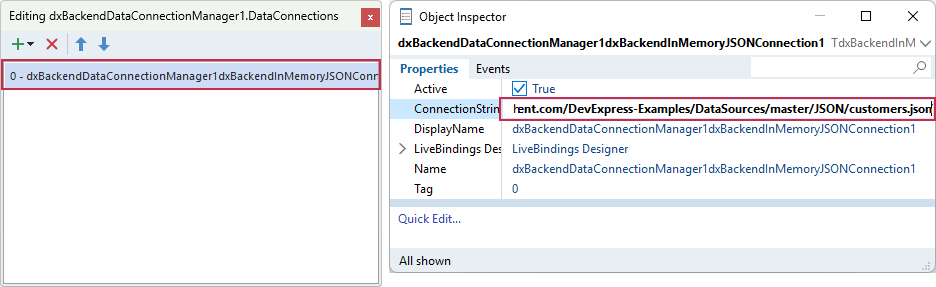
Copy the following connection string. The string points to a sample JSON data file hosted on GitHub by DevExpress:
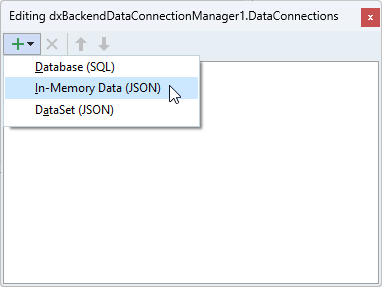
Uri=https://raw.githubusercontent.com/DevExpress-Examples/DataSources/master/JSON/customers.jsonDouble-click the TdxBackendDataConnectionManager component. In the Collection Editor dialog, select Add → In-Memory Data (JSON). This menu item creates a TdxBackendInMemoryJSONConnection component designed to load JSON data and bind it to your report.
Select the created component in the Collection Editor dialog. Paste the copied string to the ConnectionString property editor in the Object Inspector.
Step 2 — Configure Data & Report Layout Using the Report Wizard
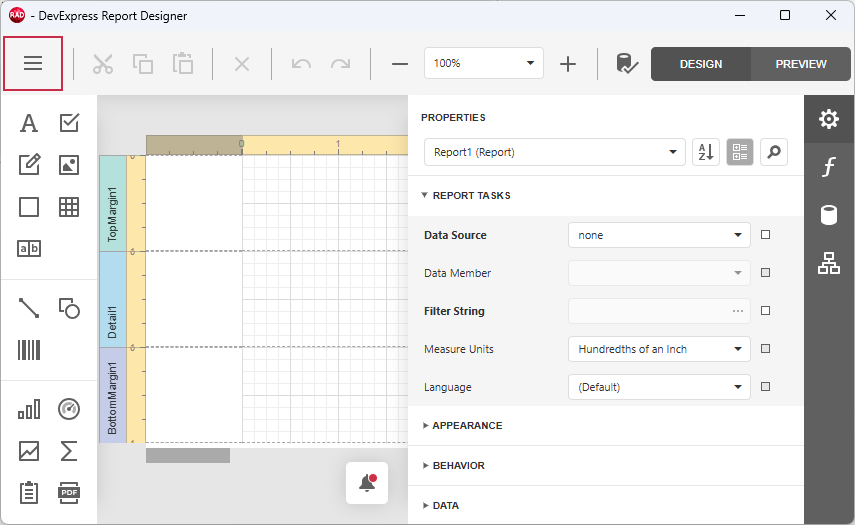
Right-click the TdxReport component and select the Designer… option[1] to display the Report Designer dialog. Click the hamburger button to display the Report Designer menu:
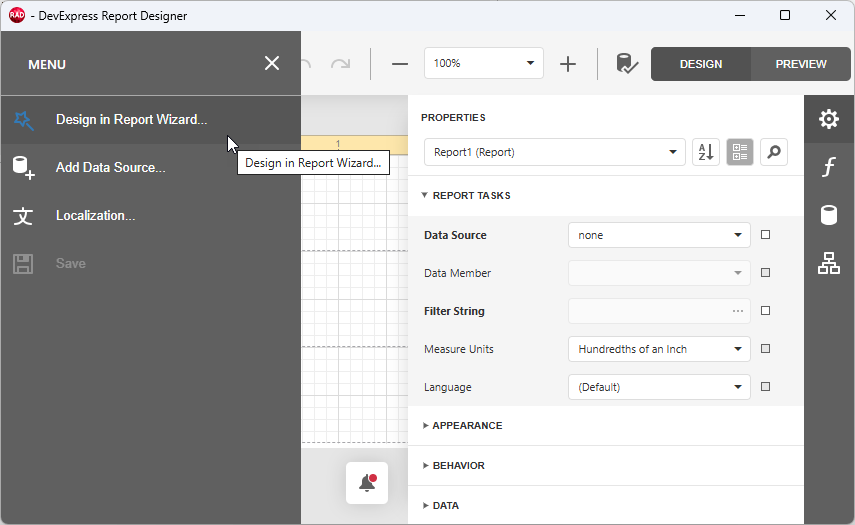
Select Design in the Report Wizard to display available report types:
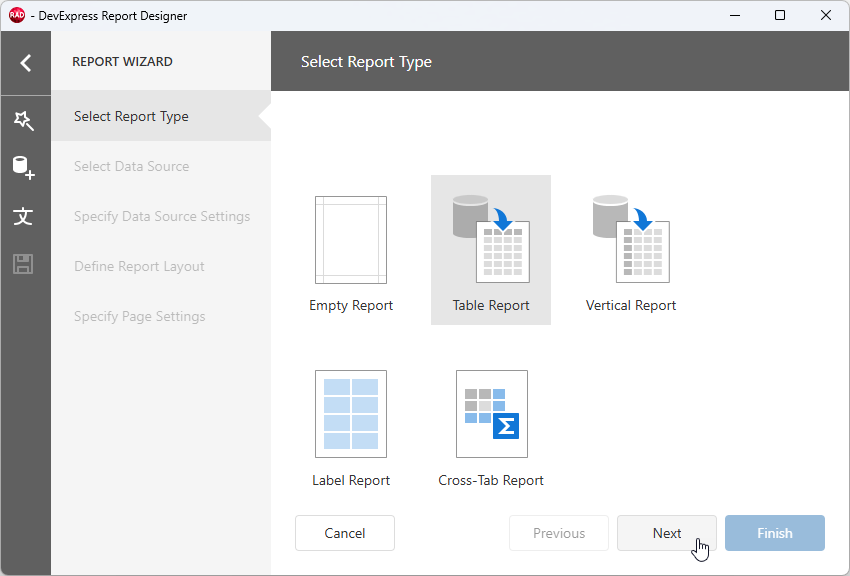
Select Table Report on the Select Report Type page to create a tabular layout and click Next.
Select JSON on the Select Data Source page to use the previously configured JSON connection component as a data source and click Next.

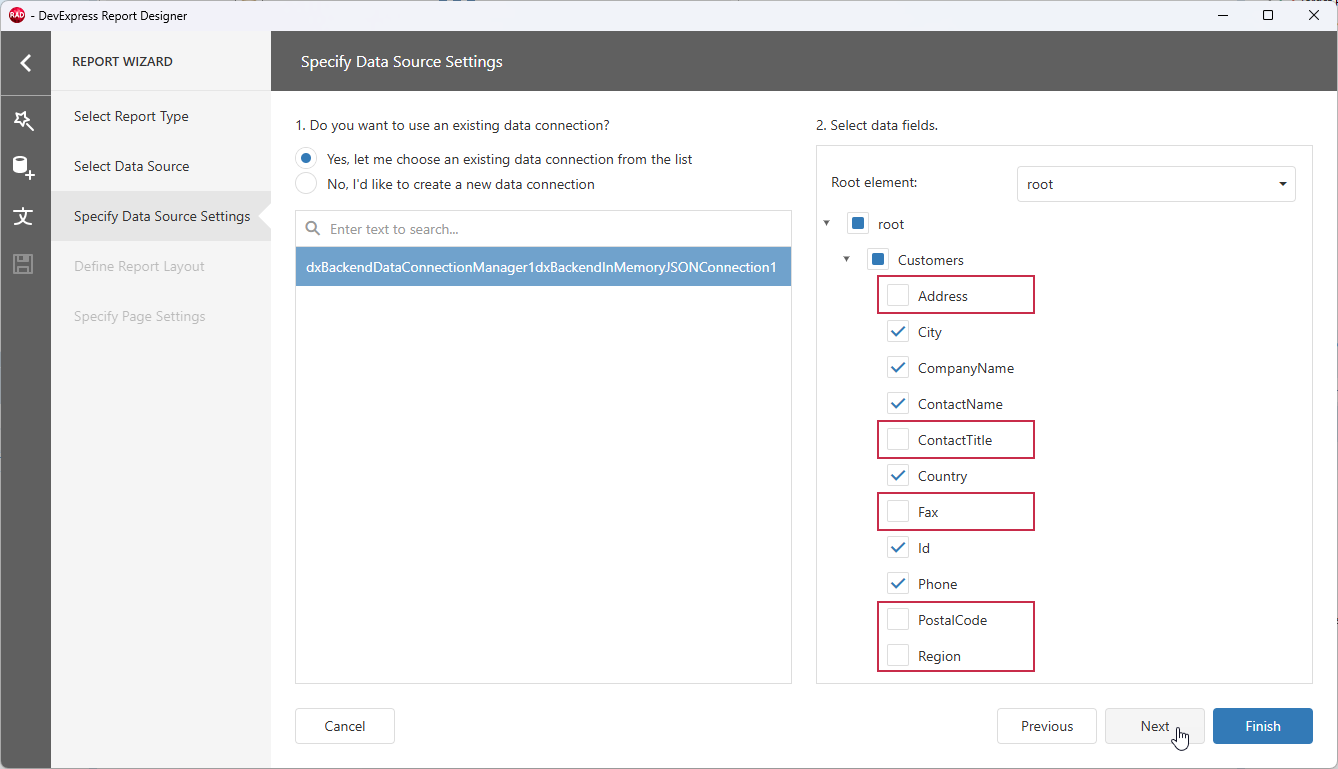
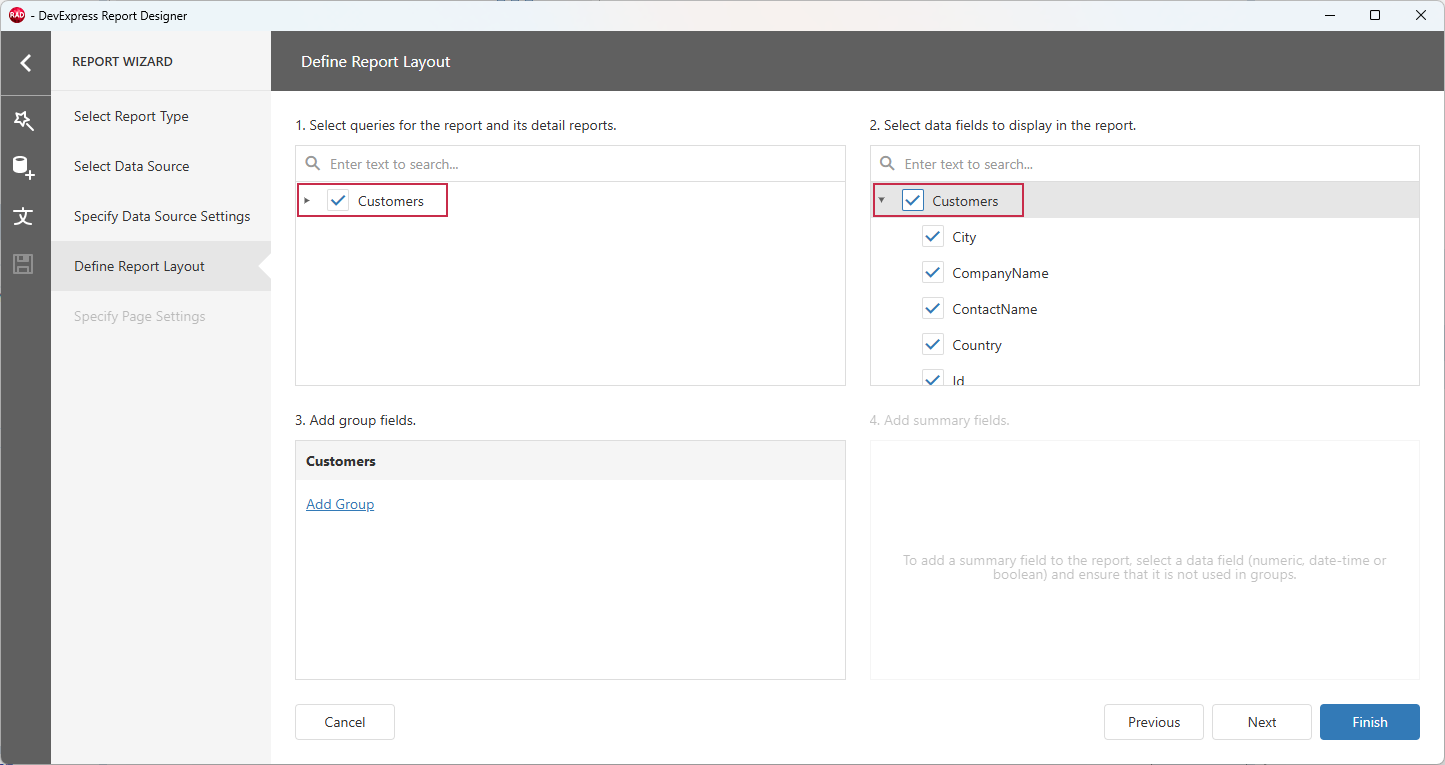
Select the configured JSON connection component on the Specify Data Source Settings page and uncheck the following fields in the right pane (Select data fields): Address, ContactTitle, Fax, PostalCode, and Region.
Check Customers in panes 1 and 2 on the Define Report Layout page to use all data fields defined in the previous step and click Finish.
Step 3 — Modify/Preview & Save the Generated Report Layout
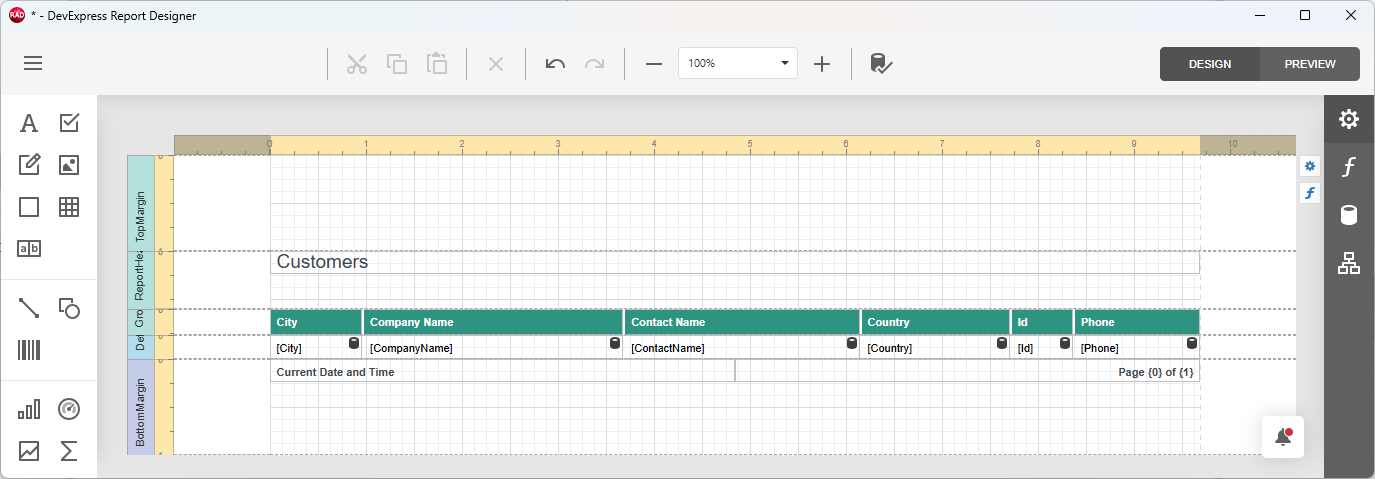
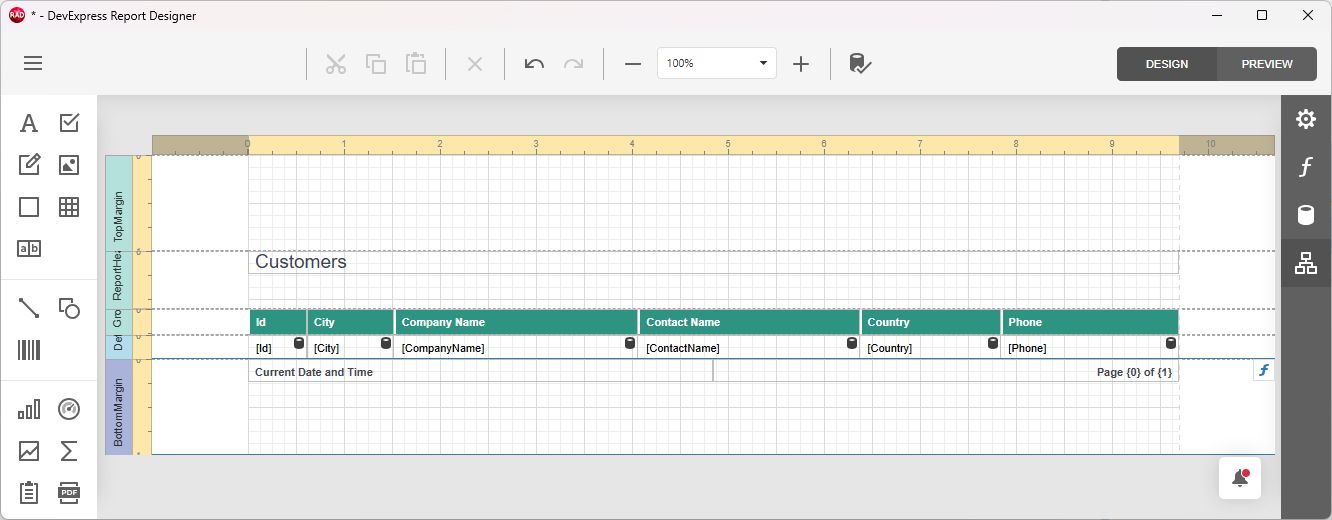
The Report Designer dialog displays the generated report layout. To switch between Design and Preview modes[2], click corresponding buttons.
Modify the Report Layout (Optional)
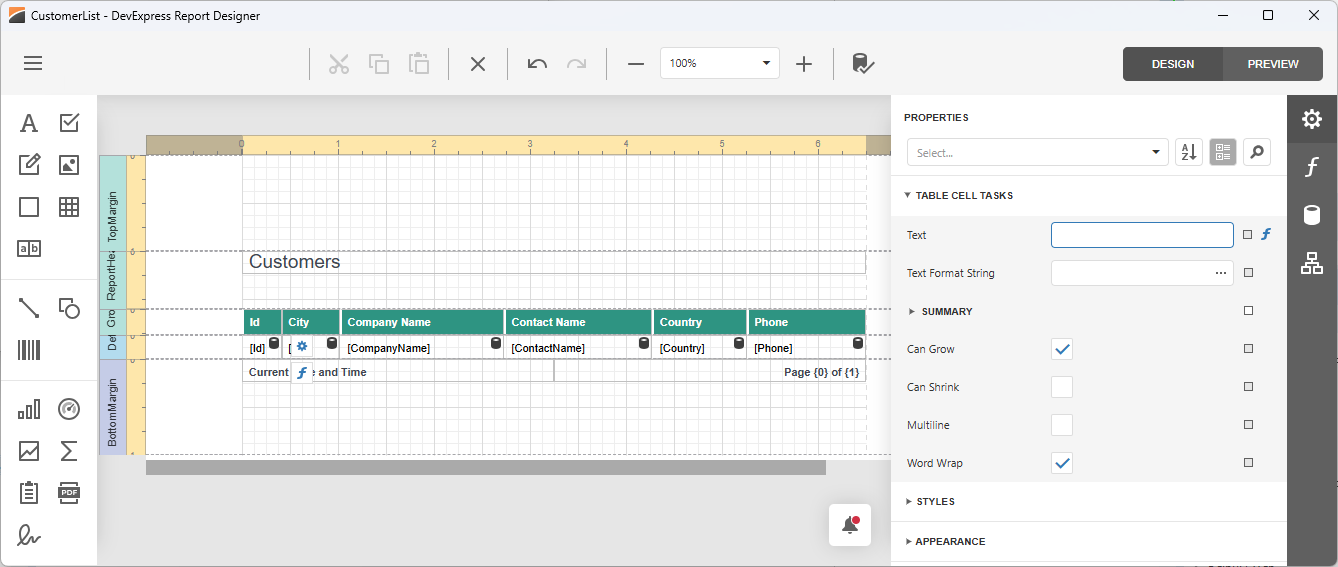
You can modify the generated report layout as necessary (rearrange columns, customize appearance settings, add labels, logos, etc.). For example, you can move the Id column to the leftmost position.
Switch to Design[2] mode and do the following:
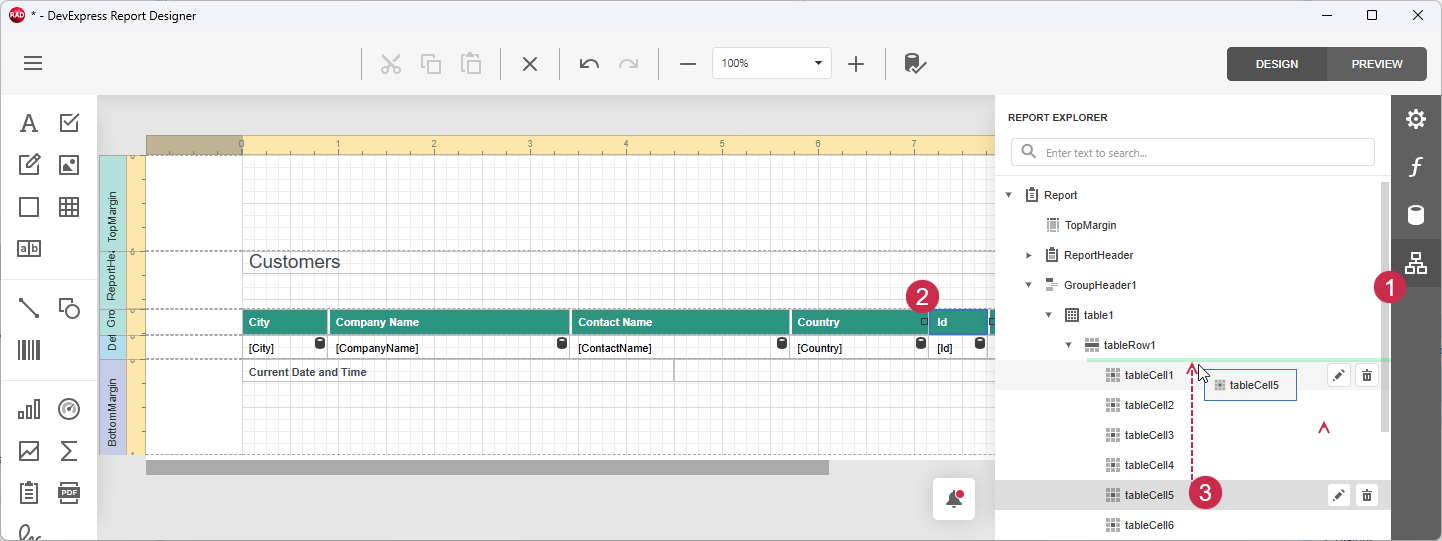
- 1. Select the Id header cell in the report layout.
- 2. Expand the REPORT EXPLORER pane.
3. Drag the header cell within the REPORT EXPLORER to the first position:
4. Select the Id detail cell in the report layout.
5. Drag the detail cell within the REPORT EXPLORER to the first position:
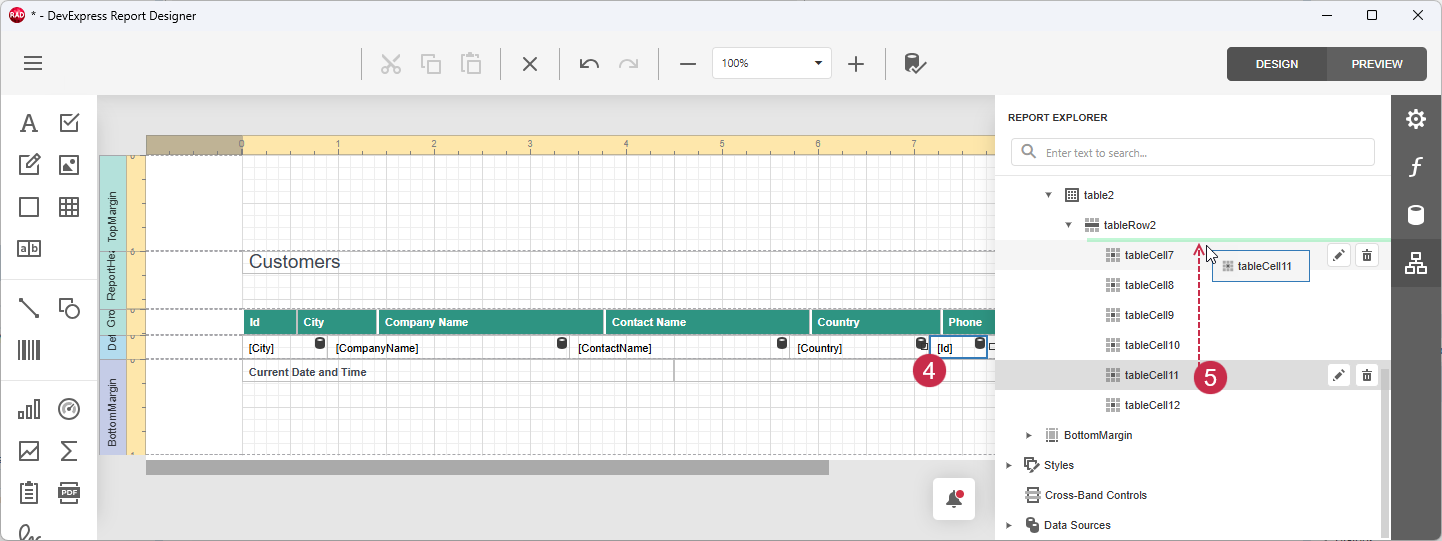
6. Collapse the REPORT EXPLORER pane and review the updated report layout (the Id column occupies the leftmost position within the report layout table).
Tip
Refer to the following section for detailed information on report layout customization options:
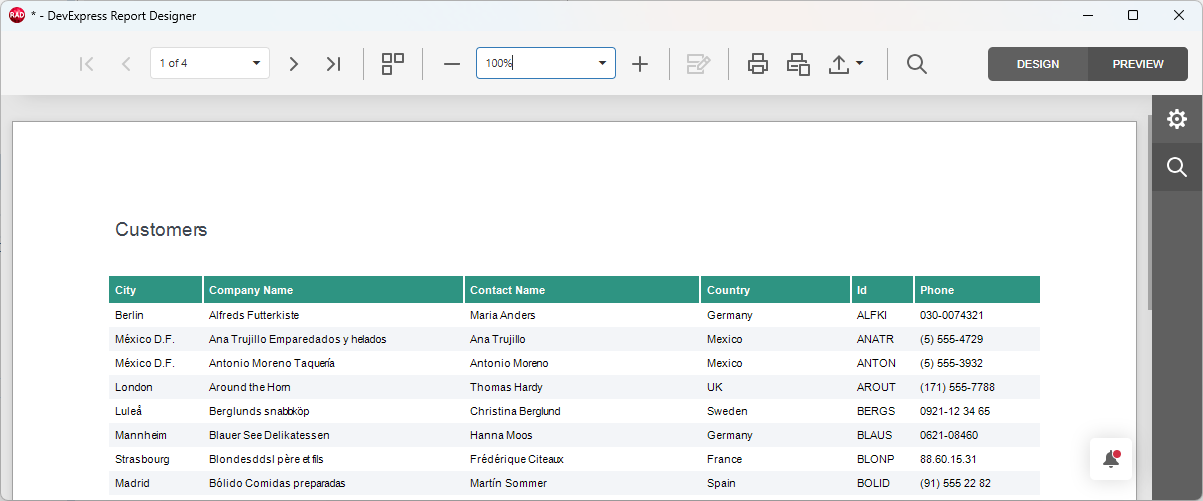
Preview & Save the Report Layout
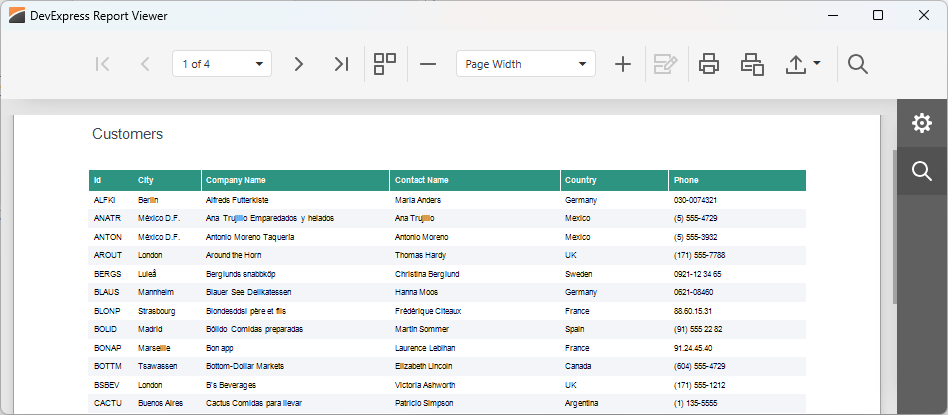
Click the PREVIEW button and review the resulting report document. The report title and table headers are followed by the data row template (repeated for every record in the bound JSON file).
Switch back to Design mode. Click the hamburger button, select the Save[3] option, and specify a report layout name (CustomerList, for example).

The Report Designer dialog saves the current report layout and the specified name to the TdxReport component’s Layout and ReportName properties. These property values are stored in the RAD Studio project’s DFM file when defined at design time.
Step 4 — Display Report Viewer & Designer Dialogs at Runtime
Place two TcxButton components on a form. Change the predefined button captions to Display Designer and Display Viewer.
Double-click the Display Designer button and handle its OnClick event as follows:
procedure TMyForm.cxButtonDisplayDesignerClick(Sender: TObject);
begin
  dxReport1.ShowDesigner;
end;
Switch to the Design form view, double-click the Display Viewer button and handle its OnClick event as follows:
procedure TMyForm.cxButtonDisplayViewerClick(Sender: TObject);
begin
  dxReport1.ShowViewer;
end;
Step 5 — Build & Test Your First App
Post-Build Events for WebView2 Loader DLL Deployment
All applications that include the TdxReport component require the WebView2 Runtime as a dependency.
To automatically copy a 32- or 64-bit WebView2Loader.dll file to the target build folder, do the following:
- Open the Project Options dialog. Select the Project → Options… item in the RAD Studio menu or press Ctrl + Shift + F11).
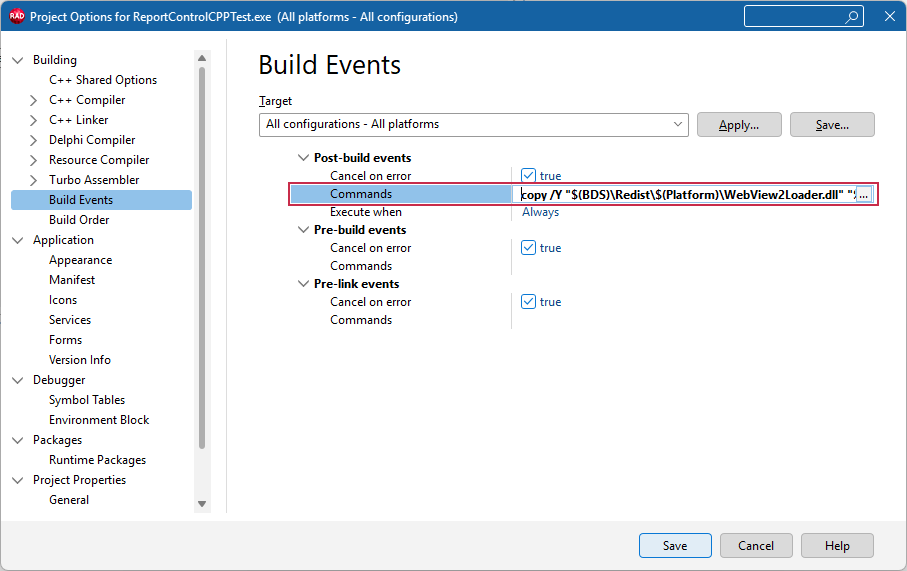
Select Build → Build Events in the tree view pane on the left and select the following option in the Target combo box:
'All Configurations - All Platforms'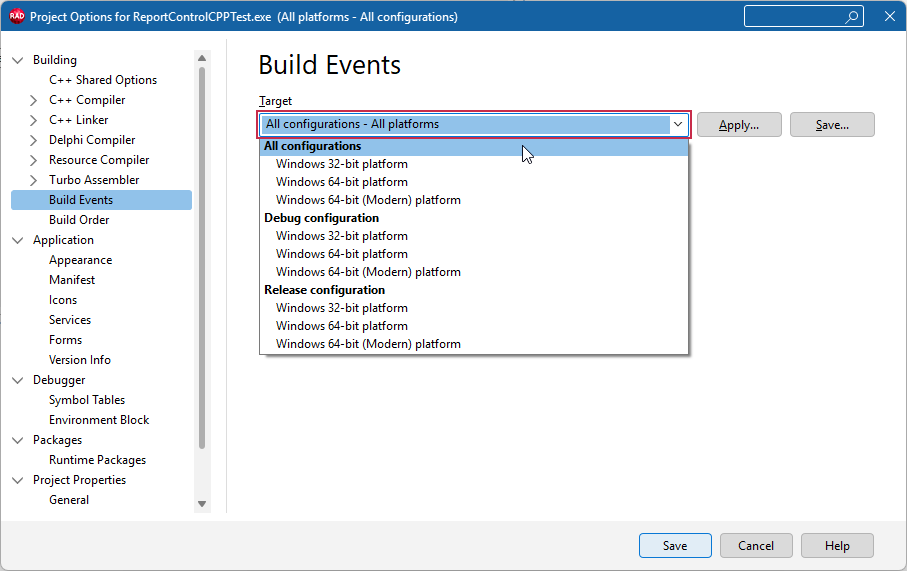
Copy the command line for the target compiler and platform:
copy /Y "$(BDS)\Redist\$(Platform)\WebView2Loader.dll" "$(OUTPUTDIR)"Paste the DLL deployment command line into the Commands box:
Optional. This step is required only for the Modern C++ RAD Studio compiler.
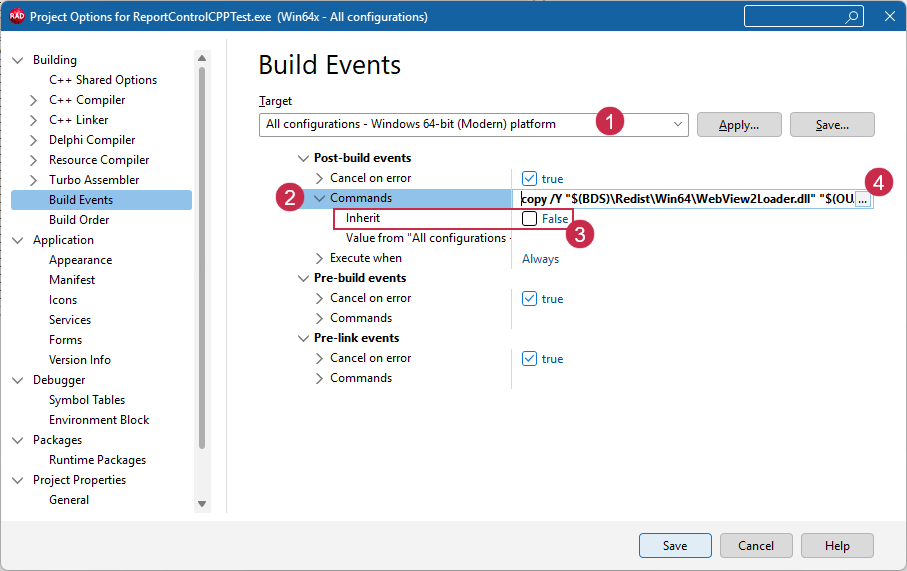
If you use Windows 64-bit (Modern) as a build target, select the Windows 64-bit (Modern) platform (1), expand the Post-build events → Commands node (2), uncheck the Inherit option (3), and paste the Modern compiler-specific command into the Commands box (4):
Click Save to apply pending changes and close the Project Options dialog.
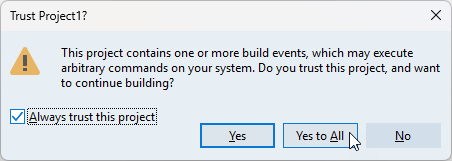
Build the project. Confirm that the configured post-build event is trusted in the following dialog:
All build operations in the current RAD Studio project now ensure that the platform-specific WebView2Loader.dll file version is available in the target build folder (for both Debug and Release configurations).
Run & Test the App
Run the app and click Display Viewer and Display Designer buttons to open end-user Report Designer and Report Viewer dialogs.
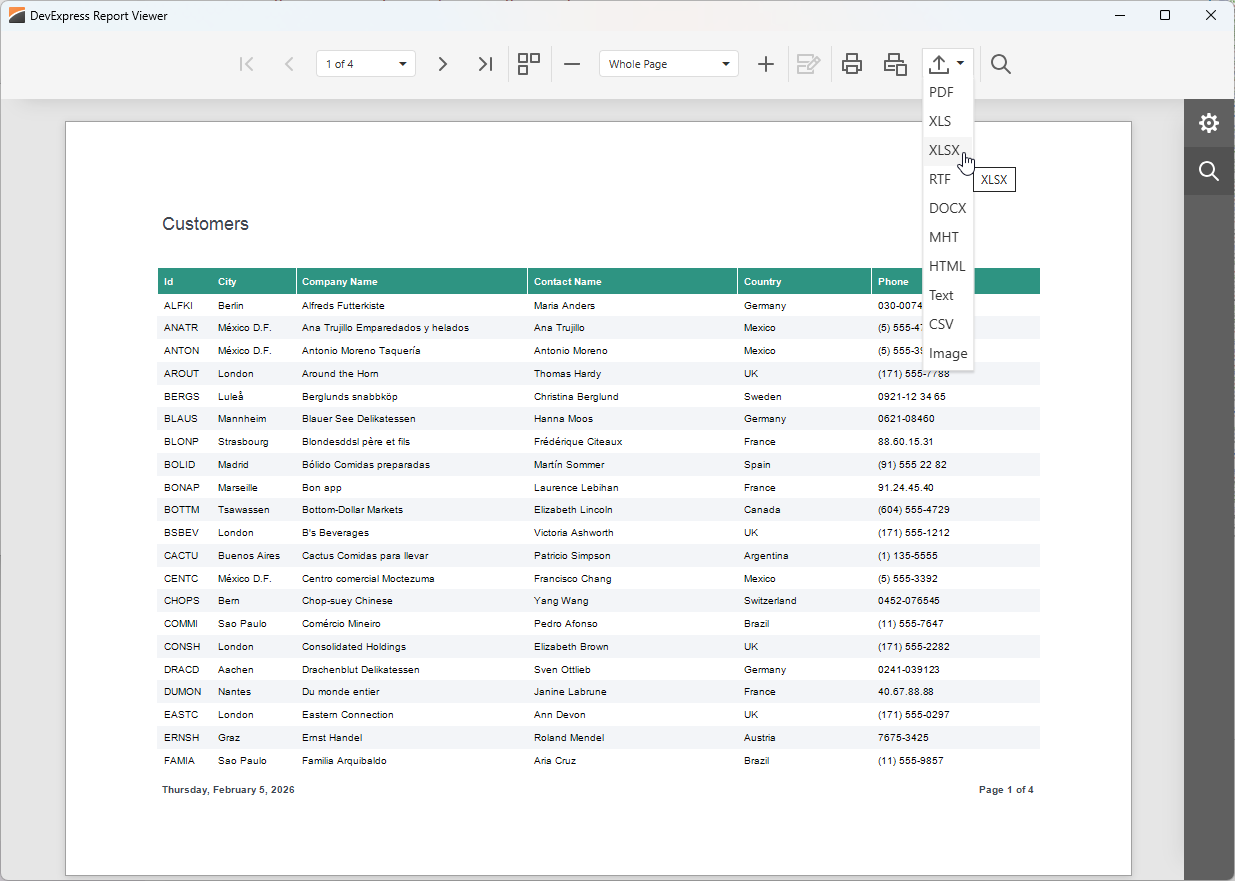
You can print and export reports using built-in UI elements within the Report Viewer dialog:
Other Tutorials
- Follow this tutorial to create a table report and bind it to data using standard FireDAC components (TFDQuery and TFDConnection) shipped with the RAD Studio IDE.
- Follow this tutorial to create a table report, bind it to a stored database procedure, and pass a report parameter to that procedure using Report Designer and Report Wizard dialogs at design time.
- Follow this tutorial to create a master-detail relationship between two tables in a relational SQL database and display hierarchical data in a table report.
- Follow this tutorial to create a Tabbed MDI (multi-document interface) Report Viewer application where different tabs allow users to display different data from a relational SQL database in the same report template.
-
Alternatively, you can double-click the TdxReport component.
-
You can switch to Preview mode at any moment to ensure that the resulting report document looks as intended.
-
If you attempt to close the Report Designer dialog, you will be prompted to save pending report layout and data binding changes.