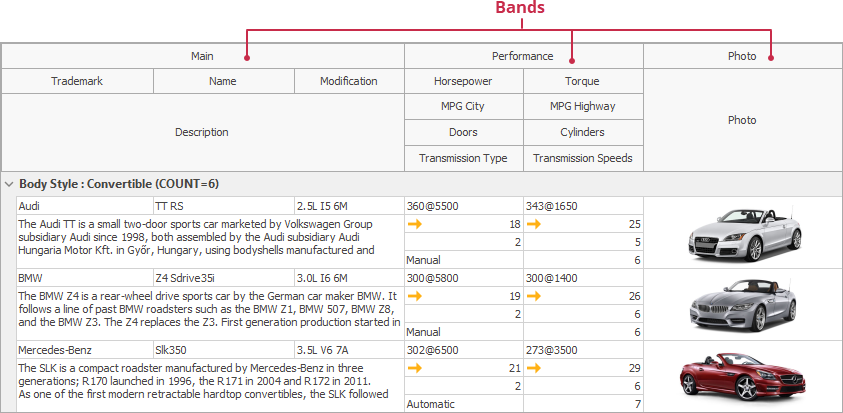
Banded Table View
- 5 minutes to read
This View displays data in a banded table. Bands allow users to group columns that contain information related to a specific category.

To get started with a Banded Table View in the Data Grid control, refer to the following tutorial: Banded Table View Tutorial.
After a Banded View is created and connected to a dataset, activate the Component Editor. Create the appropriate number of bands by clicking the Add button on the Bands tab of the Component Editor. After that you can specify band settings via the Object Inspector.

or programmatically.
for I := 0 to 2 do
  btvItems.Bands.Add;
btvItems.Bands[0].Caption := 'Issue Info';
btvItems.Bands[1].Caption := 'Issue Status';
btvItems.Bands[2].Caption := 'OwnerInfo';
//...
Then go to the Columns tab of the Component Editor and click the Retrieve Fields button. This creates TcxGridDBBandedColumn objects corresponding to the dataset fields. Once columns have been added to the View their names appear in the list located on the Columns page, along with the names and indexes of the bands assigned to these columns, which are called parent bands. By default, the parent band for retrieved fields is the first visible band in the View, the Issue Info band in this case.

for I := 0 to 2 do
  btvItems.Bands.Add;
btvItems.Bands[0].Caption := 'Issue Info';
btvItems.Bands[1].Caption := 'Issue Status';
btvItems.Bands[2].Caption := 'OwnerInfo';
btvItems.DataController.CreateAllItems;
//...
After creating columns, you should arrange them in bands. To do this, select a column in the Component Editor and expand the Position property list in the Object Inspector. You can move a column to a band by assigning the band’s index to the Position.BandIndex property of the column. You can use the Object Inspector to set a band’s index or select a band from the list of available View bands, at design time. Note that the Position property controls not only the band to which a column is assigned, but also the column’s position within the band.

for I := 0 to 2 do
  btvItems.Bands.Add;
btvItems.Bands[0].Caption := 'Issue Info';
btvItems.Bands[1].Caption := 'Issue Status';
btvItems.Bands[2].Caption := 'OwnerInfo';
btvItems.DataController.CreateAllItems;
//...
btvItemsTYPE.Position.BandIndex := 1;
btvItemsPRIORITY.Position.BandIndex := 1;
btvItemsSTATUS.Position.BandIndex := 1;
btvItemsFIXEDDATE.Position.BandIndex := 1;
//...
After a column is assigned to a specific band, it appears within a View. Arrange all View columns as appropriately. An example of a configured Banded View is demonstrated below:

We have performed the first steps to set up the Banded Table View. Now we will enhance it in order to make it show the information in the columns in a more compact manner.
First, note that a user has to scroll a View at runtime to view all columns data. In some cases this is not convenient (for instance, when columns containing the most important information should always stay on the screen). Using the Band.FixedKind property can solve this problem. Set this property to fkLeft for the Issue Info band and to fkRight - for the Owner Info band.

for I := 0 to 2 do
  btvItems.Bands.Add;
btvItems.Bands[0].Caption := 'Issue Info';
btvItems.Bands[1].Caption := 'Issue Status';
btvItems.Bands[2].Caption := 'OwnerInfo';
btvItems.DataController.CreateAllItems;
//...
btvItemsTYPE.Position.BandIndex := 1;
btvItemsPRIORITY.Position.BandIndex := 1;
btvItemsSTATUS.Position.BandIndex := 1;
btvItemsFIXEDDATE.Position.BandIndex := 1;
//...
btvItems.Bands[0].FixedKind := fkLeft;
btvItems.Bands[2].FixedKind := fkRight;
//...
Now these bands are fixed to the specified sides of a View. Try to scroll the View horizontally and you will notice that only the columns belonging to the Issue Status band (which is not fixed) are scrolled. Let us place the Created Date and Owner Phone columns into the second row of their bands. The Position property is again how we set the position of a column within a band.

for I := 0 to 2 do
  btvItems.Bands.Add;
btvItems.Bands[0].Caption := 'Issue Info';
btvItems.Bands[1].Caption := 'Issue Status';
btvItems.Bands[2].Caption := 'OwnerInfo';
btvItems.DataController.CreateAllItems;
//...
btvItemsTYPE.Position.BandIndex := 1;
btvItemsPRIORITY.Position.BandIndex := 1;
btvItemsSTATUS.Position.BandIndex := 1;
btvItemsFIXEDDATE.Position.BandIndex := 1;
//...
btvItems.Bands[0].FixedKind := fkLeft;
btvItems.Bands[2].FixedKind := fkRight;
btvItemsCREATEDDATE.Position.RowIndex := 1;
btvItemsOwnerPhone.Position.RowIndex := 1;
//...
The following image shows the result of all the actions described above:

The bands can be arranged as nested bands. Finally, the creator information and owner information can be combined to provide additional information on an issue. For this purpose create a new band and name it as “Additional Info” as shown in the following image.

Now let us assign the Creator Info and Owner Info bands to the newly created band. In the same way as with columns, these bands can be selected in the Component Editor and the Additional Info band can then be assigned as their parent band by setting its index to the BandPosition.BandIndex or selecting this band from the dropdown list of available bands.

The Bands list now displays ParentBand information for the Creator Info and Owner Info bands.
The following image shows the finished grid.
