Restrictions and Protection
- 9 minutes to read
This topic describes how to prevent users from document modification. The Rich Text Editor has three ways to solve this task: prohibit editing the entire document, restrict performing certain operations, and prevent inserting unnecessary elements.
Restrict Document Modification
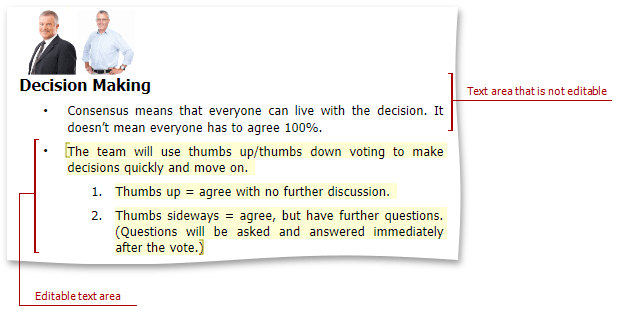
You can restrict document modification using the Document.Protect method. This method sets the password, and specifies actions allowed for the protected document (the DocumentProtectionType enumeration values). The Document.IsDocumentProtected property indicates whether content modification protection is enabled.
If you want to protect only parts of the document, separate the document into sections and protect specific sections. To do this, use the ProtectedForForms property. For more information on sections, refer to the following topic: Sections.
Use the Document.Unprotect method to disable protection. Note that it unlocks the document without a password request.
You can also restrict document modification with Document Protection and Unprotect Document dialogs. For more information, refer to the following topic: Document Protection Dialogs.
Note
The protection mechanism described above affects only the document modification.
Open and Save Password-Encrypted Files
The RichEditControl allows you to load and save password-encrypted files.
Open an Encrypted File
Specify the RichEditDocumentImportOptions.EncryptionPassword property to decrypt a loaded file. The table below lists a chain of events raised if the EncryptionPassword property is not specified or returns an invalid password.
| Event | Description |
|---|---|
| RichEditControl.EncryptedFilePasswordRequested | Fires if the EncryptionPassword property is not specified or returns an invalid password. Use the EncryptedFilePasswordRequestedEventArgs.Password property to specify a new password. |
| RichEditControl.EncryptedFilePasswordCheckFailed | Occurs if the EncryptedFilePasswordRequestedEventArgs.Password is set to an empty or invalid password. Handle this event to obtain the error that led to this event (Error) and determine whether to prompt a user for a password (TryAgain). |
| RichEditControl.DecryptionFailed | Raised if the TryAgain property is not specified or set to false. This event also occurs if the RichEditControl fails to open an encrypted file. The Exception property indicates the exception that led to this event. |
The code sample below shows how to handle the EncryptedFilePasswordRequested and EncryptedFilePasswordCheckFailed events to prompt users to enter a password. If the user cancels the operation, the RichEditControl creates an empty file.
private void RichEditControl1_EncryptedFilePasswordRequested(object sender, EncryptedFilePasswordRequestedEventArgs e)
{
    //Count the number of attempts to enter the password
    if (tryCount > 0)
    {
        tryCount--;
    }
}

private void RichEditControl1_EncryptedFilePasswordCheckFailed(object sender, EncryptedFilePasswordCheckFailedEventArgs e)
{

    //Analyze the error that led to this event
    //Depending on the user input and number of attempts,
    //Prompt user to enter a password again
    //or create an empty file
    switch (e.Error)
    {
        case RichEditDecryptionError.PasswordRequired:
            if (tryCount > 0)
            {
                e.TryAgain = true;
                e.Handled = true;
                MessageBox.Show("You did not enter the password!", String.Format(" {0} attempts left", tryCount));
            }
            else
                e.TryAgain = false;

            break;

        case RichEditDecryptionError.WrongPassword:
            if (tryCount > 0)
            {
                if ((MessageBox.Show("The password is incorrect. Try Again?", String.Format(" {0} attempts left", tryCount),
                    MessageBoxButtons.YesNo)) == DialogResult.Yes)
                {
                    e.TryAgain = true;
                    e.Handled = true;
                }

            }
            break;
    }
}
The RichEditControl.EncryptedFileIntegrityCheckFailed event occurs if the document did not pass the code verification.
Encrypt a Document with a Password
Use the Document.Encryption property to access the document encryption options. The code sample belows shows how to encrypt the document with a password and save the result:
using DevExpress.XtraRichEdit.API.Native;

richEditControl.Document.Encryption.Type = EncryptionType.Strong;
richEditControl.Document.Encryption.Password = "12345";

richEditControl.SaveDocument("EncryptedWithNewPassword.docx", DocumentFormat.Docx);
Call the RichEditControl.SaveDocument(String, DocumentFormat, EncryptionSettings) method overload to password-protect the document on save. Use the EncryptionSettings object properties to specify password and protection type.
EncryptionOptions encryptionOptions = new EncryptionOptions();
encryptionOptions.Type = EncryptionType.Strong;
encryptionOptions.Password = "12345";

richEditControl1.SaveDocument("EncryptedFile.docx", DocumentFormat.Docx, encryptionOptions);
Grant Permission to Users
Create Range Permissions as described in the steps below to allow certain users to edit parts of a protected document.
Set Group Lists
Set the users and user group lists. The default users list is empty and the user group list contains predefined entries (Everyone, Administrators, Contributors, Owners, Editors, and Current User). To use a custom list of users or user groups, add a custom service implementing the IUserListService or IUserGroupListService interface and register this service with the RichEditControl.ReplaceService<T> method. The RichEditControl does not associate users with groups, so user names and group names are independent.
richEditControl1.ReplaceService<IUserListService>(new MyUserListService());
richEditControl1.ReplaceService<IUserGroupListService>(new MyGroupListService());

class MyGroupListService : IUserGroupListService
{
    List<string> userGroups = CreateUserGroups();

    static List<string> CreateUserGroups()
{
    List<string> result = new List<string>();
    result.Add(@"Everyone");
    result.Add(@"Administrators");
    result.Add(@"Contributors");
    result.Add(@"Owners");
    result.Add(@"Editors");
    result.Add(@"Current User");
    result.Add("Skywalkers");
    result.Add("Nihlus");
    return result;
}
    public IList<string> GetUserGroups()
    {
        return userGroups;
    }
}
class MyUserListService : IUserListService
{
    List<string> users = CreateUsers();

    static List<string> CreateUsers()
    {
        List<string> result = new List<string>();
        result.Add("Nancy Skywalker");
        result.Add("Andrew Nihlus");
        result.Add("Janet Skywalker");
        result.Add("Margaret");
        return result;
    }
    public IList<string> GetUsers()
    {
        return users;
    }
}
Define the User Identity
The edit permission is given depending on the authentication credentials. To define the identity of the current user, use the AuthenticationOptions class properties.
//Define the user credentials:
richEditControl1.Options.Authentication.UserName = "Nancy Skywalker";
richEditControl1.Options.Authentication.Group = "Skywalkers";
Create Range Permissions
Call the SubDocument.BeginUpdateRangePermissions method to access the document range permissions collection.
Create a new RangePermission object using the RangePermissionCollection.CreateRangePermission method.
Utilize the RangePermission.UserName and/or RangePermission.Group properties to specify the specific user and/or the group of users that are eligible to edit the document.
The table below shows what properties should have the same value to make the range editable to the current user.
| This property value | Should be equal to |
|---|---|
| AuthenticationOptions.Group | RangePermission.Group “Everyone” |
| AuthenticationOptions.UserName AuthenticationOptions.EMail |
RangePermission.UserName |
Add the created object to the corresponding collection. Finalize the modification with the SubDocument.EndUpdateRangePermissions method. Enable document protection as described above
RangePermissionCollection rangePermissions = richEditControl1.Document.BeginUpdateRangePermissions();

RangePermission permission = rangePermissions.CreateRangePermission(rangeAdmin);
permission.UserName = "Nancy Skywalker";
permission.Group = "Skywalkers";
rangePermissions.Add(permission);

RangePermission permission2 = rangePermissions.CreateRangePermission(rangeBody);
permission2.Group = @"Everyone";
rangePermissions.Add(permission2);

RangePermission permission3 = rangePermissions.CreateRangePermission(rangeSignature);
permission3.Group = "Nihlus";
rangePermissions.Add(permission3);

richEditControl1.Document.EndUpdateRangePermissions(rangePermissions);
// Enforce protection and set password.
richEditControl1.Document.Protect("123");
Change the Range Appearance
Customize the appearance of the protected ranges in the document. At runtime, they are highlighted with a certain color and enclosed with bookmark brackets. By default, the highlighting color is selected from a predefined colors collection. This is done to specify different highlighting colors for ranges that belong to different user groups. There is no straightforward way to change these colors manually.

You can set the highlighting options to the ranges that are editable to the current user only. To do that, use the RangePermissionOptions properties. They can be accessed through the Options.RangePermissions notation.
//Customize the editable ranges appearance:
richEditControl1.Options.RangePermissions.HighlightColor = Color.PapayaWhip;
richEditControl1.Options.RangePermissions.HighlightBracketsColor = Color.Olive;
Restrict Performing Operations
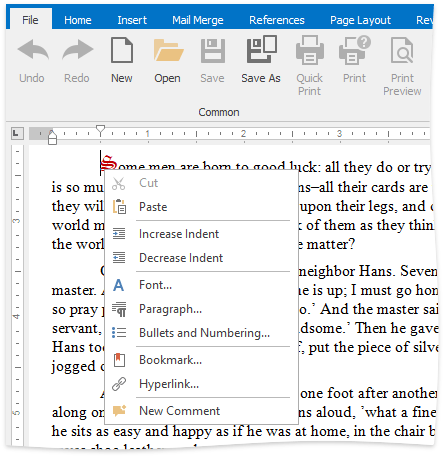
Protect the document from editing, copying or printing by restricting the corresponding functions. To perform the restriction, access the desired operation using the RichEditControlOptionsBase.Behavior property and specify its behavior. Depending on the selected property value, the application menu buttons that correspond to restricted operations can be disabled or hidden. Additionally, you can prevent the showing of the context menu. To do that, use the RichEditBehaviorOptions.ShowPopupMenu property.
using DevExpress.XtraRichEdit;

private void RestrictOperations(RichEditBehaviorOptions behaviorOptions) {
    behaviorOptions.Drag = DocumentCapability.Disabled;
    behaviorOptions.Printing = DocumentCapability.Disabled;
    behaviorOptions.Copy = DocumentCapability.Hidden;
}
The code execution result is illustrated in the picture below. Such buttons as Print, Quick Print and Print Preview are disabled, whereas the Copy item is hidden from the context menu.

Restrict Using Document Elements
You can also prohibit the formatting of characters and paragraphs or the use of certain document elements, such as pictures, tables, fields, etc.
These restrictions can be specified by the RichEditControlOptionsBase.DocumentCapabilities property, as illustrated in the following code sample.
private void RestrictFormatting()
{
  richEditControl.Options.DocumentCapabilities.CharacterFormatting = DocumentCapability.Hidden;
  richEditControl.Options.DocumentCapabilities.Comments = DocumentCapability.Disabled;
  richEditControl.Options.DocumentCapabilities.FloatingObjects = DocumentCapability.Hidden;
}
Similar to operation restrictions, the application menu items that correlate with the prohibited actions can be hidden or disabled. If a document is loaded after certain restrictions are applied, the corresponding characteristics are set to default and the restricted objects are not created. In the case of floating objects, the existing floating pictures are converted into inline pictures, whereas the text boxes and their contents are hidden.