FlowLayoutControl.MaximizedElement Property
Gets or sets the FlowLayoutControl’s item that is maximized. This is a dependency property.
Namespace: DevExpress.Xpf.LayoutControl
Assembly: DevExpress.Xpf.LayoutControl.v26.1.dll
Declaration
Property Value
| Type | Description |
|---|---|
| FrameworkElement | A FrameworkElement that represents the FlowLayoutControl’s maximized item. |
Remarks
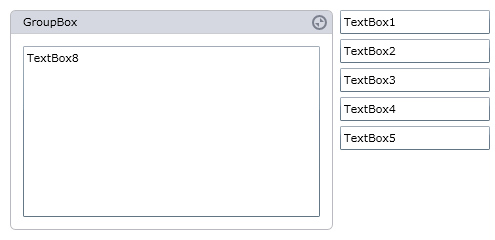
The FlowLayoutControl supports maximizing its items, one at a time. When an item is maximized, it occupies the major part of the control, while other items are arranged in a single layer (column or row) along the control’s edge:
The following image shows the Group Box item in the maximized state:
You can maximize an item by assigning it to the MaximizedElement property. A GroupBox control (when it belongs to the FlowLayoutControl) can be maximized by setting the GroupBox.State property to GroupBoxState.Maximized. An end-user can maximize and then restore a GroupBox via the Maximize Element (see GroupBox.MaximizeElementVisibility).
The following code shows how to set the MaximizedElement property in XAML:
<lc:FlowLayoutControl MaximizedElement="{Binding ElementName=item3}">
It’s possible to customize the position of the maximized element relative to the remaining items. In code, you can do this via the FlowLayoutControl.MaximizedElementPosition property. At runtime, an end-user can change the position via drag-and-drop, provided that the FlowLayoutControl.AllowMaximizedElementMoving property is enabled.
Example
The following example creates a FlowLayoutControl with four GroupBox objects as children. For the GroupBox objects, the Maximize and Minimize elements are enabled via the GroupBox.MaximizeElementVisibility and GroupBox.MinimizeElementVisibility properties.
The first group is maximized in XAML by setting the FlowLayoutControl.MaximizedElement property.
The following image shows the result:

<Window x:Class="FlowLayoutControl_GroupBox.MainWindow"
        xmlns="http://schemas.microsoft.com/winfx/2006/xaml/presentation"
        xmlns:x="http://schemas.microsoft.com/winfx/2006/xaml"
        xmlns:lc="http://schemas.devexpress.com/winfx/2008/xaml/layoutcontrol"
        Title="MainWindow" Height="350" Width="525">
    <Window.Resources>
        <Style x:Key="myGroupBoxStyle" TargetType="lc:GroupBox">
            <Setter Property="MaximizeElementVisibility" Value="Visible"/>
            <Setter Property="MinimizeElementVisibility" Value="Visible"/>
            <Setter Property="Width" Value="150"/>
        </Style>
    </Window.Resources>

    <Grid x:Name="LayoutRoot" Background="White">
        <lc:FlowLayoutControl Orientation="Vertical" Background="#FFFAFAFA" BreakFlowToFit="True"
            MaximizedElementPosition="Right" MaximizedElement="{Binding ElementName=groupBox1}">
            <lc:GroupBox x:Name="groupBox1" Header="Group 1" Style="{StaticResource  myGroupBoxStyle}">
                <TextBlock  TextWrapping="Wrap" Text="Lorem ipsum dolor sit amet, consectetur adipiscing elit. Sed molestie porttitor congue..."/>
            </lc:GroupBox>
            <lc:GroupBox  Header="Group 2" Style="{StaticResource  myGroupBoxStyle}">
                <TextBlock  TextWrapping="Wrap" Text="Ut sagittis urna et lorem..."/>
            </lc:GroupBox>
            <lc:GroupBox  Header="Group 3" Style="{StaticResource  myGroupBoxStyle}">
                <TextBlock  TextWrapping="Wrap" Text="Nunc diam justo, tempus sit amet..."/>
            </lc:GroupBox>
            <lc:GroupBox  Header="Group 4" Style="{StaticResource  myGroupBoxStyle}">
                <TextBlock  TextWrapping="Wrap" Text="Quisque iaculis, risus ac bibendum ornare..."/>
            </lc:GroupBox>
        </lc:FlowLayoutControl>
    </Grid>
</Window>