Microsoft Templates (.NET CLI)
- 5 minutes to read
Important
Ensure your system meets these requirements.
This topic describes how to:
- Use Microsoft templates to create a Blazor project from .NET Core CLI.
- Install the DevExpress.Blazor NuGet package that includes DevExpress components.
- Add DevExpress components to a project.
You can execute CLI commands in any command line interpreter: Command Prompt (CMD), Visual Studio Code and macOS terminals, and others.
1. Create a New Project
Run one of the following commands to create a project:
Blazor Server App
dotnet new blazorserver -o MyBlazorServerProject
cd MyBlazorServerProject
Blazor WebAssembly App
dotnet new blazorwasm -o MyBlazorWasmProject
cd MyBlazorWasmProject
Blazor Hosted WebAssembly App
dotnet new blazorwasm -ho -o MyBlazorWasmHostedProject
cd MyBlazorWasmHostedProject
2. Obtain Your NuGet Feed Credentials
You need to obtain your personal NuGet feed credentials to access the DevExpress.Blazor NuGet package from your project. You can use NuGet feed URL or feed authorization key to manage DevExpress packages.
Make sure your DevExpress.com account has access to Blazor UI Components. This product line is included in the Universal, DXperience, and ASP.NET subscriptions. Refer to the subscription comparison matrix for more information.
Use your DevExpress credentials to log into nuget.devexpress.com.
Obtain your NuGet feed credentials and copy them to the clipboard.
You can find the same URL in the Download Manager.
3. Register the NuGet Feed as a Package Source
Add the feed as a package source to your NuGet configuration files. To do this, create the nuget.config file with the following content:
<?xml version="1.0" encoding="utf-8"?>
<configuration>
  <packageSources>
    <add key="MyGet" value="https://api.nuget.org/v3/index.json" />
    <add key="DevExpress Nuget server" value="https://nuget.devexpress.com/{your-feed-url}/api" />
  </packageSources>
</configuration>
Alternatively, you can use console commands:
# Register packages with an authorization key
dotnet nuget add source https://nuget.devexpress.com/api -n DXFeed -u DevExpress -p {your-feed-authorization-key}

# Register packages with a feed URL
dotnet nuget add source https://nuget.devexpress.com/{your-feed-url}/api -n DXFeed
Refer to the following topic for more information: Manage Packages with .NET CLI.
An error can occur if the specified source is already in the source list. You can run dotnet nuget list source to view all the configured sources and ensure the specified and nuget.org package sources are enabled. To enable them, use the dotnet nuget enable source command.
4. Install the DevExpress Blazor NuGet Package
Run the following commands to add the DevExpress.Blazor NuGet package to the newly created application:
dotnet add package DevExpress.Blazor
dotnet restore
5. Register DevExpress Resources
Register the
DevExpress.Blazornamespace in the _Imports.razor file:@using DevExpress.BlazorCall the AddDevExpressBlazor method in the Program.cs file and specify the BootstrapVersion global option. The option’s default value is
v4. If your application uses a theme based on Bootstrap 5, you should set theBootstrapVersionproperty tov5.using DevExpress.Blazor; /* ... */ builder.Services.AddDevExpressBlazor(configure => configure.BootstrapVersion = BootstrapVersion.v5);Call the UseStaticWebAssets method on the host builder in the Program.cs file to enable the application to load client-side resources:
builder.WebHost.UseWebRoot("wwwroot");
builder.WebHost.UseStaticWebAssets();
Apply a theme in the layout file—Pages/_Layout.cshtml (Server) or wwwroot/index.html (WebAssembly). Do one of the following:
The project may already contain a link to the standard or custom Bootstrap theme. In this case, you should also add a link to the bootstrap-external stylesheet (v4 or v5). This stylesheet applies CSS variables from Bootstrap CSS files to DevExpress Blazor components.
<head>
    @*...*@
    @* Bootstrap theme *@
    <link rel="stylesheet" href="css/bootstrap/bootstrap.min.css" />

    @* bootstrap-external for Bootstrap 5 *@
    <link rel="stylesheet" href="_content/DevExpress.Blazor.Themes/bootstrap-external.bs5.min.css" />
    @* bootstrap-external for Bootstrap 4 *@
    <link rel="stylesheet" href="_content/DevExpress.Blazor.Themes/bootstrap-external.bs4.min.css" />
    @*...*@
</head>
You can apply a DevExpress theme. We use the DevExpress Blazing Berry theme in our documentation. To apply this theme, add the following link before the
site.cssand<ProjectName>.styles.csslinks:<head> @*...*@ @* Bootstrap 5 *@ <link href="_content/DevExpress.Blazor.Themes/blazing-berry.bs5.min.css" rel="stylesheet" /> @* Bootstrap 4 *@ <link href="_content/DevExpress.Blazor.Themes/blazing-berry.bs4.min.css" rel="stylesheet" /> <link href="css/site.css" rel="stylesheet" /> <link href="<ProjectName>.styles.css" rel="stylesheet" /> @*...*@ </head>
Refer to the following topic for more information: Themes.
For Blazor WebAssembly only. If you enabled the ASP.NET Core hosted option when you created the project, make sure that the server-side project is set as the solution’s startup project.
6. Add DevExpress Blazor Components
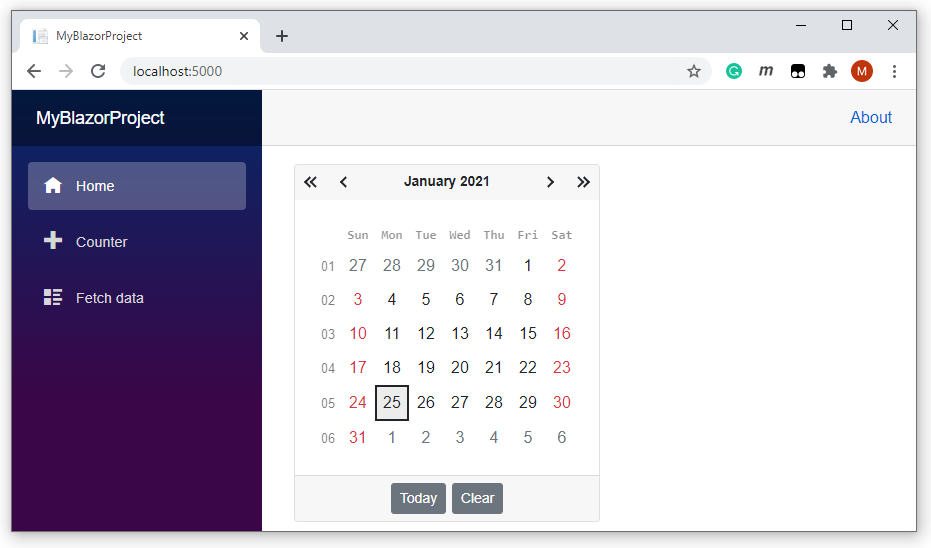
Add DevExpress Blazor components to any .razor file in the Pages folder. For example, the following code demonstrates how to add a DxCalendar component to Pages/Index.razor:
@page "/"

<DxCalendar @bind-SelectedDate="@SelectedDate" />

@code{
    DateTime SelectedDate { get; set; } = DateTime.Now;
}
The following help topics contain information on how to add different DevExpress Blazor components:
Data Editors
Navigation and Layout Components
- Accordion
- Context Menu
- DropDown
- Flyout
- Form Layout
- Grid Layout
- Layout Breakpoint
- Menu
- Stack Layout
- Pager
- Popup
- Tabs
- Toolbar
- TreeView
7. Run the Application
Run a Server or WebAssembly application:
dotnet run
Run a hosted WebAssembly application:
cd Server
dotnet run
The project starts listening on https://localhost:5000. Open it in the browser.