Add a Report Designer to a DevExtreme ASP.NET Core Application (Razor Pages)
- 6 minutes to read
Follow this step-by-step tutorial to add a Report Designer to an ASP.NET Core Bootstrap Application project template. This tutorial targets the Visual Studio IDE.
Prerequisites
Important
In .NET 8, the System.Drawing.Common library is compatible with Windows only. An exception is thrown on other platforms. See the following topic for more information: Reporting - .NET Limitations.
Create a DevExtreme ASP.NET Core Application
Skip this step if you already have a DevExtreme ASP.NET Core application.
- Open Visual Studio and select Create a new project.
- In the Create a new project dialog, search for DevExpress Template Kit.
- Select the DevExpress v25.2 Template Kit template.
- Click Next.
- Specify the project name and location, and click Create.
- Click ASP.NET Core in the left pane of the Template Kit window.
Select the ASP.NET Core Bootstrap Application template. Select Razor Pages in the App Type option.
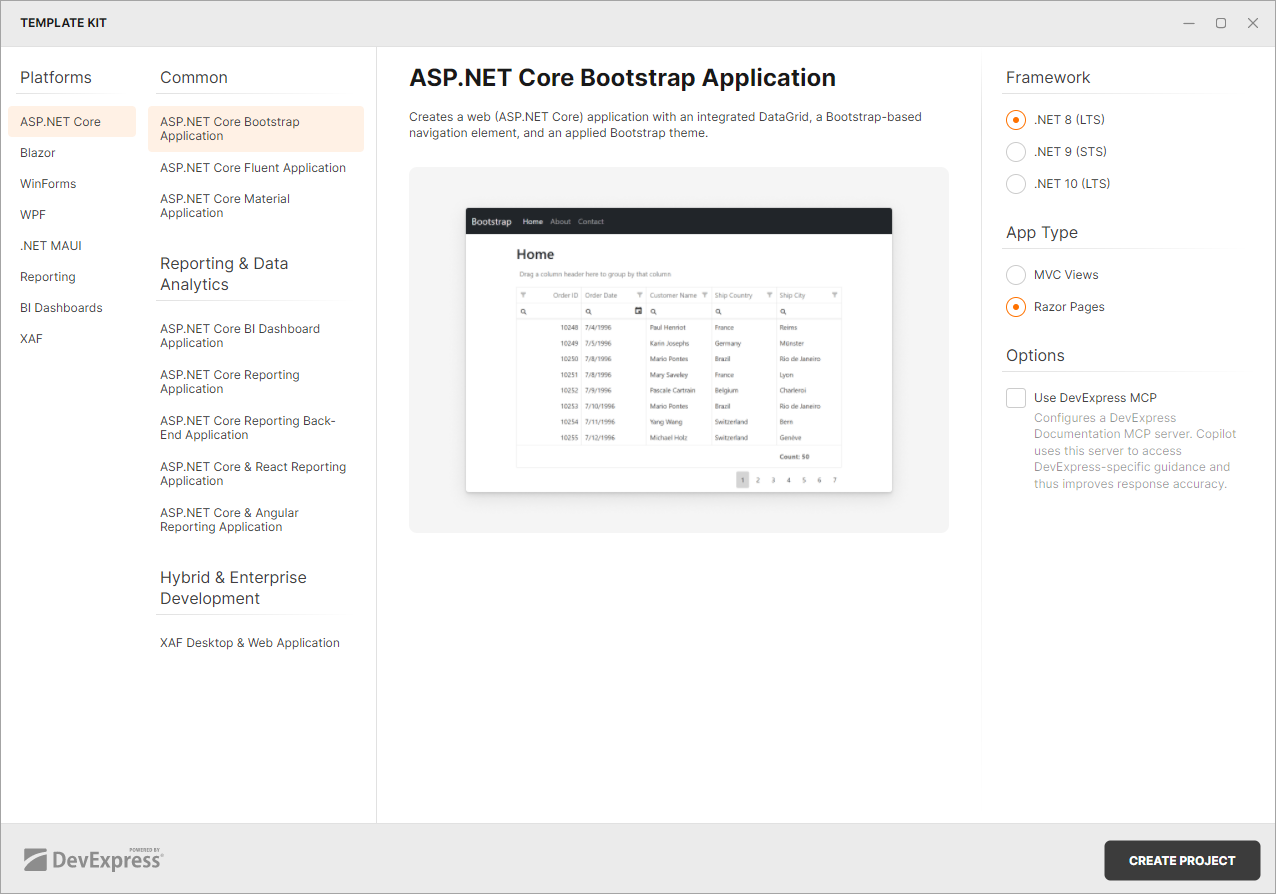
Click Create Project.
For more information on how to get started with DevExtreme-based controls, refer to the following topics:
- Cross-IDE Template Kit (Windows, macOS)
- Configure a Visual Studio Project
- Configure a non-Visual Studio Project
Install NuGet Packages
Install the following NuGet package:
For more information on how to install NuGet packages for DevExpress components, review the following help topic: Choose Between Offline and Online DevExpress NuGet Feeds.
Install npm packages
Modify the package.json file as follows to add reporting npm packages to the project:
{
  "name": "DXApplication14",
  "version": "1.0.0",
  "license": "MIT",
  "private": true,
  "dependencies": {
    "bootstrap": "^5.3.8",
    "devextreme-aspnet-data": "5.1.0",
    "devextreme-dist": "25.2-stable",
    "@devexpress/analytics-core": "25.2-stable",
    "devexpress-reporting": "25.2-stable",
    "jquery": "^3.7.1"
  }
}
Right-click package.json in the Solution Explorer and select Restore Packages. Alternatively, you can execute the following command in the folder that contains the package.json file:
npm install
Manage Libraries
Modify the libman.json file as follows:
{
  "version": "1.0",
  "defaultProvider": "filesystem",
  "libraries": [
    // ...
    {
      "library": "node_modules/devextreme-dist/css/icons/",
      "destination": "wwwroot/css/icons",
      "files": [
        "dxiconsmaterial.ttf",
        "dxiconsmaterial.woff",
        "dxiconsmaterial.woff2",
        "dxicons.ttf",
        "dxicons.woff2",
        "dxicons.woff"
      ]
    },
    {
      "library": "node_modules/@devexpress/analytics-core/dist/css/",
      "destination": "wwwroot/css/reporting",
      "files": [
        "dx-analytics.light.css",
        "dx-analytics.common.css",
        "dx-querybuilder.css"
      ]
    },
    {
      "library": "node_modules/devexpress-reporting/dist/css",
      "destination": "wwwroot/css/reporting"
    },
    {
      "library": "node_modules/ace-builds/css/ace.css",
      "destination": "wwwroot/css/reporting"
    },
    {
      "library": "node_modules/ace-builds/css/theme/",
      "destination": "wwwroot/css/reporting",
      "files": [
        "dreamweaver.css",
        "ambiance.css"
      ]
    },
    {
      "library": "node_modules/@devexpress/analytics-core/dist/js/",
      "destination": "wwwroot/js/reporting",
      "files": [
        "dx-analytics-core.min.js",
        "dx-querybuilder.min.js"
      ]
    },
    {
      "library": "node_modules/devexpress-reporting/dist/js/",
      "destination": "wwwroot/js/reporting",
      "files": [
        "dx-webdocumentviewer.min.js",
        "dx-reportdesigner.min.js"
      ]
    },
    {
      "library": "node_modules/ace-builds/src-min-noconflict/",
      "destination": "wwwroot/js/reporting",
      "files": [
        "ace.js",
        "ext-language_tools.js"
      ]
    },
    {
      "library": "node_modules/ace-builds/src-min-noconflict/snippets/text.js",
      "destination": "wwwroot/js/reporting"

    },
    {
      "library": "node_modules/knockout/build/output/knockout-latest.js",
      "destination": "wwwroot/js/reporting"
    }
  ]
}
Reference the js and css files in the _Layout.cshtml file as follows:
@* ...*@
<head>
    <meta charset="utf-8">
    <meta name="viewport" content="width=device-width, initial-scale=1">
    <title>DXApplication1</title>
    <link href="~/css/devextreme/bootstrap.css" rel="stylesheet" />
    @* Predefined themes: https://js.devexpress.com/DevExtreme/Guide/Themes_and_Styles/Predefined_Themes/ *@
    <link href="~/css/devextreme/dx.light.css" rel="stylesheet" />
    <link href="~/css/reporting/dx-analytics.common.css" rel="stylesheet" />
    <link href="~/css/reporting/dx-analytics.light.css" rel="stylesheet" />
    <link href="~/css/reporting/dx-webdocumentviewer.css" rel="stylesheet" />
    <link href="~/css/reporting/dx-querybuilder.css" rel="stylesheet" />
    <link href="~/css/reporting/dx-reporting-skeleton-screen.css" rel="stylesheet" />
    <link href="~/css/reporting/dx-reportdesigner.css" rel="stylesheet" />
    <link href="~/css/reporting/ace.css" rel="stylesheet" />
    <link href="~/css/reporting/dreamweaver.css" rel="stylesheet" />
    <link href="~/css/reporting/ambiance.css" rel="stylesheet" />
    <link rel="stylesheet" href="~/css/Site.css" />

    <script src="~/js/devextreme/jquery.js"></script>
    <script src="~/js/devextreme/bootstrap.js"></script>
    <script src="~/js/reporting/knockout-latest.js"></script>
    <script src="~/js/devextreme/dx.all.js"></script>
    <script src="~/js/devextreme/aspnet/dx.aspnet.mvc.js"></script>
    <script src="~/js/devextreme/aspnet/dx.aspnet.data.js"></script>
    <script src="~/js/reporting/dx-analytics-core.min.js"></script>
    <script src="~/js/reporting/dx-webdocumentviewer.min.js"></script>
    <script src="~/js/reporting/dx-querybuilder.min.js"></script>
    <script src="~/js/reporting/dx-reportdesigner.min.js"></script>
    <script src="~/js/reporting/ace.js"></script>
    <script src="~/js/reporting/ext-language_tools.js"></script>
    <script src="~/js/reporting/text.js"></script>
</head>
@* ...*@
Configure Application and Services
Open the Program.cs file and modify the code as shown in the following code snippet:
using DevExpress.AspNetCore;

var builder = WebApplication.CreateBuilder(args);

// Add services to the container.
builder.Services
    .AddDevExpressControls()
    .AddRazorPages()
    .AddJsonOptions(options => options.JsonSerializerOptions.PropertyNamingPolicy = null);

var app = builder.Build();
//...
app.UseDevExpressControls();

//...

app.Run();
Implement controllers to process the Report Designer requests. In the Controllers folder, create the ReportingControllers.cs file with the following content:
using DevExpress.AspNetCore.Reporting.QueryBuilder;
using DevExpress.AspNetCore.Reporting.QueryBuilder.Native.Services;
using DevExpress.AspNetCore.Reporting.ReportDesigner;
using DevExpress.AspNetCore.Reporting.ReportDesigner.Native.Services;
using DevExpress.AspNetCore.Reporting.WebDocumentViewer;
using DevExpress.AspNetCore.Reporting.WebDocumentViewer.Native.Services;


public class CustomWebDocumentViewerController : WebDocumentViewerController {
    public CustomWebDocumentViewerController(IWebDocumentViewerMvcControllerService controllerService)
        : base(controllerService) {    }
}

public class CustomReportDesignerController : ReportDesignerController {
    public CustomReportDesignerController(IReportDesignerMvcControllerService controllerService)
        : base(controllerService) { }
}

public class CustomQueryBuilderController : QueryBuilderController {
    public CustomQueryBuilderController(IQueryBuilderMvcControllerService controllerService)
        : base(controllerService) {    }
}
An application with End-User Report Designer requires all three controllers for proper operation.
Add a Sample Report
Right-click the project in the Solution Explorer and select Add | New Folder from the context menu. Rename the created folder to Reports.
Right-click the Reports folder and select Add | New Item from the context menu. In the invoked Add New Item dialog, click the Reporting tree node and select DevExpress v25.2 Report.

Rename the new report to TestReport and click Add.
Select the Blank report type in the invoked Report Wizard. The Report Designer displays the newly created blank report.
- Drop an XRLabel from the Toolbox to the Detail band and rename the label to Hello, world!. Save the report and close the designer.
See the following section for more information about creating reports in Visual Studio: Create a Report from A to Z.
Add the End-User Report Designer Component
Register the
DevExpress.AspNetCorenamespace directive to the _ViewImports.cshtml file. As an alternative, you can add this namespace to the view that contains the Report Designer control.@using DevExpress.AspNetCoreAdd a Razor Page (Designer.cshtml) with the following code, which displays the Report Designer and loads the TestReport:
Note
If you implement a custom report that inherits from XtraReport and want to open it in the End-User Report Designer, add a constructor without parameters to this report.
@page

@(Html.DevExpress().ReportDesigner("reportDesigner")
    .Height("1000px")
        .Bind(new Reports.TestReport()))
Open the Layout.cshtml file (Views|Shared folder) and add a link to the Designer.cshtml page:
...
    <div id="navbar" class="collapse navbar-collapse">
        <ul class="navbar-nav mr-auto">
            <li class="active nav-item"><a href="#" class="nav-link">Home</a></li>
            <li class="nav-item"><a href="#about" class="nav-link">About</a></li>
            <li class="nav-item"><a href="#contact" class="nav-link">Contact</a></li>
            <li class="nav-item"><a href="/Designer" class="nav-link">Report Designer</a></li>
        </ul>
    </div>
...
Run the Application
When you run the application, the page contains the End-User Report Designer with the TestReport. You can design a report, preview it, print and export, but you cannot save it or load another report.
Troubleshooting
If the page does not display the Report Designer component, or it is displayed incorrectly, check the following:
- The script files should be registered in the correct order. For more information, review the following help topic: Script Registration Order.
- There should be no duplicate registrations. Report Designer component bundles should be included in the pages that contain the component.
- The version of the DevExpress scripts (npm packages) should match the version of the server-side libraries (NuGet packages). You can enable Development Mode to check for library version mismatch on every request to the server. For more information, review the following help topic: Server-Side Libraries Version.
Review the following help topic for more information: Troubleshooting.
What’s Next
You have now completed a basic DevExtreme ASP.NET Core App with a Report Designer control. Refer to the following help topics for more information on Reporting features:
- Add a Report Storage
- Create and register a report storage to enable users to save and load reports.
- Data Sources in End-User Report Designer
- Manage data sources in the Report Designer to enable users to create a data-bound report.
- Add Features to the Report Designer
- Extend the End-User Report Designer in ASP.NET Core Applications.
- Customize End-User Report Designer
- Customize available End-User Report Designer elements.