Node Selection
- 6 minutes to read
You can enable node selection to allow multiple nodes to be selected. Selected nodes are highlighted in a specific manner, indicating their states. You can access these nodes in code and process them, if required.
Note that selected nodes are different from focused nodes. The focused node specifies the node containing focus. (There is only one focused node.) In node selection mode, when a node is focused by an end user, it is automatically selected - but a user can click the focused node with the CTRL key pressed to deselect it. See the following help topic to learn more: Focus and Navigation.
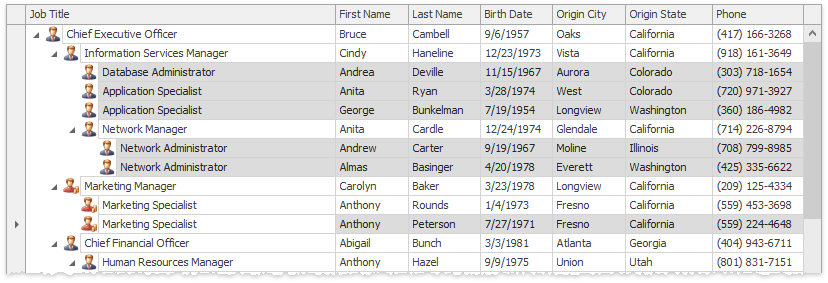
Selected Nodes Overview
To enable node selection, set the TreeListOptionsSelection.MultiSelect property to true. In node selection mode, you or an end user can select contiguous and non-contiguous node ranges.
Selected nodes are highlighted in a specific manner. You can use the TreeListAppearanceCollection.SelectedRow property to customize the appearance of selected nodes. The TreeListAppearanceCollection.HideSelectionRow property specifies the appearance of selected nodes, when the Tree List control is not focused.
If the TreeListOptionsSelection.KeepSelectedOnClick option is active, selection is preserved while editing cells within the selected nodes.
Selecting Nodes Using the Mouse and Keyboard
To use the mouse pointer to select multiple nodes, an end user must press the SHIFT or CTRL key, and click the desired nodes. To select a continuous range of nodes, click the first node of the range. Then, hold the SHIFT key down and click the last node of the range. To select a specific node (and add it to the existing selection), click it with the CTRL key pressed.
When you click a node while pressing the CTRL key, the node’s selected state is toggled (i.e., the state changes from selected to deselected, and vice-versa).
If the UseIndicatorForSelection option is enabled, a user can utilize the node indicator panel to select nodes as follows:
- To select a single node, click its corresponding node indicator;
- To select multiple nodes, hold the Ctrl key and click the corresponding node indicators;
- To select multiple nodes, click a node indicator and drag it across all required nodes.
For other approaches to selecting nodes, see the following help topic: Selecting Nodes.
Selection Availability
Handle the TreeList.SelectionChanging event to control whether users can select and unselect nodes.
The following code sample does not allow users to select root nodes:
treeList.SelectionChanging += (s, e) => {
    e.Cancel = e.Action == CollectionChangeAction.Add && e.Node.Level == 0;
};
Selection Appearance
The TreeList control highlights selected nodes with specific background and foreground colors. The actual colors depend on the currently applied skin. You can use the SelectedRow appearance settings to override default background and foreground colors for selected rows.
Note that appearance settings are applied to various visual elements: rows, focused row, focused cell, etc. Appearance settings are prioritized from more common visual elements and states (for example, non-focused rows) to more specific elements and states (for example, focused cells). You can use the HighPriority property to prioritize appearance settings for a specific visual element or state. For example, you can prioritize a specific column’s cell appearance settings. See the following help topic for more information about skins and appearance settings: Application Appearance and Skin Colors.
To specify appearance settings for a particular cell, handle the NodeCellStyle event. You can also specify appearance settings in the CustomDrawRow and CustomDrawNodeCell events that fire before a row or cell is painted on-screen. Appearance settings in these events have the highest priority.
Tip
DevExpress controls support consistent UIs and APIs within similar features. You can use the same approach to customize appearances in the Gantt Control, Data Grid, and Vertical Grid.
 treeList.NodeCellStyle += (s, e) => {
       TreeList tl = s as TreeList;
       if(tl.IsCellSelected(e.Node, e.Column))
           e.Appearance.BackColor = tl.ViewInfo.PaintAppearance.SelectedRow.BackColor;
   };
Tip
Run the following demo to see the result: Prioritize cell selection appearances.
treeList.OptionsBehavior.Editable = false;
// Prevent the focused cell from being highlighted.
treeList.OptionsSelection.EnableAppearanceFocusedCell = false;
Tip
Run the following demo to see the result: Disable focused cell highlight.
treeList.NodeCellStyle += (s, e) => {
       TreeList tl = s as TreeList;
       //Change selected rows' fore and back colors
       bool mark = (bool)e.Node.GetValue(tl.Columns["Mark"]);
       if(mark) {
           if(tl.FocusedNode == e.Node)
               e.Appearance.BackColor = tl.ViewInfo.PaintAppearance.SelectedRow.BackColor;
           else {
               e.Appearance.ForeColor = foreColor;
               e.Appearance.BackColor = backColor;
           }
       }
   };
Tip
Run the following demo to see the result: Appearances of nodes (dynamically)
Select Nodes in Code
Use the TreeList.Selection property to access the collection of currently selected nodes. You can add nodes to the collection to select them. To deselect the nodes, remove them from the collection.
You can also call the SelectNode, SelectNodes, UnselectNode and UnselectNodes methods to toggle node selection.
To respond to a change in node selection, you can handle the TreeList.SelectionChanged event.
Example
The following code demonstrates how to traverse through selected nodes, in order to expand them. The selected nodes are accessed via the TreeList.Selection property.
for(int i = 0; i < treeList1.Selection.Count; i++) {
   treeList1.Selection[i].Expanded = true;
}
Example
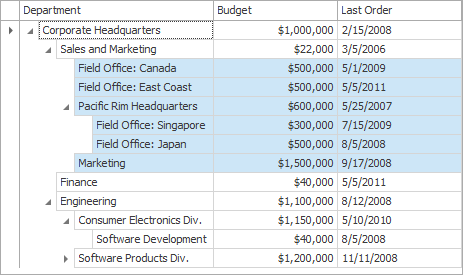
The following code shows how to select children of a specific node. In the example, nodes are selected via the TreeListMultiSelection.Set method of the TreeList.Selection object.
The image below shows the result of selecting a Sales and Marketing node’s children.
using DevExpress.XtraTreeList.Nodes;

TreeListNode node = treeList1.FindNodeByFieldValue("Department", "Sales and Marketing");
if (node != null) {
    ArrayList selectedNodes = new ArrayList();
    selectChildren(node, selectedNodes);
    treeList1.Selection.Set(selectedNodes);
}

void selectChildren(TreeListNode parent, ArrayList selectedNodes) {
   IEnumerator en = parent.Nodes.GetEnumerator();
   TreeListNode child;
   while(en.MoveNext()) {
      child = (TreeListNode)en.Current;
      selectedNodes.Add(child);
      if(child.HasChildren) selectChildren(child, selectedNodes);
   }
}