Layout Assistant Extension
- 5 minutes to read
The DevExpress WinForms component installation automatically adds the Layout Assistant Extension to Visual Studio. When enabled, the extension provides smart tags and links for forms and user controls, and allows you to utilize this extension.
- Enable or Disable the Layout Assistant Extension
- Form/UserControl smart tags and links
- Instant Layout Assistant
Enable or Disable the Layout Assistant Extension
The extension is enabled by default, so there is no need to turn it on manually. To toggle the extension on or off, select DEVEXPRESS | WinForms Controls in the Visual Studio main menu and click “Disable (Enable) Layout Assistant Extension”.

Note
The Layout Assistant Extension is not available in .NET/.NET Core applications.
Form/UserControl Smart Tags and Links
A smart tag for any form or user control is the entry point for other Layout Assistant Extension features.
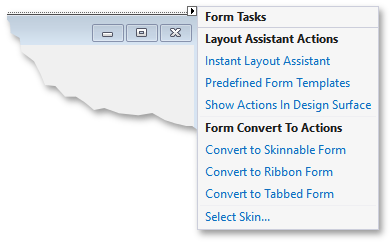
The smart tag contains the following items.
- Instant Layout Assistant - invokes the Instant Layout Assistant guides.
- Predefined Form (User Control) Templates - invokes the Template Gallery with UI-ready templates that can be applied directly to this form (user control).
Show Actions in Design Surface - moves the previous two smart tag items onto the form (user controls). To undo this action, click the Hide Actions to Smart Tag link.

- Convert to… - provides multiple commands that allow you to convert your form to an XtraForm, Ribbon Form or Tabbed Form. For user controls, conversion to the XtraUserControl is available.
- Select Skin… - adds a DefaultLookAndFeel component to select the required DevExpress skin. This option is displayed in form smart tags only.
If your form or user control does not display a smart tag, check the following list that addresses the most common causes.
- Your solution does not reference any DevExpress libraries.
- DevExpress libraries have just been added. Rebuild the solution and open the form again at design time.
- The version of DevExpress libraries included in your solution is v15.2 or older. Use the Project Converter tool to replace DevExpress libraries with newer libraries.
- You are using an unsupported version of Visual Studio.
- The Layout Assistant Extension is disabled.
Instant Layout Assistant
Instant Layout Assistant (ILA) is a design-time helper that allows you to build a form (user control) layout without searching for DevExpress controls in the Visual Studio toolbox. When ILA is activated, it breaks down the form’s free space into five abstract regions (see the animation below). This mark-up fits a traditional UI with commanding regions at the form’s top, navigation controls at both sides, a status panel or additional navigation control docked to the form’s bottom, and main form content displayed in the middle.
The three buttons visible next to the form are as follows:
- The “close” button - which discards any previous modifications and hides the ILA interface (click the Instant Layout Assistant link again to re-display ILA with five blank default regions).
- The “apply” button - which closes the ILA interface and applies your layout; the modified layout is considered a draft until you click this button.
- The “add” button - which allows you to add non-visual components such as the Workspace Manager or Spell Checker.
When you hover over a region, ILA will show multiple available actions (see below).

- Clicking the Remove Area link will delete this region. Remaining regions will resize accordingly to occupy this free space. Removing the central region will leave a gap between the left and right ILA regions.
The Wrap in Dock Panel link adds the Dock Manager component and creates a dock panel. You can identify regions wrapped in panels by false panel headers (see the figure below). This option is unavailable in the central region.

Note
Wrapping regions in dock panels also adds the Application UI Manager component to enable advanced docking hints. See the Interaction with Dock Panels article to learn more about the benefits of using both components within the same form.
- The Add Control link shows controls that suit the current region.
Controls shown after you click the Add Control link are grouped by purpose. Depending on the region, ILA will display different groups with different controls inside. For instance, side regions offer a Navigation group that allows you to add Accordion Control, Navigation Bar, Navigation Pane, Tree List, Tile Bar, Tile Control or GalleryControl. The Back button navigates back from the currently viewed control group to the root one.

To change a control that should be displayed within a region, hover over this region and click the Change Control option.

If ILA has automatically added the Application UI Manager, but your central region hosts any other control (e.g., a Data Grid), this control will be displayed inside the Application UI Manager. See the Non-Document Mode article for more details.
After you customize and populate all the required ILA regions, click the “Apply” button to add all controls and components at once. If no free space remains on your form, actions that invoke ILA will become unavailable from both the form surface and the form smart tag. Otherwise, you can click the Instant Layout Assistant link again to break down the remaining space. The figure below illustrates a form with populated side and bottom regions; the remaining space is marked up by ILA into five more regions.
