Lesson 1 - Bind a Pivot Grid to an MDB Database
- 4 minutes to read
This tutorial will teach you how to add the PivotGridControl to your WPF application, bind it to a data source and map its fields to appropriate fields from a database. For teaching purposes, this example will use the Microsoft Access database (.mdb), which is one of the many data providers to which this pivot grid can be bound.
Note
This tutorial is based on the .NET Framework. For the .NET tutorial, refer to the following topic: Bind a Pivot Grid to an MDB Database (.NET)
Documentation: Migrate WPF Applications to .NET
To create a simple WPF application with a pivot grid, do the following.
- Steps 1-5. Create a New Project and Add the PivotGridControl
- Steps 6-15. Create Data Objects
- Step 16-18. Bind the PivotGridControl to a Data Source/Specify Pivot Grid Data Source
- Step 19. Create Pivot Grid Fields and Bind Them to Database Fields
- Result
Steps 1-5. Create a New Project and Add the PivotGridControl
- Run MS Visual Studio.
- Create a new WPF Application project.
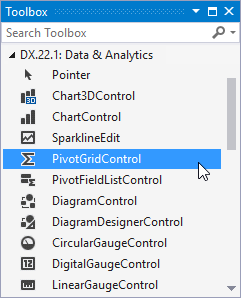
Add PivotGridControl to your project by dragging the PivotGridControl item from the DX.25.2: Data & Analytics toolbox tab.
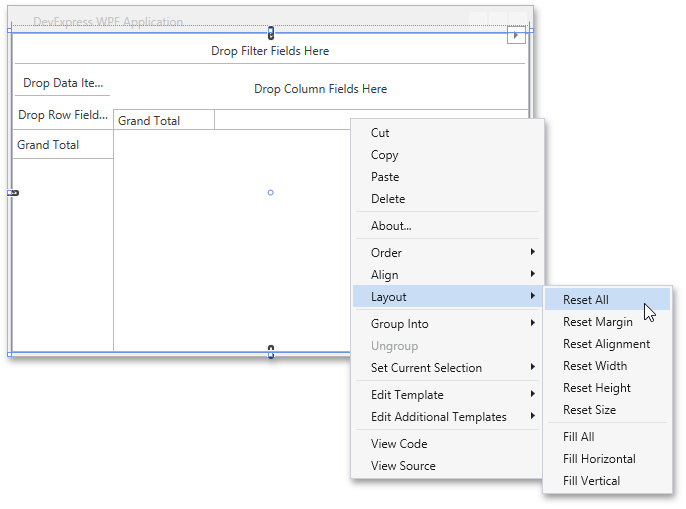
Right-click the pivot grid and choose the Layout → Reset All option in the context menu. This will stretch the control to fill the whole window.
After this, your XAML may look like the following:
<Window x:Class="WpfApplication1.MainWindow"
        xmlns="http://schemas.microsoft.com/winfx/2006/xaml/presentation"
        xmlns:x="http://schemas.microsoft.com/winfx/2006/xaml"
        Title="MainWindow" Height="350" Width="525"
        xmlns:dxpg="http://schemas.devexpress.com/winfx/2008/xaml/pivotgrid">
    <Grid>
        <dxpg:PivotGridControl />
    </Grid>
</Window>
Steps 6-15. Create Data Objects
To add a data source to a WPF Application, follow the steps below.
Select the PivotGridControl and click the smart tag icon at the top right corner of the control. Click the Items Source Wizard to invoke the wizard.

Select the ADO.NET Typed DataSet data access technology and click the New Data Source… button.

A message box that notifies you of the necessity to rebuild the solution and reopen the Items Source Configuration Wizard appears. Click Ok to run the Data Source Configuration Wizard.

Choose Database as the type of data source.

Then, choose Dataset as the Database Model.

On the Choose Your Data Connection page, click New Connection… to create a connection to a database.

The Add Connection dialog will be invoked.
Specify the Microsoft Access Database File as your data source. Then, select the nwind.mdb database as your data connection. By default, it is stored in the following path.
C:\Users\Public\Documents\DevExpress Demos 25.2\Components\Data

Click OK to close the dialog and then click Next in the wizard.
A message box that asks whether to copy the database file to the project appears. Click Yes.

In the next step, you can choose whether to save the connection settings to a connection string or not.

Make sure that the Yes, save the connection as check box is checked and click Next.
In the Database Objects menu, choose the database columns that you need to include in the data source.
To do this, expand the Views and SalesPerson nodes and select the following columns in the SalesPerson view.
- Country;
- ProductName;
- CategoryName;
- Extended Price;
- Sales Person.

After this, click Finish to close the wizard.
Steps 16-18. Bind the PivotGridControl to a Data Source/Specify Pivot Grid Data Source
To bind the PivotGridControl to a data source, follow the steps below.
Rebuild the solution and reopen the Items Source Configuration Wizard. The newly created data source will be displayed within the Data Sources section.

Select Simple Binding to bind the control to a plain collection of data objects and click Next.

This will enable collections to have current record management functionalities, custom sorting, filtering, and grouping, select Manipulating Data via ICollectionView.
Select the SalesPerson table and click Finish.

Step 19. Create Pivot Grid Fields and Bind Them to Database Fields
Click the pivot grid’s smart tag icon and then click Retrieve Fields in the popup window.

The Pivot Grid control will create fields for all columns in the data source and locate the created fields in the Filter Header Area.

Put the Country and Sales Person fields into the Column Header Area, the CategoryName and ProductName fields into the Row Header Area, and the Extended Price field into the Data Header Area.
You can drag fields between areas and change their order within areas using drag-and-drop.

After you have finished, the pivot grid fields should be arranged as illustrated below.

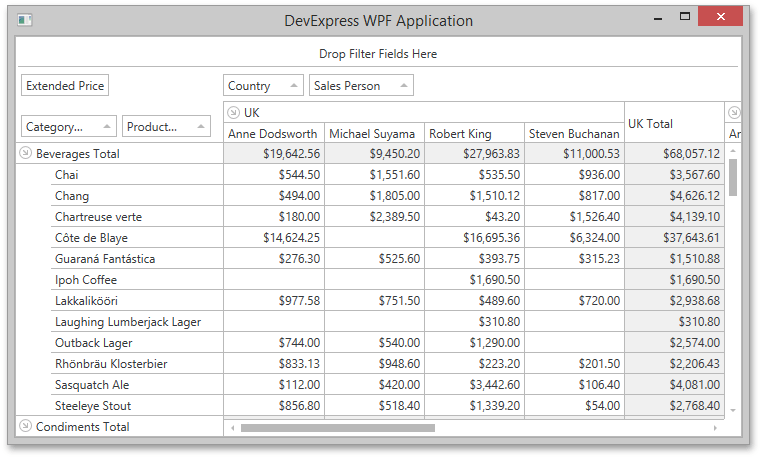
Result
Run the project and see the result.