Bands
- 3 minutes to read
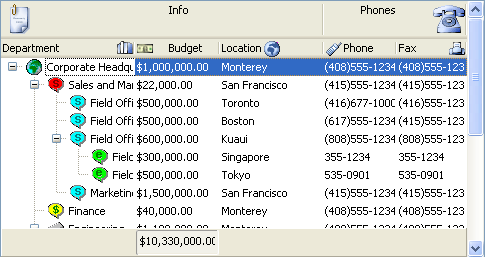
Let’s create a TcxTreeList with the following bands and columns layout:
First, drop a TreeList control on a form. Invoke the Component Editor and go to the Bands tab to create two bands by pressing the Add button:

Set the OptionsView.Bands property to True to display bands within the tree list. Set their desired captions (the Caption.Text property), glyphs and their alignment (the Caption.Glyph, Caption.GlyphAlignHorz and Caption.GlyphAlignVert properties).
Now it is time to create columns. Invoke the Component Editor, go to the Columns tab and create five columns by pressing the Add button. By default, they will be created in the first band, the band that has a zero index. If there is no band in your tree list when adding columns, a new band will be created automatically.

After setting the Caption properties, text and glyph, we need to move two columns to the second band. It can be done by dragging columns from one band into the other at design time or by changing their Position.BandIndex from 0 (the default value) to 1.

The first image illustrates band captions that occupy two text lines. To achieve this result, set the OptionsView.BandLineHeight property to 34 or increase the band’s height by clicking and dragging the band’s bottom edge at design time.
Now your TreeList control should look exactly like the one in the first screenshot.
The following code does the same at runtime.
//...
var
  ATreeList: TcxTreeList;
begin
  // Create a TreeList control
  ATreeList := TcxTreeList.Create(self);
  ATreeList.Parent := self;
  ATreeList.Left := 10;
  ATreeList.Top := 10;
  ATreeList.Width := 400;
  ATreeList.Height := 300;
  // Make bands visible
  ATreeList.OptionsView.Bands := True;
  // Set the band header panel's height
  ATreeList.OptionsView.BandLineHeight := 34;
  // Create bands
  ATreeList.Bands.Add;
  ATreeList.Bands.Add;
  // Set band captions
  ATreeList.Bands[0].Caption.Text := 'Info';
  ATreeList.Bands[1].Caption.Text := 'Phones';
  // Create columns in the first band
  with ATreeList.CreateColumn(ATreeList.Bands[0]) do
    Caption.Text := 'Department';
  with ATreeList.CreateColumn(ATreeList.Bands[0]) do
    Caption.Text := 'Budget';
  with ATreeList.CreateColumn(ATreeList.Bands[0]) do
    Caption.Text := 'Location';
  // Create columns in the second band
  with ATreeList.CreateColumn(ATreeList.Bands[1]) do
    Caption.Text := 'Phone';
  with ATreeList.CreateColumn(ATreeList.Bands[1]) do
    Caption.Text := 'Fax';
  // Enable columns auto width
  ATreeList.OptionsView.ColumnAutoWidth := True;
end;
Another feature of the ExpressQuantumTreeList is fixed bands. Fixing bands to the left or to the right of the control makes compacts data representation as fixed bands are not included in horizontal scrolling. To fix a band, set its FixedKind property to tlbfRight or to tlbfLeft.

In this case, the band becomes non-scrollable. This feature does not make sense if OptionsView.ColumnAutoWidth is set to True.
For data-aware TreeLists, you can use the DataController.CreateAllItems method, which creates items for all fields in a bound data source and automatically links them to the corresponding fields via the DataBinding property.