Cell Management
- 7 minutes to read
This topic covers the cell management operations, including:
Insert Cells
Delete Cells
Merge/Split Cells
Clear Cells
Sort Cells
The end-user cell management functionality is described in the following document sections:
The Cell Context Menu
The AutoFill Functionality
Drag-and-Drop Cells Manipulation
Insert Cells
There are two techniques you can use to insert cells into a worksheet:
- Insert entire rows and columns of cells by calling a worksheet’s InsertRows and InsertColumns procedures, respectively. As a result, rows or columns located below or to the right of an inserted row(s) or column(s) are shifted down or right:

- Insert an arbitrary rectangular cell range by calling a worksheet’s InsertCells procedure. Its AModification parameter determines whether the cells are shifted down or right:

For instance, the following code example inserts the cell range B2:B3:
var
  ATableView: TdxSpreadSheetTableView;
//...
  ATableView := dxSpreadSheet1.ActiveSheetAsTable;
  ATableView.InsertCells(Rect(1, 1, 1, 2), cmShiftCellsHorizontally);
As a result, the previous occupants of this range and adjacent cells are shifted to the right.

Delete Cells
Similar to insert cell operations, there are two basic ways to delete cells:
- Remove entire rows and columns by calling a worksheet’s DeleteRows and DeleteColumns procedures, respectively. As a result, rows or columns located below or to the right of a deleted row(s) or column(s) are shifted up or left:

- Delete an arbitrary rectangular cell range by calling a worksheet’s DeleteCells procedure. Similarly to the previous case, the AModification parameter determines the adjacent cells shift direction:

The following code example deletes two rows containing the occupied cells:
var
  ATableView: TdxSpreadSheetTableView;
//...
  ATableView := dxSpreadSheet1.ActiveSheetAsTable;
  ATableView.DeleteRows(1, 2);
As a result, underlying rows are shifted up:

Merge/Split Cells
Any cell range within a worksheet can be merged into a single cell. The upper-left cell within a source cell range is always considered as the primary, and the resulting merged cell displays this cell’s value while other cells’ content is discarded. When a merged cell is split back into the original cells, the primary cell retains the merged cell value while other cells are blank.
Use methods provided by its MergedCells property to manage merged cells in a worksheet. For instance, you can call the MergedCells.Add procedure to merge a cell range:
var
  ATableView: TdxSpreadSheetTableView;
//...
  ATableView := dxSpreadSheet1.ActiveSheetAsTable;
  ATableView.MergedCells.Add(Rect(1, 1, 2, 2));

You can call a worksheet’s MergedCells.Clear procedure to unmerge all merged cells instantly. However if you need to split them up individually, invoke the MergedCells.DeleteItemsInArea procedure:
var
  ATableView: TdxSpreadSheetTableView;
//...
  ATableView := dxSpreadSheet1.ActiveSheetAsTable;
  ATableView.MergedCells.DeleteItemsInArea(ATableView.Selection.Area);
Clear Cells
The Spreadsheet and Report Designer controls provide several ways to clear cells. An end-user can press the Del key, you can invoke a worksheet’s ClearCells procedure to clear all cells within the current selection(s). This clears both the cell content and formatting for a specified cell range by default. Refer to the following code example to clear the current cell selection programmatically:
var
  ATableView: TdxSpreadSheetTableView;
//...
  ATableView := dxSpreadSheet1.ActiveSheetAsTable;
  ATableView.ClearCells(ATableView.Selection.Area);
Alternatively, you can call this procedure with the optional AClearValues and AClearFormats parameters to clear either the cell content or formatting.
If you need to clear the entire worksheet, you can call its Columns.Clear or Rows.Clear procedure that clears both the cell content and formatting.
Sort Cells
Call a worksheet’s SortByColumnValues and SortByRowValues procedures to sort cell values against multiple columns or rows, respectively. Sorting by multiple columns means that you can define the sort order for each column in the specified range. If cells in a particular column have the identical values, then cells in other columns are compared and sorted.
You have to identify the cell range for the sort operation, but it is not necessary to specify the sort order for every column or row within the sorting range.
Suppose that you want to sort against the continent and country columns in descending and ascending orders, respectively:

The following code example performs the selected cell range’s sorting. As the values in the C column relate to the data of the two previous columns, you must specify all three columns in the sort procedure. In this example, the selected area is used as the sorting range, and it is necessary to select all three columns with data before the code execution.
var
  ATableView: TdxSpreadSheetTableView;
const
  ASortOrder: array[1..3] of TdxSortOrder = (soDescending, soAscending, soAscending);
  AColumns: array[1..3] of Integer = (0, 1, 2);
//...
  ATableView := dxSpreadSheet1.ActiveSheetAsTable;
  ATableView.SortByColumnValues(ATableView.Selection.Area, ASortOrder, AColumns);

The Cell Context Menu
The Spreadsheet and Report Designer controls provide the cell management context menu that can be invoked from any cell and allows end-users to:
Cut, copy, or paste the cell contents. Cut, Copy, and Paste context menu options emulate the Ctrl+X Ctrl+C and Ctrl+V key combinations, respectively.
Merge a rectangular cell range into the single cell and split it back into multiple cells;
Either insert or delete cells individually, by rectangular ranges, by individual rows or columns;
Clear cells of contents;
Invoke the Format Cells Dialog for a selected cell or a cell range.

The Insert, Delete, and Format Cells menu options invoke their respective dialogs.
The Insert dialog window provides an end-user with four cell insert options:
Insert the number of cells within a selected range width. Adjacent cells are shifted to the right from the insertion point;
Insert the number of cells within a selected range height. Underlying cells are shifted down from the insertion point;
Insert a number of rows equal to the cell selection height. Underlying rows are shifted down from the insertion point;
Insert a number of columns equal to the cell selection width. The columns to the right of the insertion point are shifted to the right.

The Delete dialog is similar to the Insert dialog and provides an end-user with four cell delete options:
Delete cells within a selected range. Cells to the right are shifted left to occupy the freed space;
Delete cells within a selected range. Underlying cells are shifted up to occupy the freed space;
Deletes a number of rows equal to the cell selection height. Underlying cells are shifted up to occupy the freed space;
Deletes a number of columns equal to the cell selection width. Cells to the right of the deleted columns are shifted to the left to occupy the freed space.

Refer to the About Cells Formatting topic for detailed information on the Format Cells dialog, which is invoked by clicking the Format Cells menu item.
The AutoFill Functionality
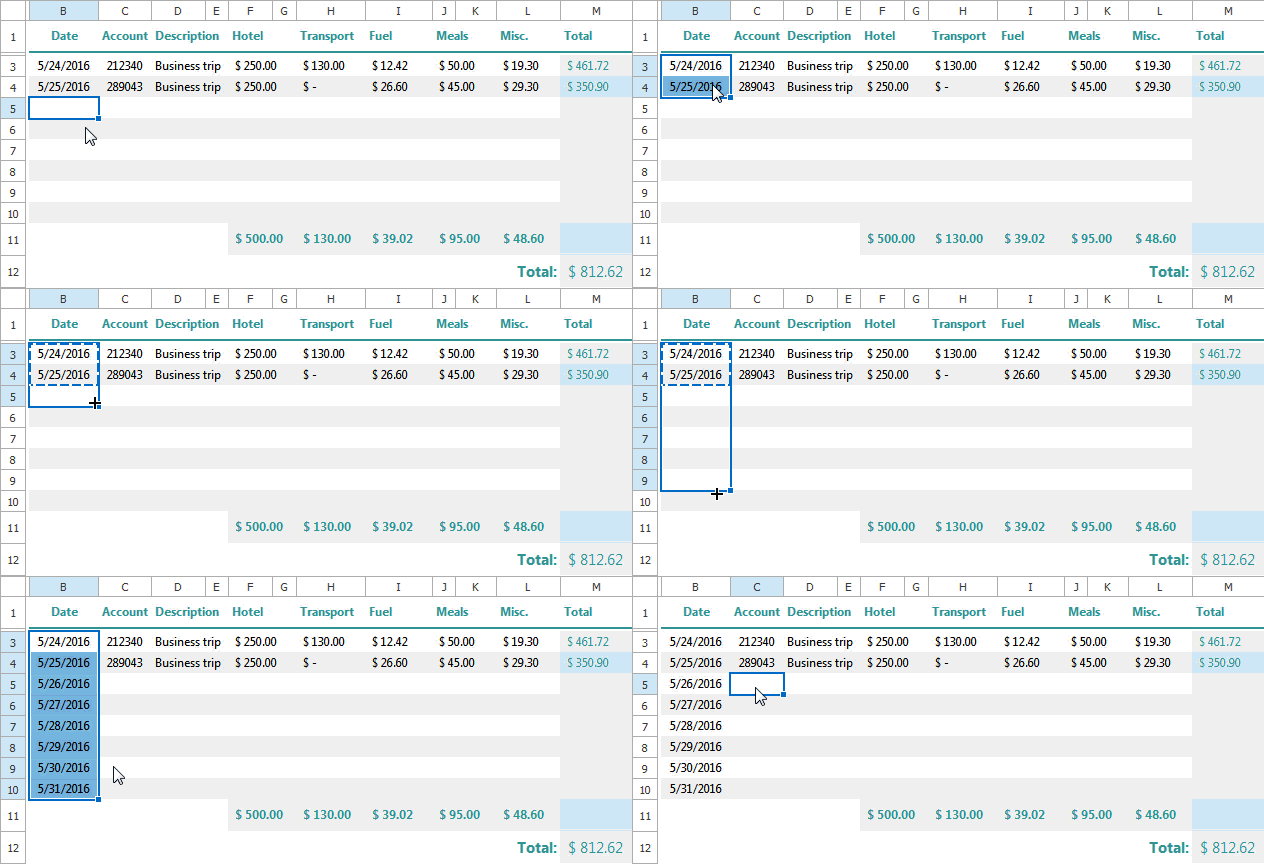
The Spreadsheet control allows an end-user to populate cells with data that follows a pattern or one that is based on data in other cells. An end-user can drag the fill handle in the respective direction and drop it when the required number of cells is selected to fill cells located to the left, to the right, above, or below the current selection.

You can disable the end-user AutoFill functionality by setting the Spreadsheet control’s OptionsBehavior.DragFilling property to False.
Drag-and-Drop Cells Manipulation
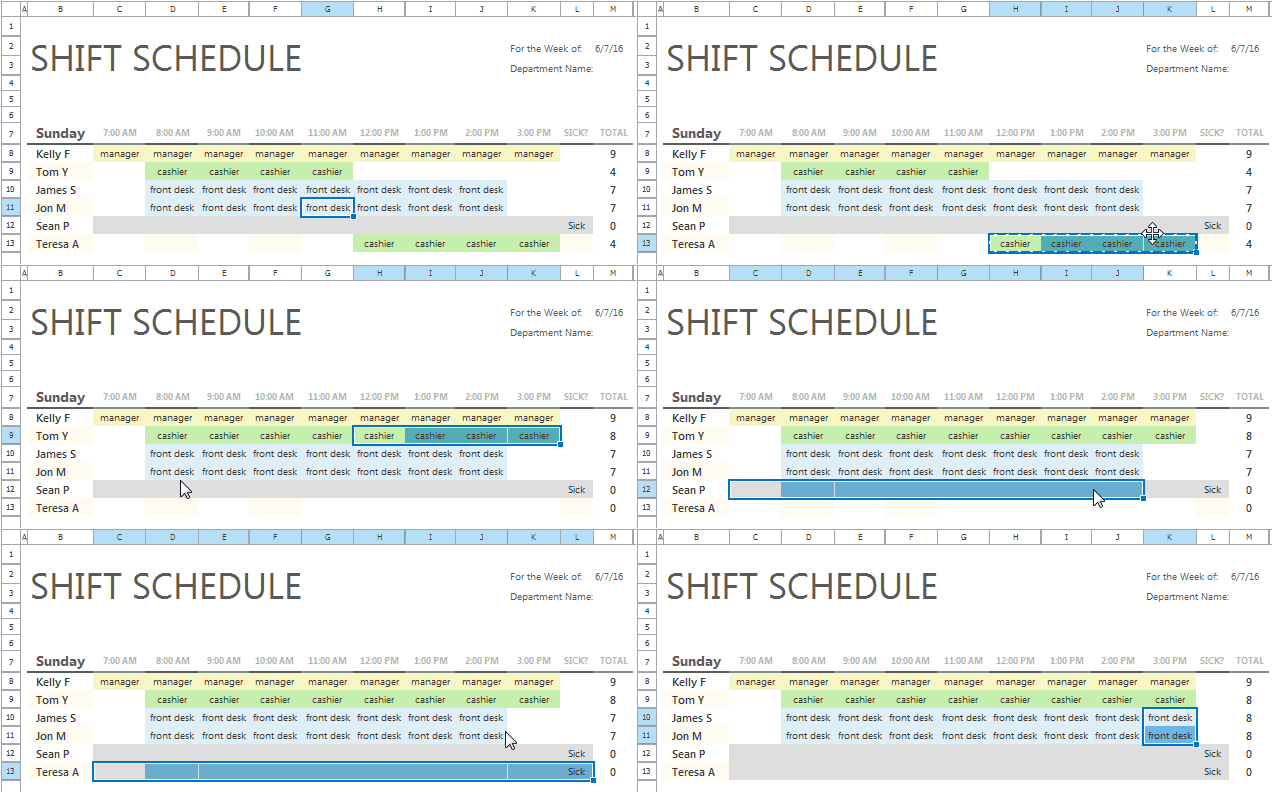
An end-user can easily move or copy a selected cell range within the active worksheet by performing drag-and-drop operations. To move cells, select a cell or cell range, then drag the edge of the selection and release the mouse button at the new location. The source cell range is highlighted while an end-user is dragging the selection:

The Confirm dialog is invoked if the destination cell range is currently occupied:

Pressing and holding the Ctrl key while dragging the selected cells, copies them instead.
Note that the edge of the selection cannot be dragged while multiple cell ranges are selected.
You can disable drag-and-drop cell manipulation by setting the Spreadsheet/Report Designer control’s OptionsBehavior.DragMoving property to False.