Get Started with Blazor Grid
- 16 minutes to read
This tutorial describes how to create a simple Blazor application that uses a DevExpress Grid component.
Video Tutorial
Create a New Project (DevExpress Template Kit)
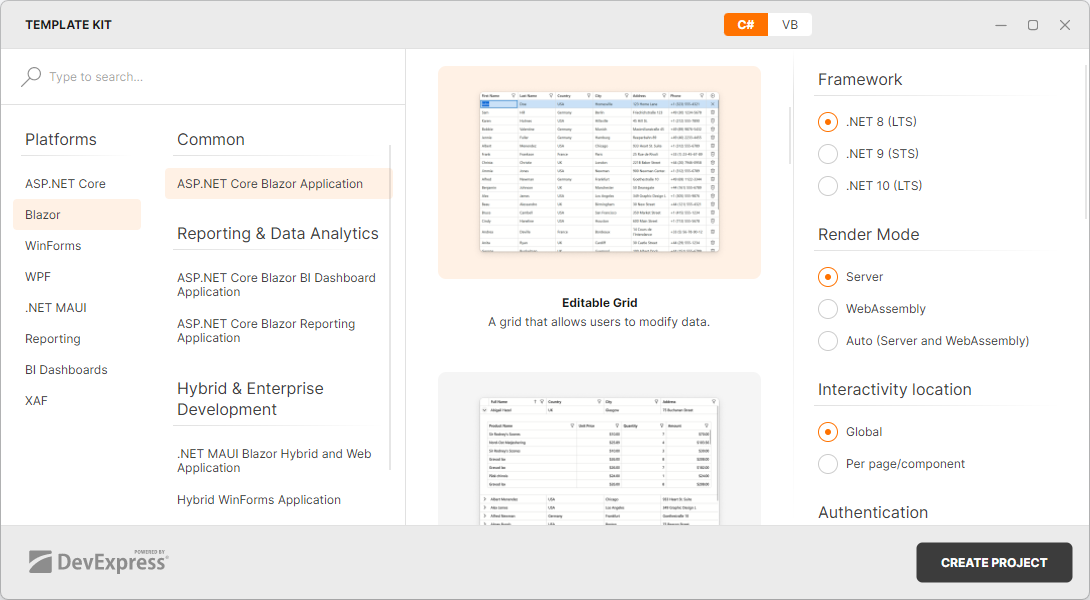
- Start the DevExpress Template Kit. Select Blazor as the platform and ASP.NET Core Blazor Application as the project type.
- In the Add views to the application section, choose the Grid group and select the Editable Grid tile. The Template Kit automatically registers component packages, adds the required static resources, and populates the Grid with sample data.
Run the application to see the result:
If you want to understand how to reproduce the code generated by the Template Kit and what it does, see Configure an Existing Project.
Configure an Existing Project
Register Common DevExpress Resources
Create an application as described in the following topic: Get Started With DevExpress Components for Blazor.
Enable Interactivity on a Page
The Grid component responds to data updates and supports user interaction when you enable interactive render mode. In static render mode, the Grid can display only static data.
@rendermode InteractiveServer
Prepare a Data Source
Create a Models folder in your solution and add the following classes to this folder:
public class Category { public int CategoryID { get; set; } public string CategoryName { get; set; } = string.Empty; public string? Description { get; set; } }Create a Services folder in your solution. Implement a service to populate Grid with sample data:
using System.Collections.ObjectModel;

public class DataService {
    List<Customer> customers = [
        new(1, "John", "Doe", "USA", "Homesville", "123 Home Lane", "+1 (323) 555-4321", "55555"),
        new(2, "Sam", "Hill", "Germany", "Berlin", "Friedrichstraße 123", "+49 (30) 1234-5678", "10117"),
        new(3, "Karen", "Holmes", "USA", "Hillsville", "45 Hill St.", "+1 (212) 555-7890", "44444"),
        new(4, "Bobbie", "Valentine", "Germany", "Munich", "Maximilianstraße 45", "+49 (89) 9876-5432", "80539"),
        new(5, "Jennie", "Fuller", "Germany", "Hamburg", "Reeperbahn 89", "+49 (40) 2233-4455", "20359"),
        new(6, "Albert", "Menendez", "USA", "Chicago", "933 Heart St. Suite", "+1 (312) 555-6789", "9900"),
        new(7, "Frank", "Frankson", "France", "Paris", "25 Rue de Rivoli", "+33 (1) 23-45-67-89", "75004"),
        new(8, "Christa", "Christie", "UK", "London", "221B Baker Street", "+44 (20) 7946-0958", "NW1 6XE"),
        new(9, "Jimmie", "Jones", "USA", "Newman", "900 Newman Center.", "+1 (312) 555-6789", "89123"),
        new(10, "Alfred", "Newman", "Germany", "Frankfurt", "Goethestraße 10", "+49 (69) 1122-3344", "60313"),
        new(11, "Benjamin", "Johnson", "UK", "Manchester", "50 Deansgate", "+44 (161) 555-6789", "M3 2BW"),
        new(12, "Alex", "James", "USA", "Los Angeles", "349 Graphic Design L", "+1 (305) 555-9876", "12211"),
        new(13, "Beau", "Alessandro", "UK", "Birmingham", "30 New Street", "+44 (121) 555-4321", "B2 4ND"),
        new(14, "Bruce", "Cambell", "USA", "San Francisco", "350 Market Street", "+1 (415) 555-1234", "94103"),
        new(15, "Cindy", "Haneline", "USA", "Houston", "600 Main Street", "+1 (713) 555-5678", "77002"),
        new(16, "Andrea", "Deville", "France", "Bordeaux", "14 Cours de l'Intendance", "+33 (5) 56-78-90-12", "33000"),
        new(17, "Anita", "Ryan", "UK", "Cardiff", "30 Castle Street", "+44 (29) 555-1234", "CF10 1BT"),
        new(18, "George", "Bunkelman", "UK", "Liverpool", "100 Albert Dock", "+44 (151) 555-6789", "L3 4AA"),
        new(19, "Anita", "Cardle", "USA", "Seattle", "1200 Pine Street", "+1 (206) 555-8765", "98101"),
        new(20, "Andrew", "Carter", "Germany", "Stuttgart", "Königstraße 20", "+49 (711) 6543-2100", "70173"),
        new(21, "Almas", "Bunch", "USA", "Boston", "75 Beacon Street", "+1 (617) 555-4321", "02108"),
        new(22, "Abigail", "Hazel", "UK", "Glasgow", "75 Buchanan Street", "+44 (141) 555-4321", "G1 3HL"),
        new(23, "Anthony", "Vicars", "Germany", "Düsseldorf", "Königsallee 85", "+49 (211) 7894-5678", "40212"),
        new(24, "Dora", "Geeter", "UK", "Bristol", "20 Queen Square", "+44 (117) 555-8765", "BS1 4ND"),
        new(25, "Anthony", "Boyd", "USA", "Denver", "1500 Blake Street", "+1 (303) 555-7890", "80202"),
        new(26, "Dora", "Catto", "USA", "Atlanta", "200 Peachtree Street", "+1 (404) 555-2345", "30303"),
    ];
    static DateTime restockDate = DateTime.Today.AddMonths(1);
    List<Product> products = [
        new Product { ProductID = 1, ProductName = "Chai", SupplierID = 1, CategoryID = 1, QuantityPerUnit = "10 boxes x 20 bags", UnitPrice = 18.00m, UnitsInStock = 39, UnitsOnOrder = 0, ReorderLevel = 10, Discontinued = false },
        new Product { ProductID = 2, ProductName = "Chang", SupplierID = 1, CategoryID = 1, QuantityPerUnit = "24 - 12 oz bottles", UnitPrice = 19.00m, UnitsInStock = 17, UnitsOnOrder = 40, ReorderLevel = 25, Discontinued = false, RestockDate = restockDate },
        new Product { ProductID = 3, ProductName = "Aniseed Syrup", SupplierID = 1, CategoryID = 2, QuantityPerUnit = "12 - 550 ml bottles", UnitPrice = 10.00m, UnitsInStock = 13, UnitsOnOrder = 70, ReorderLevel = 25, Discontinued = false, RestockDate = restockDate },
        new Product { ProductID = 4, ProductName = "Chef Anton's Cajun Seasoning", SupplierID = 2, CategoryID = 2, QuantityPerUnit = "48 - 6 oz jars", UnitPrice = 22.00m, UnitsInStock = 53, UnitsOnOrder = 0, ReorderLevel = 0, Discontinued = false },
        new Product { ProductID = 5, ProductName = "Chef Anton's Gumbo Mix", SupplierID = 2, CategoryID = 2, QuantityPerUnit = "36 boxes", UnitPrice = 21.35m, UnitsInStock = 0, UnitsOnOrder = 0, ReorderLevel = 0, Discontinued = true },
        new Product { ProductID = 6, ProductName = "Grandma's Boysenberry Spread", SupplierID = 3, CategoryID = 2, QuantityPerUnit = "12 - 8 oz jars", UnitPrice = 25.00m, UnitsInStock = 120, UnitsOnOrder = 0, ReorderLevel = 25, Discontinued = false },
        new Product { ProductID = 7, ProductName = "Uncle Bob's Organic Dried Pears", SupplierID = 3, CategoryID = 7, QuantityPerUnit = "12 - 1 lb pkgs.", UnitPrice = 30.00m, UnitsInStock = 15, UnitsOnOrder = 0, ReorderLevel = 10, Discontinued = false, RestockDate = restockDate },
        new Product { ProductID = 8, ProductName = "Northwoods Cranberry Sauce", SupplierID = 3, CategoryID = 2, QuantityPerUnit = "12 - 12 oz jars", UnitPrice = 40.00m, UnitsInStock = 6, UnitsOnOrder = 0, ReorderLevel = 0, Discontinued = false, RestockDate = restockDate },
        new Product { ProductID = 9, ProductName = "Mishi Kobe Niku", SupplierID = 4, CategoryID = 6, QuantityPerUnit = "18 - 500 g pkgs.", UnitPrice = 97.00m, UnitsInStock = 29, UnitsOnOrder = 0, ReorderLevel = 0, Discontinued = true },
        new Product { ProductID = 10, ProductName = "Ikura", SupplierID = 4, CategoryID = 8, QuantityPerUnit = "12 - 200 ml jars", UnitPrice = 31.00m, UnitsInStock = 31, UnitsOnOrder = 0, ReorderLevel = 0, Discontinued = false },
        new Product { ProductID = 11, ProductName = "Queso Cabrales", SupplierID = 5, CategoryID = 4, QuantityPerUnit = "1 kg pkg.", UnitPrice = 21.00m, UnitsInStock = 22, UnitsOnOrder = 30, ReorderLevel = 30, Discontinued = false },
        new Product { ProductID = 12, ProductName = "Queso Manchego La Pastora", SupplierID = 5, CategoryID = 4, QuantityPerUnit = "10 - 500 g pkgs.", UnitPrice = 38.00m, UnitsInStock = 86, UnitsOnOrder = 0, ReorderLevel = 0, Discontinued = false },
        new Product { ProductID = 13, ProductName = "Konbu", SupplierID = 6, CategoryID = 8, QuantityPerUnit = "2 kg box", UnitPrice = 6.00m, UnitsInStock = 24, UnitsOnOrder = 0, ReorderLevel = 5, Discontinued = false },
        new Product { ProductID = 14, ProductName = "Tofu", SupplierID = 6, CategoryID = 7, QuantityPerUnit = "40 - 100 g pkgs.", UnitPrice = 23.25m, UnitsInStock = 35, UnitsOnOrder = 0, ReorderLevel = 0, Discontinued = false },
        new Product { ProductID = 15, ProductName = "Genen Shouyu", SupplierID = 6, CategoryID = 2, QuantityPerUnit = "24 - 250 ml bottles", UnitPrice = 15.50m, UnitsInStock = 39, UnitsOnOrder = 0, ReorderLevel = 5, Discontinued = false },
        new Product { ProductID = 16, ProductName = "Pavlova", SupplierID = 7, CategoryID = 3, QuantityPerUnit = "32 - 500 g boxes", UnitPrice = 17.45m, UnitsInStock = 29, UnitsOnOrder = 0, ReorderLevel = 10, Discontinued = false },
        new Product { ProductID = 17, ProductName = "Alice Mutton", SupplierID = 7, CategoryID = 6, QuantityPerUnit = "20 - 1 kg tins", UnitPrice = 39.00m, UnitsInStock = 0, UnitsOnOrder = 0, ReorderLevel = 0, Discontinued = true },
        new Product { ProductID = 18, ProductName = "Carnarvon Tigers", SupplierID = 7, CategoryID = 8, QuantityPerUnit = "16 kg pkg.", UnitPrice = 62.50m, UnitsInStock = 42, UnitsOnOrder = 0, ReorderLevel = 0, Discontinued = false },
        new Product { ProductID = 19, ProductName = "Teatime Chocolate Biscuits", SupplierID = 8, CategoryID = 3, QuantityPerUnit = "10 boxes x 12 pieces", UnitPrice = 9.20m, UnitsInStock = 25, UnitsOnOrder = 0, ReorderLevel = 5, Discontinued = false },
        new Product { ProductID = 20, ProductName = "Sir Rodney's Marmalade", SupplierID = 8, CategoryID = 3, QuantityPerUnit = "30 gift boxes", UnitPrice = 81.00m, UnitsInStock = 40, UnitsOnOrder = 0, ReorderLevel = 0, Discontinued = false }
    ];
    List<Category> categories = [
        new Category { CategoryID = 1, CategoryName = "Beverages", Description = "Soft drinks, coffees, teas, beers, and ales" },
        new Category { CategoryID = 2, CategoryName = "Condiments", Description = "Sweet and savory sauces, relishes, spreads, and seasonings" },
        new Category { CategoryID = 3, CategoryName = "Confections", Description = "Desserts, candies, and sweet breads" },
        new Category { CategoryID = 4, CategoryName = "Dairy Products", Description = "Cheeses" },
        new Category { CategoryID = 5, CategoryName = "Grains/Cereals", Description = "Breads, crackers, pasta, and cereal" },
        new Category { CategoryID = 6, CategoryName = "Meat/Poultry", Description = "Prepared meats" },
        new Category { CategoryID = 7, CategoryName = "Produce", Description = "Dried fruit and bean curd" },
        new Category { CategoryID = 8, CategoryName = "Seafood", Description = "Seaweed and fish" }
    ];
    List<Order> orders;

    public DataService() {
        orders = GenerateOrders(150);
    }
    public IEnumerable<Customer> GetCustomers() => customers;
    public IEnumerable<Product> GetProducts() => products;
    public IEnumerable<Category> GetCategories() => categories;
    public IEnumerable<Order> GetOrders() => orders;
    List<Order> GenerateOrders(int count) {
        Random random = new Random();
        var generatedOrders = new List<Order>();
        for (int i = 1; i <= count; i++) {
            var customer = customers[random.Next(customers.Count)];
            var order = new Order {
                Id = i,
                Customer = customer,
                OrderDate = DateTime.Now.AddDays(-random.Next(1, 500)),
                Items = new ObservableCollection<OrderItem>()
            };

            int itemsCount = random.Next(1, 5);
            for (int j = 0; j < itemsCount; j++) {
                var product = products[random.Next(products.Count)];
                order.Items.Add(new OrderItem {
                    Id = i * 10 + j,
                    Order = order,
                    Product = product,
                    Quantity = random.Next(1, 10)
                });
            }

            customer.Orders.Add(order);
            generatedOrders.Add(order);
        }
        return generatedOrders;
    }
}
Register the
DataServicein the Program.cs file:// ... builder.Services.AddScoped<DataService>();Inject the
DataServiceto a Razor page.@rendermode InteractiveServer @inject DataService DataServiceOn the same page, load generated data in the
OnInitializedlifecycle method:@inject DataService DataService @rendermode InteractiveServer @code { private List<Product> products = new(); private List<Category> categories = new(); protected override void OnInitialized() { products = DataService.GetProducts().ToList(); categories = DataService.GetCategories().ToList(); } }
Add a Grid and Bind It to Data
Add
<DxGrid></DxGrid>tags.@rendermode InteractiveServer <DxGrid> </DxGrid> @code { private List<Product> products = new(); // ... }Bind the Data property to the
productslist:<DxGrid Data="@products"> </DxGrid> @code { private List<Product> products = new(); // ... }
Add Columns
- Add DxGridDataColumn objects to the Columns collection.
- Use the FieldName property to bind columns to data source fields. The FieldName property value must be unique for each data column.
Optional. Specify the following settings to customize columns:
- Caption
- Specifies the column caption.
- DisplayFormat
- Specifies the format of column values and summary values calculated for this column.
- Width | MinWidth
- Specify column width.
- ColumnResizeMode
- Specifies whether and how users can resize Grid columns. In this tutorial, the Grid uses the
NextColumnoption to preserve the component width.
<DxGrid Data="@products"
        ColumnResizeMode="GridColumnResizeMode.NextColumn">
    <Columns>
        <DxGridDataColumn FieldName="@nameof(Product.ProductID)" Width="90px" />
        <DxGridDataColumn FieldName="@nameof(Product.ProductName)" MinWidth="200" Width="50%" />
        <DxGridDataColumn FieldName="@nameof(Product.CategoryID)" Caption="Category" MinWidth="150" />
        <DxGridDataColumn FieldName="@nameof(Product.UnitPrice)" DisplayFormat="c2" MinWidth="130" />
        <DxGridDataColumn FieldName="@nameof(Product.UnitsInStock)" MinWidth="130" />
        <DxGridDataColumn FieldName="@nameof(Product.RestockDate)" DisplayFormat="d" MinWidth="130" />
        <DxGridDataColumn FieldName="@nameof(Product.Discontinued)" MinWidth="130" />
    </Columns>
</DxGrid>
The Blazor Grid now displays records from the bound data source:

Shape Data
Sort Data
The Grid component supports multi-column sorting without additional setup. Use SortOrder and SortIndex to configure the initial sort settings.
<DxGrid Data="@products"
        ColumnResizeMode="GridColumnResizeMode.NextColumn">
    <Columns>
        <DxGridDataColumn FieldName="@nameof(Product.ProductID)" Width="90px" />
        <DxGridDataColumn FieldName="@nameof(Product.ProductName)" MinWidth="200" Width="50%" />
        <DxGridDataColumn FieldName="@nameof(Product.CategoryID)" Caption="Category" MinWidth="150" />
        <DxGridDataColumn FieldName="@nameof(Product.UnitPrice)"
                          DisplayFormat="c2"
                          MinWidth="130"
                          SortOrder="GridColumnSortOrder.Ascending"
                          SortIndex="0" />
        <DxGridDataColumn FieldName="@nameof(Product.UnitsInStock)"
                          MinWidth="130"
                          SortOrder="GridColumnSortOrder.Descending"
                          SortIndex="1" />
        <DxGridDataColumn FieldName="@nameof(Product.RestockDate)" DisplayFormat="d" MinWidth="130" />
        <DxGridDataColumn FieldName="@nameof(Product.Discontinued)" MinWidth="130" />
    </Columns>
</DxGrid>

Refer to the following topic for additional information: Sort Data in Blazor Grid.
Filter Data
Set the ShowFilterRow property to true to display a filter row that allows users to filter data.
<DxGrid Data="@products"
        ColumnResizeMode="GridColumnResizeMode.NextColumn"
        ShowFilterRow="true">
    <Columns>
        <DxGridDataColumn FieldName="@nameof(Product.ProductID)" Width="90px" />
        <DxGridDataColumn FieldName="@nameof(Product.ProductName)" MinWidth="200" Width="50%" />
        <DxGridDataColumn FieldName="@nameof(Product.CategoryID)" Caption="Category" MinWidth="150" />
        <DxGridDataColumn FieldName="@nameof(Product.UnitPrice)"
                          DisplayFormat="c2"
                          MinWidth="130"
                          SortOrder="GridColumnSortOrder.Ascending"
                          SortIndex="0" />
        <DxGridDataColumn FieldName="@nameof(Product.UnitsInStock)"
                          MinWidth="130"
                          SortOrder="GridColumnSortOrder.Descending"
                          SortIndex="1" />
        <DxGridDataColumn FieldName="@nameof(Product.RestockDate)" DisplayFormat="d" MinWidth="130" />
        <DxGridDataColumn FieldName="@nameof(Product.Discontinued)" MinWidth="130" />
    </Columns>
</DxGrid>
Group Data
Enable the ShowGroupPanel option to allow users to group data. To improve user experience when working with large amounts of data, you can use the following properties:
- GroupIndex
- Allows you to group data by an individual column.
- AutoExpandAllGroupRows
- Specifies whether to expand all group rows automatically when the grid loads data or users interact with the grid.
<DxGrid Data="@products"
        ColumnResizeMode="GridColumnResizeMode.NextColumn"
        ShowFilterRow="true"
        ShowGroupPanel="true"
        AutoExpandAllGroupRows="true">
    <Columns>
        <DxGridDataColumn FieldName="@nameof(Product.ProductID)" Width="90px" />
        <DxGridDataColumn FieldName="@nameof(Product.ProductName)" MinWidth="200" Width="50%" />
        <DxGridDataColumn FieldName="@nameof(Product.CategoryID)"
                          Caption="Category"
                          MinWidth="150"
                          GroupIndex="0" />
        <DxGridDataColumn FieldName="@nameof(Product.UnitPrice)"
                          DisplayFormat="c2"
                          MinWidth="130"
                          SortOrder="GridColumnSortOrder.Ascending"
                          SortIndex="0" />
        <DxGridDataColumn FieldName="@nameof(Product.UnitsInStock)"
                          MinWidth="130"
                          SortOrder="GridColumnSortOrder.Descending"
                          SortIndex="1" />
        <DxGridDataColumn FieldName="@nameof(Product.RestockDate)" DisplayFormat="d" MinWidth="130" />
        <DxGridDataColumn FieldName="@nameof(Product.Discontinued)" MinWidth="130" />
    </Columns>
</DxGrid>

Refer to the following help topic for additional information: Group Data in Blazor Grid.
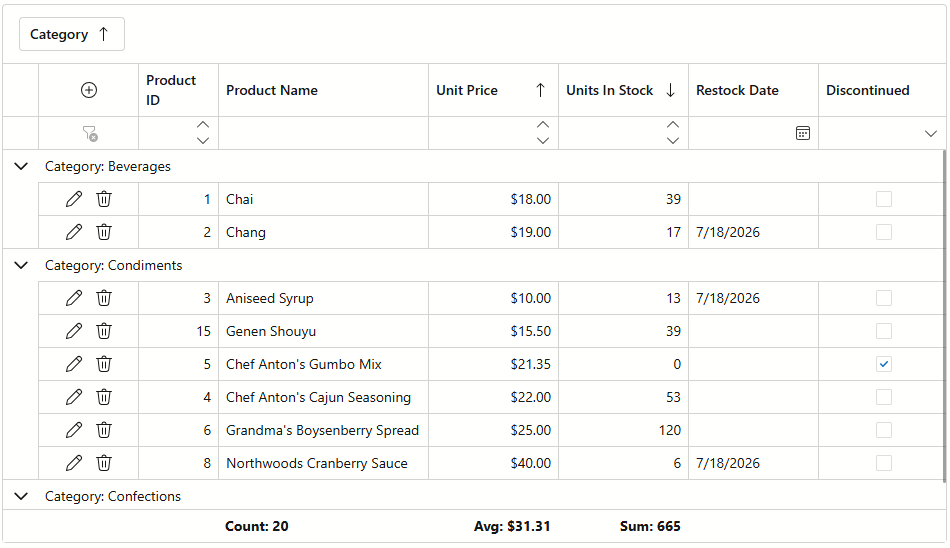
Add a Total Summary
The DevExpress Blazor Grid supports total and group summaries. These summaries can use built-in or custom aggregation functions.
Follow the steps below to display a total summary in the Grid component:
- Add a DxGridSummaryItem object to the TotalSummary collection.
- Specify the item’s SummaryType and FieldName properties.
- Optional. Specify other summary settings (FooterColumnName, DisplayText, and so on).
<DxGrid Data="@products"
        ColumnResizeMode="GridColumnResizeMode.NextColumn"
        ShowFilterRow="true"
        ShowGroupPanel="true"
        AutoExpandAllGroupRows="true">
    <Columns>
        @* ... *@
    </Columns>
    <TotalSummary>
        <DxGridSummaryItem FieldName="@nameof(Product.ProductName)"
                           SummaryType="GridSummaryItemType.Count" />
        <DxGridSummaryItem FieldName="@nameof(Product.UnitPrice)"
                           SummaryType="GridSummaryItemType.Avg"
                           ValueDisplayFormat="c2" />
        <DxGridSummaryItem FieldName="@nameof(Product.UnitsInStock)"
                           SummaryType="GridSummaryItemType.Sum" />
    </TotalSummary>
</DxGrid>

Refer to the following help topic for information about other summary types: Summary in Blazor Grid.
Edit Data
- Declare a DxGridCommandColumn object in the
Columnscollection. The command column displays buttons that allow users to add, edit, and delete rows. - Set the EditMode property to
EditRowto use inline editors for data editing. In this mode, the Grid automatically generates editors for columns based on their data types. - Handle EditModelSaving and DataItemDeleting events to post changes to the data source.
- Optional. Declare an EditSettings object within a column to replace the column’s default editor (chosen based on the associated data type). The following code snippet assigns a combo box editor to the Category column and customizes the text displayed within data cells using the TextFieldName property.
- Optional. If a column is bound to a read-only field or a data item class does not declare a parameterless constructor, handle the CustomizeEditModel event to initialize an edit model for new data rows.
<DxGrid Data="@products"
        ColumnResizeMode="GridColumnResizeMode.NextColumn"
        ShowFilterRow="true"
        ShowGroupPanel="true"
        AutoExpandAllGroupRows="true"
        EditMode="GridEditMode.EditRow"
        DataItemDeleting="OnDataItemDeleting"
        EditModelSaving="OnEditModelSaving"
        CustomizeEditModel="OnCustomizeEditModel">
    <Columns>
        <DxGridCommandColumn Width="100px" />
        <DxGridDataColumn FieldName="@nameof(Product.ProductID)" Width="90px" ReadOnly="true" />
        <DxGridDataColumn FieldName="@nameof(Product.ProductName)" MinWidth="200" Width="50%" />
        <DxGridDataColumn FieldName="@nameof(Product.CategoryID)"
                          Caption="Category"
                          MinWidth="150"
                          GroupIndex="0">
            <EditSettings>
                <DxComboBoxSettings Data="@categories"
                                    ValueFieldName="@nameof(Category.CategoryID)"
                                    TextFieldName="@nameof(Category.CategoryName)" />
            </EditSettings>
        </DxGridDataColumn>
        <DxGridDataColumn FieldName="@nameof(Product.UnitPrice)"
                          DisplayFormat="c2"
                          MinWidth="130"
                          SortOrder="GridColumnSortOrder.Ascending"
                          SortIndex="0" />
        <DxGridDataColumn FieldName="@nameof(Product.UnitsInStock)"
                          MinWidth="130"
                          SortOrder="GridColumnSortOrder.Descending"
                          SortIndex="1" />
        <DxGridDataColumn FieldName="@nameof(Product.RestockDate)"
                          DisplayFormat="d"
                          MinWidth="130" />
        <DxGridDataColumn FieldName="@nameof(Product.Discontinued)" MinWidth="130" />
    </Columns>
    <TotalSummary>
        @* ... *@
    </TotalSummary>
</DxGrid>
Refer to the following topic for additional information: Editing and Validation in Blazor Grid.
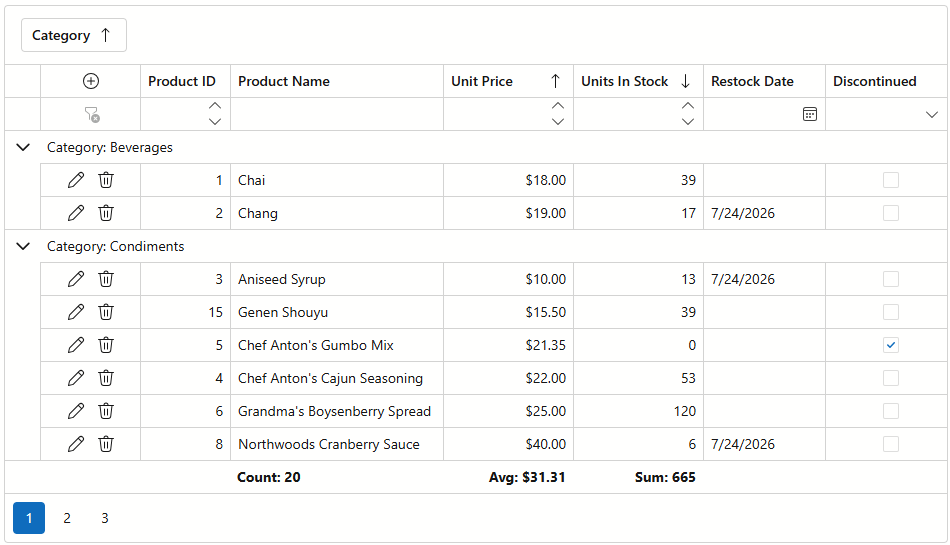
Enable Scrolling
- Set the VirtualScrollingEnabled property to
trueto activate virtual scrolling and optimize performance when working with large data sets. Use the VirtualScrollingMode property to specify whether to virtualize rows, columns, or both. - Define a CSS constraint for the Grid height. Otherwise, the Grid automatically adjusts its height (up to a maximum of 10,000 pixels) to fit all rows.
<DxGrid Data="@products"
        EditMode="GridEditMode.EditRow"
        ShowFilterRow="true"
        ShowGroupPanel="true"
        AutoExpandAllGroupRows="true"
        ColumnResizeMode="GridColumnResizeMode.NextColumn"
        DataItemDeleting="OnDataItemDeleting"
        EditModelSaving="OnEditModelSaving"
        CustomizeEditModel="OnCustomizeEditModel"
        VirtualScrollingEnabled="true"
        CssClass="grid">
    <Columns>
        <DxGridCommandColumn Width="100px" />
        <DxGridDataColumn FieldName="@nameof(Product.ProductID)" Width="90px" ReadOnly="true" />
        <DxGridDataColumn FieldName="@nameof(Product.ProductName)" MinWidth="200" Width="50%" />
        <DxGridDataColumn FieldName="@nameof(Product.CategoryID)"
                          Caption="Category"
                          MinWidth="150"
                          GroupIndex="0">
            <EditSettings>
                <DxComboBoxSettings Data="@categories"
                                    ValueFieldName="@nameof(Category.CategoryID)"
                                    TextFieldName="@nameof(Category.CategoryName)" />
            </EditSettings>
        </DxGridDataColumn>
        <DxGridDataColumn FieldName="@nameof(Product.UnitPrice)"
                          DisplayFormat="c2"
                          MinWidth="130"
                          SortOrder="GridColumnSortOrder.Ascending"
                          SortIndex="0" />
        <DxGridDataColumn FieldName="@nameof(Product.UnitsInStock)"
                          MinWidth="130"
                          SortOrder="GridColumnSortOrder.Descending"
                          SortIndex="1" />
        <DxGridDataColumn FieldName="@nameof(Product.RestockDate)"
                          DisplayFormat="d"
                          MinWidth="130" />
        <DxGridDataColumn FieldName="@nameof(Product.Discontinued)" MinWidth="130" />
    </Columns>
    <TotalSummary>
        <DxGridSummaryItem FieldName="@nameof(Product.ProductName)"
                           SummaryType="GridSummaryItemType.Count" />
        <DxGridSummaryItem FieldName="@nameof(Product.UnitPrice)"
                           SummaryType="GridSummaryItemType.Avg"
                           ValueDisplayFormat="c2" />
        <DxGridSummaryItem FieldName="@nameof(Product.UnitsInStock)"
                           SummaryType="GridSummaryItemType.Sum" />
    </TotalSummary>
</DxGrid>
Refer to the following help topic for additional information: Scrolling in Blazor Grid.
You have now replicated the code generated by the Template Kit. Run the application to see the result:
Helpful Resources
Refer to the following topics for additional information on Blazor Grid: