Get Started with Document Manager
- 6 minutes to read
This topic introduces major Document Manager concepts. We also recommend that you review these help articles that demonstrate how the Document Manager component can help you build different UI types:
Create a Sample Project
Create a blank Windows Forms project (you can use the “Blank Application” template from the Template Gallery) and drop a DocumentManager component on a form.
Document Manager includes multiple Views. The default View is “Tabbed”. Use the component smart tag menu to switch to another View.

Tip
Each View creates a unique UI type and operates its own type of Documents. If you populate a View with Documents, and then change the Document Manager View (for instance, from NativeMDI to WindowsUI), documents from the previous View will be lost.
For the purpose of this tutorial, leave the default Tabbed View active.
Use the same smart tag menu to open the Designer dialog. Go to the Documents tab and click Add New Document.

You now have a blank Document. Try to run the application and notice that it crashes with the
DevExpress.XtraBars.Docking2010.Views.DeferredLoadingException. This happens because Documents are content wrappers and cannot be empty.Click the Assign Control button and specify the BaseDocument.ControlType property in the opened window:

Alternatively, you can handle the View.QueryControl event. It fires repeatedly for every blank document that is about to be shown, and allows you to assign document content to the
e.Controlproperty.void TabbedView1_QueryControl(object sender, QueryControlEventArgs e) { if (e.Document == document1) e.Control = new UserControl1(); }
Tip
You can assign any control to the
e.Controlproperty, but we recommend that you assign forms or user controls.Create another User Control, rebuild the solution, and go back to the “Documents” tab of the Document Manager Designer. Notice that the “Populate” button is now enabled - you can click it to add a new Document for every UserControl in your app. Created documents refer to their content by ControlName and ControlTypeName properties.

When you click “Populate”, the component handles the
QueryControlevent (if it is not handled yet) and adds code that populates auto-generated documents. Since you already have the event handler, add the following code:Another option to add and populate documents is to call View.AddDocument method overloads. You do not need to handle
QueryControlfor Documents added in this manner.void Form1_Load(object sender, EventArgs e) { var newDoc = tabbedView1.AddDocument(new ucRichEditControl(), "Document3"); }Tip
This technique allows you to load all Documents at once, which degrades the application start-up performance, but eliminates the need to load Documents when users select them. In contrast, the
QueryControlevent allows you to delay Document load up until it is selected for the first time - the application starts faster, but navigation between Documents takes time. See this help article for more information: Deferred Load.You now have three Documents docked as tabs. To move and select them, use View controller methods. You can access the View controller with the BaseView.Controller property.
//place a document in another spot
tabbedView1.Controller.Move(document3, 0);
//select a document
tabbedView1.Controller.Select(document2);
//undock a Document and make it float
tabbedView1.Controller.Float(document1,
    new Point(this.Location.X + 150, this.Location.Y + 150), //or set Document.FloatLocation
    new Size(600, 300)); //or set Document.FloatSize
//dock a floating Document as a tab
tabbedView1.Controller.Dock(document1);
Document Groups
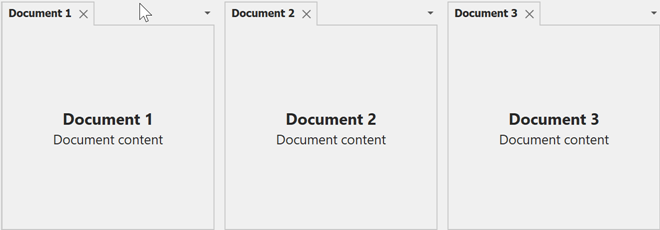
Tabbed Documents are not hosted directly inside the View; they must be placed in DocumentGroup containers. All Documents you create are first placed into a default Group. When you or your users dock a Document to either side of another Document, the View creates new groups for these Documents. The figure below illustrates three side-by-side Documents. Each document resides in its own Group.
If you need to rearrange Documents in code, create Document Groups and use View.Controller.Dock method overloads to place Documents into these Groups.
DocumentGroup group2 = new DocumentGroup();
DocumentGroup group3 = new DocumentGroup();
tabbedView1.DocumentGroups.AddRange(new DocumentGroup[] { group2, group3 });
tabbedView1.Controller.Dock((Document)tabbedView1.Documents[1], group2);
tabbedView1.Controller.Dock((Document)tabbedView1.Documents[2], group3);
The code above arranges all three documents side-by-side in a horizontal line. If you need to arrange groups in a column (one below another), change the View’s orientation.
With default View settings, all groups can be arranged either vertically (in a column) or horizontally (in a row). If you need to mix vertically and horizontally oriented groups and allow users to freely arrange Documents across the View surface, enable Free Layout Mode.

tabbedView1.EnableFreeLayoutMode = DevExpress.Utils.DefaultBoolean.True;

DocumentGroup group2 = new DocumentGroup();
DocumentGroup group3 = new DocumentGroup();
tabbedView1.DocumentGroups.AddRange(new DocumentGroup[] { group2, group3 });

group2.DockTo(tabbedView1.DocumentGroups[0], Orientation.Vertical);
group3.DockTo(group2, Orientation.Horizontal);

tabbedView1.Controller.Dock((Document)tabbedView1.Documents[1], group2);
tabbedView1.Controller.Dock((Document)tabbedView1.Documents[2], group3);
Customize Document Properties
Use properties from the TabbedView.DocumentProperties section to specify additional document settings. For example, you can disable the AllowClose property to remove a close button from document headers.
All Boolean properties from the DocumentProperties group are also available for individual documents. Individual document properties are of the DefaultBoolean type: the DefaultBoolean.Default value means this document should act according to the global View setting, and DefaultBoolean.True/DefaultBoolean.False values override it.
//only document2 can float
tabbedView1.DocumentProperties.AllowFloat = false;
document2.Properties.AllowFloat = DevExpress.Utils.DefaultBoolean.True;
Floating Document Host
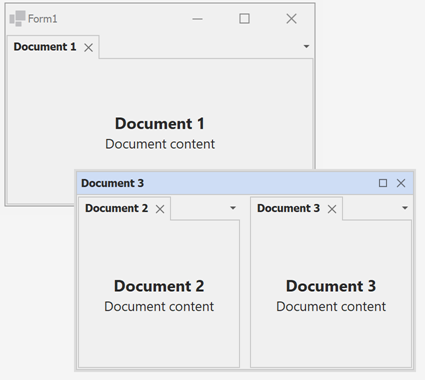
You can allow floating Documents to be placed into containers that contain their own document manager components. Such containers can host multiple documents, which allow you and your users to group floating documents rather than keep each of them as a separate window.
To enable this behavior, set the FloatingDocumentContainer property to DocumentsHost.
Document Manager in MVVM Applications
DevExpress MVVM Framework allows you to build applications that follow a Model-View-ViewModel concept. This concept implies that data, UI, and application logic are split into independent layers.
To manage a Document UI from a ViewModel layer, register a DocumentManagerService or a WindowedDocumentManagerService in the View layer, and call its public methods from a ViewModel to create, dock and select documents.
//View
mvvmContext1.RegisterService(DocumentManagerService.Create(tabbedView1));

//ViewModel
public void ShowDocument(){
    var dms = this.GetService<IDocumentManagerService>();
    var doc = dms.CreateDocument(...);
    doc.Show();
}
See this help article for details: Standard DevExpress Services.