How to: Modify Brick Appearance using Styles
- 3 minutes to read
This tutorial provides you with information on how to modify brick appearance using styles.
Bricks appearance can be set up in several ways. The most advanced approach is to use the BrickStyle class. This class provides all graphical properties, which are required to draw bricks of any type. Different class instances can be created to represent different styles used in a report. Moreover, different brick styles can be assigned to bricks of different types. Then, all modifications done with a specific BrickStyle apply to all bricks drawn with this style. This simplifies the customization of brick groups drawn with a specific style.
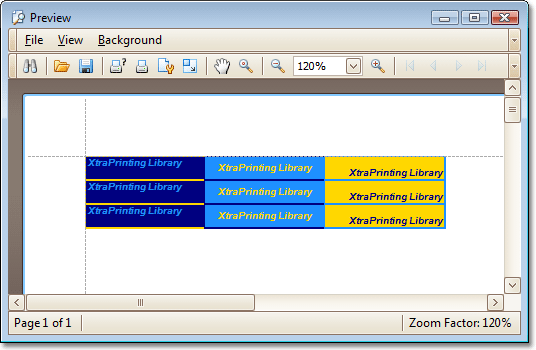
The following code arranges text bricks in three columns. Each column has its own BrickStyle. All style settings are defined in the BrickStyle‘s constructors. Text bricks are created via the BrickGraphics.DrawString method. This method does not affect graphical properties of the TextBrick already defined via the BrickStyle.
This example illustrates how to change the brick appearance using the BrickStyle object.
using DevExpress.XtraPrinting;
// ...


printingSystem1.Begin();

// Specify the style definitions.
BrickStyle column_style1 = new BrickStyle(BorderSide.Left | BorderSide.Bottom | BorderSide.Top, 2,
    Color.Gold, Color.Navy, Color.DodgerBlue, new Font("Arial", 6, FontStyle.Bold |
    FontStyle.Italic), new BrickStringFormat(StringAlignment.Near, StringAlignment.Near));
BrickStyle column_style2 = new BrickStyle(BorderSide.Top | BorderSide.Bottom, 2,
    Color.Navy, Color.DodgerBlue, Color.Gold, new Font("Arial", 6, FontStyle.Bold |
    FontStyle.Italic), new BrickStringFormat(StringAlignment.Center, StringAlignment.Center));
BrickStyle column_style3 = new BrickStyle(BorderSide.Right | BorderSide.Bottom | BorderSide.Top, 2,
    Color.DodgerBlue, Color.Gold, Color.Navy, new Font("Arial", 6, FontStyle.Bold |
    FontStyle.Italic), new BrickStringFormat(StringAlignment.Far, StringAlignment.Far));

BrickGraphics gr = printingSystem1.Graph;
gr.Modifier = BrickModifier.Detail;
string s = "XtraPrinting Library";
TextBrick t_brick;

// Draw the first column and apply the style.
for (int i = 0; i < 3; i++) {
    t_brick = gr.DrawString(s, new RectangleF(0, 20 * i, 100, 20));
    t_brick.Style = column_style1;
}

// Draw the second column and apply the style.
for (int i = 0; i < 3; i++) {
    t_brick = gr.DrawString(s, new RectangleF(100, 20 * i, 100, 20));
    t_brick.Style = column_style2;
}

// Draw the first column and apply the style.
for (int i = 0; i < 3; i++) {
    t_brick = gr.DrawString(s, new RectangleF(200, 20 * i, 100, 20));
    t_brick.Style = column_style3;
}

printingSystem1.End();
printingSystem1.PreviewFormEx.Show();
The image shown below illustrates the resulting report’s preview: