How to: Perform a Mail Merge
- 8 minutes to read
This tutorial describes the process of creating a spreadsheet document based on data retrieved from a data source with the SpreadsheetControl’s mail merge functionality.
- Create an Application, Add Controls and Provide a Ribbon UI
- Connect to a Data Source
- Preview the Result
- Perform Mail Merge and Save Generated Documents
Create an Application, Add Controls and Provide a Ribbon UI
- Create a new WinForms application with a Ribbon Form. To do this, select DevExpress Template Gallery in the New Project dialog, select Ribbon Based Application in the Template Gallery wizard and click Create Project. When the project is created, remove the unneeded ribbonPage1 from the form by selecting it and pressing Delete.
Drop the SpreadsheetControl item from the DX.25.2: Spreadsheet toolbox tab onto the form. Invoke the SpreadsheetControl’s actions list via the smart tag…

…and click the following items.
- Dock in Parent Container - The SpreadsheetControl will be stretched to fill the entire form.
- Create FormulaBar - The SpreadsheetFormulaBar control will be added to the form and positioned above the SpreadsheetControl.
- Create Field List Panel - The Field List Panel panel will be added to the form and located to the right of the SpreadsheetControl. After you specify a mail merge data source and run the application, the Field List panel will display the structure of the bound data source and allow you to drag its items onto the SpreadsheetControl document to add fields to the mail merge template cells.
- Create File Bars, Create Home Bars and Create Mail Merge Bars - The File, Home and Mail Merge tabs will be generated in the RibbonControl.

Connect to a Data Source
In this example, a spreadsheet document will be bound to the Categories table of the Northwind database using Visual Studio Designer. Alternatively, you can connect to a data source at run time, as described in the How to: Create a Master-Detail Report Without Coding document.
- Copy the nwind.mdb file to the directory of your project. The default location of this file is C:\Users\Public\Documents\DevExpress Demos 25.2\Components\Data directory.
Right-click the nwind.mdb item in the Solution Explorer and select Include In Project in the invoked context menu. This will invoke the Data Source Configuration Wizard.

Note
If the nwind.mdb item is not displayed in the Solution Explorer, select Show All Files from the Project menu or click the Show All Files icon (
 ) in the Solution Explorer toolbar.
In the invoked window, select the Dataset database model and click Next.

The next page allows you to choose tables to be obtained from the database. Select the Categories table and click Finish.

As a result, Visual Studio will generate a set of classes that support the ADO.NET architecture. The main classes include the following:
- CategoriesDataTable - an object that will contain records from the Categories table of the nwind database;
- nwindDataSet - a System.Data.DataSet object (a collection of tables that can be related to each other). The generated DataSet contains the Categories table;
- CategoriesTableAdapter - an object that can communicate with the Categories table of the nwind database.
Populate the underlying CategoriesDataTable table with data from the database using the Fill method of the CategoriesTableAdapter object.
Finally, bind a mail merge template (a workbook loaded into the SpreadsheetControl) to the specified data source. To do this, set the IWorkbook.MailMergeDataSource property to the nwindDataSet object, and the IWorkbook.MailMergeDataMember property to the “Categories” string that specifies the data table in this data source.
using DevExpress.Spreadsheet;
using DevExpress.XtraBars.Ribbon;
using System.Collections.Generic;

namespace DXApplication1 {
    public partial class Form1 : RibbonForm {

        nwindDataSet dataSet;
        nwindDataSetTableAdapters.CategoriesTableAdapter adapter;
        IWorkbook template;

        public Form1() {
            InitializeComponent();

            dataSet = new nwindDataSet();
            adapter = new nwindDataSetTableAdapters.CategoriesTableAdapter();
            adapter.Fill(dataSet.Categories);
        }

        private void Form1_Load(object sender, System.EventArgs e) {
            spreadsheetControl1.LoadDocument("Documents\\MailMergeTemplate.xlsx");
            template = spreadsheetControl1.Document;
            template.MailMergeDataSource = dataSet;
            template.MailMergeDataMember = "Categories";
        }
After providing the data source, proceed with creating a mail merge template.
Prepare a Template
A template is a workbook with a single worksheet based on which merged documents will be generated. A template contains the information that will be the same in each merged document, as well as the fields that will be filled with unique data values retrieved from the bound data source in each merged document.
The easiest way to transform a document into a mail merge template is to use the SpreadsheetControl’s Mail Merge Ribbon UI. Run the application and modify the default document loaded into the SpreadsheetControl (which includes a single worksheet under the “Sheet1” name).
Activate the Mail Merge Design View in the SpreadsheetControl to display the template structure (fields and ranges To do this, click the Mail Merge Design View button on the Mail Merge tab, in the Design group.
Insert Mail Merge Fields
A mail merge field is a placeholder in which a value from the specified data source field will appear in a merged document. To insert fields into template cells, use the following mail merge functions in cell formulas: FIELD and FIELDPICTURE. You can manually add formulas with these functions to cells, or simply drag the necessary data field items from the Field List panel and drop them onto the template cells. (The corresponding formulas will be added to the cells automatically.)
Insert the CategoryName, Description and Picture fields as shown in the image below.
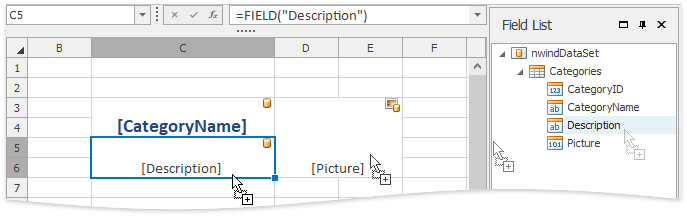
When the WorksheetView.ShowFormulas option is disabled (default value), template cells containing mail merge fields display data field names enclosed in square brackets. In the Mail Merge Design View, these cells are marked with database icons.
Specify Template Ranges
- Select the “B4:D7” cell range, which contains all added mail merge fields, and click the Detail button on the Mail Merge tab, in the Template Ranges group. This cell range will be repeated for each record of the data source.
- Specify a header to be displayed above all detail range instances in the resulting worksheet. Select the “B2:D2” range and merge it into a single cell. Type “Fall Catalog”, and center and format the text. Click the Header button on the Mail Merge tab.
The specified ranges will be highlighted in the template as shown below.

Note that after you have specified mail merge template ranges as described above, the “DETAILRANGE” and “HEADERRANGE” defined names are added for the corresponding cell ranges into the Worksheet.DefinedNames collection of the “Sheet1” worksheet.
| Name | RefersTo |
|---|---|
| DETAILRANGE | Sheet1!$B$4:$D$7 |
| HEADERRANGE | Sheet1!$B$2:$D$2 |
Select the Mail Merge Mode and Document Orientation
In this example, use the Single Sheet mail merge mode and Vertical document orientation. Merged ranges for all records of the data source will be inserted one under the other into a single worksheet. This is the default mail merge mode and document orientation.
The mail merge template is now ready. Save it to the MailMergeTemplate.xlsx file in the Documents folder added previously to the project directory.
Add the following code to automatically load the created template into the SpreadsheetControl when invoking the application.
Preview the Result
To preview how a document is generated and filled with data after a mail merge is performed, click the Mail Merge Preview button on the Mail Merge tab, in the Design group. A new window with a resulting document opened in a SpreadsheetControl instance will be invoked. You can modify and save the merged document via the Ribbon UI.

Perform Mail Merge and Save Generated Documents
To finish a mail merge, call the IWorkbook.GenerateMailMergeDocuments method of the template workbook. It returns a collection of resulting workbooks. (If the “Single Sheet” or “Multiple Sheets” mail merge mode is used, the collection will contain a single workbook.) The resulting workbook can be saved to a file or a stream, or sent for further processing to another SpreadsheetControl.
In this example, add a new Result group to the Mail Merge tab and create a new button with the Result caption.

In the Result button’s Click event handler, call the IWorkbook.GenerateMailMergeDocuments method and save the resulting documents to files.
private void barButtonItem1_ItemClick(object sender, DevExpress.XtraBars.ItemClickEventArgs e) {
    IList<IWorkbook> resultWorkbooks = spreadsheetControl1.Document.GenerateMailMergeDocuments();
    int index = 0;
    foreach (IWorkbook workbook in resultWorkbooks) {
        string fileName = string.Format("Documents\\SavedDocument{0}" + ".xlsx", index++);
        workbook.SaveDocument(fileName, DocumentFormat.Xlsx);
    }
    System.Diagnostics.Process.Start("explorer.exe", "Documents\\");
}