AI-powered Extensions for WPF
- 17 minutes to read
Supported AI Clients
- OpenAI
- Azure OpenAI
- Anthropic (Claude)
- Semantic Kernel
- Ollama (self-hosted models)
- Foundry Local (on-device AI models)
- ONNX Runtime (local ONNX models)
Prerequisites
- .NET 8+ SDK / .NET Framework v4.7.2
- OpenAI
- An active Open AI subscription
- OpenAI API key
- OpenAI .NET SDK (Version=”2.2.0”)
- Microsoft.Extensions.AI.OpenAI (Version=”9.7.1-preview.1.25365.4”)
- Azure OpenAI
- Anthropic (Claude)
- An active Anthropic account
- An Anthropic API key
- Anthropic .NET SDK (the official Claude SDK for C#; v10+ targets
Microsoft.Extensions.AI)
- Semantic Kernel
- Microsoft.SemanticKernel
- An active account/subscription to the AI service of your choice
- Microsoft.SemanticKernel.Connectors.* NuGet package (a connector to the AI service of your choice)
- Ollama (self-hosted models)
Foundry Local (on-device AI models)
- .NET 8+ SDK
Microsoft.AI.Foundry.Local*Nuget package:- Windows:
Microsoft.AI.Foundry.Local.WinML (Version="0.8.2.1")(or later) - Cross-Platform:
Microsoft.AI.Foundry.Local (Version="0.8.2.1")(or later)
See the following setup instructions: Project setup guide - Foundry Local SDK reference.
- Windows:
- OpenAI .NET SDK (Version=”2.2.0”)
- Microsoft.Extensions.AI (Version=”9.7.1”)
- Microsoft.Extensions.AI.OpenAI (Version=”9.7.1-preview.1.25365.4”)
- Foundry Local Installation (optional; the SDK does not require the CLI to run models)
- A local AI model (models download automatically when you use aliases such as
phi-4)
- ONNX Runtime (local ONNX models)
- .NET 8+ SDK
- Microsoft.ML.OnnxRuntimeGenAI
- A local ONNX model (Hugging Face Models or ONNX Model Zoo)
- Hugging Face CLI (recommended for downloading models from Hugging Face)
DevExpress.AIIntegration assemblies reference the following versions of Microsoft.Extensions.AI.* NuGet packages:
| Package Name | v26.1 |
|---|---|
Microsoft.Extensions.AI |
9.7.1 |
Microsoft.Extensions.AI.OpenAI |
9.7.1-preview.1.25365.4 |
See the following breaking change advisory for more information: DevExpress.AIIntegration references stable versions of Microsoft AI packages.
Install DevExpress NuGet Packages
DevExpress.AIIntegration.WpfDevExpress.Wpf
Register AI Clients
DevExpress AI-powered extensions operate within an AIExtensionsContainerDesktop container. This container manages all registered AI clients so that DevExpress UI controls can automatically leverage AI services. You should register an AI client at application startup (App.xml.cs).
Register OpenAI Client
The following code snippet registers an OpenAI client at application startup within the AIExtensionsContainerDesktop container:
using DevExpress.AIIntegration;
using DevExpress.Xpf.Core;
using Microsoft.Extensions.AI;
using System;
using System.Windows;

namespace AIAssistantApp {
    public partial class App : Application {
        static App() {
            CompatibilitySettings.UseLightweightThemes = true;
        }

        protected override void OnStartup(StartupEventArgs e) {
            base.OnStartup(e);
            ApplicationThemeHelper.ApplicationThemeName = "Office2019Colorful";

            // For example, Model = "gpt-4o-mini"
            IChatClient openAIChatClient = new OpenAI.OpenAIClient(OpenAIKey).GetChatClient(Model)
                .AsIChatClient();
            AIExtensionsContainerDesktop.Default.RegisterChatClient(openAIChatClient);
        }
    }
}
Register Azure OpenAI Client
The following code snippet registers an Azure OpenAI client at application startup within the AIExtensionsContainerDesktop container:
using Azure.AI.OpenAI;
using DevExpress.AIIntegration;
using DevExpress.Xpf.Core;
using Microsoft.Extensions.AI;
using System;
using System.Windows;

namespace AIAssistantApp {
    public partial class App : Application {
        static App() {
            CompatibilitySettings.UseLightweightThemes = true;
        }

        protected override void OnStartup(StartupEventArgs e) {
            base.OnStartup(e);
            ApplicationThemeHelper.ApplicationThemeName = "Office2019Colorful";

            // For example, ModelId = "gpt-4o-mini"
            IChatClient azureChatClient = new Azure.AI.OpenAI.AzureOpenAIClient(new Uri(AzureOpenAIEndpoint),
                new System.ClientModel.ApiKeyCredential(AzureOpenAIKey)).GetChatClient(ModelId).AsIChatClient();
            AIExtensionsContainerDesktop.Default.RegisterChatClient(azureChatClient);
        }
    }
}
Register Anthropic Client
Install the official Anthropic .NET SDK NuGet package to register a Claude chat client. The AsIChatClient method returns a Microsoft.Extensions.AI-compatible IChatClient. Pass the model name to this method.
The AnthropicClient reads the API key from the ANTHROPIC_API_KEY environment variable, so no additional configuration is required when this variable is set.
The following code snippet registers an Anthropic (Claude) client at application startup within the AIExtensionsContainerDesktop container:
using Anthropic;
using DevExpress.AIIntegration;
using DevExpress.Xpf.Core;
using System;
using System.Windows;

namespace AIAssistantApp {
    public partial class App : Application {
        static App() {
            CompatibilitySettings.UseLightweightThemes = true;
        }

        protected override void OnStartup(StartupEventArgs e) {
            base.OnStartup(e);
            ApplicationThemeHelper.ApplicationThemeName = "Office2019Colorful";

            // The API key is read from the ANTHROPIC_API_KEY environment variable.
            // Pass the model name to AsIChatClient.
            IChatClient anthropicChatClient = new AnthropicClient().AsIChatClient("claude-haiku-4-5");
            AIExtensionsContainerDesktop.Default.RegisterChatClient(anthropicChatClient);
        }
    }
}
Enable Reasoning (Extended Thinking)
To enable Claude’s extended thinking, configure chat client options and pass the thinking parameter through AdditionalProperties:
using Anthropic;
using Microsoft.Extensions.AI;

IChatClient chatClient = new AnthropicClient()
    .AsIChatClient("claude-haiku-4-5")
    .AsBuilder()
    .ConfigureOptions(x => {
        x.Reasoning = new ReasoningOptions() {
            Effort = ReasoningEffort.Medium,
            Output = ReasoningOutput.Full
        };
        x.MaxOutputTokens = 4096;
        x.AdditionalProperties = new() {
            {
                "thinking", new Dictionary<string, object> {
                    { "type", "enabled" },
                    { "budget_tokens", 2048 } // The minimum allowed budget is usually 1024 or 2048 tokens.
                }
            }
        };
    })
    .Build();
AIExtensionsContainerDesktop.Default.RegisterChatClient(chatClient);
Note
Anthropic limitations
Using Anthropic models with DevExpress AI-powered extensions has the following limitations:
- No embedding model. Anthropic does not offer an embeddings API (source). Extensions and scenarios that rely on a vector store (for example, Semantic Search) require a separate, third-party embedding client (such as Voyage AI).
- No image generation. Anthropic models cannot generate images. Extensions that produce images are not supported. Vision-based extensions that analyze existing images (such as Generate Image Description) continue to work.
Register Semantic Kernel
Install the connector package for the AI service. This example uses Microsoft.SemanticKernel.Connectors.Google.
using Microsoft.Extensions.AI;
using Microsoft.SemanticKernel;
using Microsoft.SemanticKernel.ChatCompletion;
using Microsoft.SemanticKernel.Connectors.Google;
using DevExpress.AIIntegration;
using DevExpress.Xpf.Core;
using System;
using System.Windows;

namespace AIAssistantApp {
    public partial class App : Application {
        static App() {
            CompatibilitySettings.UseLightweightThemes = true;
        }
        protected override void OnStartup(StartupEventArgs e) {
            base.OnStartup(e);
            ApplicationThemeHelper.ApplicationThemeName = "Office2019Colorful";

            var builder = Kernel.CreateBuilder().AddGoogleAIGeminiChatCompletion("YOUR_MODEL_ID", "YOUR_API_KEY", GoogleAIVersion.V1_Beta);
            Kernel kernel = builder.Build();
            IChatClient googleChatClient = kernel.GetRequiredService<IChatCompletionService>().AsChatClient();
            AIExtensionsContainerDesktop.Default.RegisterChatClient(googleChatClient);
        }
    }
}
Register Ollama Client
The following code snippet registers an Ollama client:
using OllamaSharp;
using DevExpress.AIIntegration;
using DevExpress.Xpf.Core;
using Microsoft.Extensions.AI;
using System;
using System.Windows;

namespace AIAssistantApp {
    public partial class App : Application {
        static App() {
            CompatibilitySettings.UseLightweightThemes = true;
        }
        protected override void OnStartup(StartupEventArgs e) {
            base.OnStartup(e);
            ApplicationThemeHelper.ApplicationThemeName = "Office2019Colorful";

            // Requires the 'Microsoft.Extensions.AI.Ollama' NuGet package.
            IChatClient asChatClient = new OllamaApiClient(new Uri("http://localhost:11434/"), "MODEL_NAME");
            AIExtensionsContainerDesktop.Default.RegisterChatClient(asChatClient);
        }
    }
}
Register Foundry Local
The following code snippets register a Foundry Local chat client. Foundry Local runs AI models directly on the local device. It does not require cloud services or API keys. The SDK downloads and manages models automatically and exposes an OpenAI-compatible interface.
Note
Users do not need to install the Foundry Local CLI. The SDK is self-contained and handles model downloads and execution independently.
using DevExpress.AIIntegration;
using Microsoft.AI.Foundry.Local;
using Microsoft.Extensions.AI;
using Microsoft.Extensions.Logging;
using OpenAI;
using System;
using System.ClientModel;
using System.Threading.Tasks;
using System.Windows.Forms;

namespace DXApplication {
    internal static class Program {
        /// <summary>
        /// The main entry point for the application.
        /// </summary>
        [STAThread]
        internal static void Main() {
            // Create a LoggerFactory and configure console logging.
            using var loggerFactory = LoggerFactory.Create(builder ={
                builder
                    // Set log level based on environment variable, fallback to Information
                    .SetMinimumLevel(Microsoft.Extensions.Logging.LogLevel.Information)
                    .AddSimpleConsole(options ={ options.SingleLine = true; options.TimestampFormat = "HH:mm:ss "; });
            });

            // Specify the model name.
            string modelName = "phi-4-mini";

            // Register a Foundry Local client.
            RegisterFoundryLocalClient(modelName, loggerFactory).GetAwaiter();

            Application.EnableVisualStyles();
            Application.SetCompatibleTextRenderingDefault(false);
            Application.Run(new Form1());
        }

        async static Task RegisterFoundryLocalClient(string modelAlias, ILoggerFactory loggerFactory) {
            // Initialize the Foundry Local manager.
            var config = new Configuration {
                AppName = "DevExpressAIApp",
                LogLevel = Microsoft.AI.Foundry.Local.LogLevel.Information,
                Web = new Configuration.WebService() {
                    Urls = "http://127.0.0.1:52495"
                }
            };

            // Create a named logger.
            var logger = loggerFactory.CreateLogger("FoundryLocal");

            await FoundryLocalManager.CreateAsync(config, logger, null);

            var manager = FoundryLocalManager.Instance;
            var catalog = await manager.GetCatalogAsync();

            // Get the model from the catalog by alias.
            var model = await catalog.GetModelAsync(modelAlias) ?? throw new Exception($"Model {modelAlias} not found");

            // Check whether the model is cached and download it if required.
            if (!await model.IsCachedAsync()) {
                await model.DownloadAsync(progress ={
                    if (progress >= 100f) Console.WriteLine();
                });
            }

            // Load the model.
            await model.LoadAsync();

            // Start the web service.
            await manager.StartWebServiceAsync();

            // OpenAIClient requires an ApiKeyCredential, but local Foundry server runs without credentials.
            ApiKeyCredential key = new ApiKeyCredential("key_not_required");

            // Create the OpenAI client that points to the Foundry Local web service.
            OpenAIClient client = new OpenAIClient(key, new OpenAIClientOptions {
                Endpoint = new Uri(config.Web.Urls + "/v1"),
            });

            // Get the chat client.
            IChatClient chatClient = client.GetChatClient(model.Id).AsIChatClient();
            AIExtensionsContainerDesktop.Default.RegisterChatClient(chatClient);

            // Cleanup on exit.
            Application.ApplicationExit += async (sender, e) ={
                try {
                    chatClient.Dispose();
                    await model.UnloadAsync();
                }
                catch (Exception unloadEx) {
                    logger.LogWarning(unloadEx, "Error during model unload/cleanup.");
                }
            };
        }
    }
}
See the following resources for additional information:
- Foundry Local
- Foundry Local on GitHub
- Microsoft.AI.Foundry.Local NuGet Package
- Foundry Local Documentation
Register ONNX Runtime
The following code snippets register an ONNX Runtime GenAI chat client. ONNX Runtime runs optimized AI models directly on the local device. It does not require cloud services.
Note
ONNX models are not bundled with the SDK. You must download an ONNX model to the local machine before use. You can obtain ONNX models from Hugging Face or ONNX Model Zoo. You can also convert custom models with ONNX converter tools.
using DevExpress.AIIntegration;
using Microsoft.Extensions.AI;
using Microsoft.ML.OnnxRuntimeGenAI;

// Define the path to the ONNX model directory.
var modelPath = "..\\..\\models\\cpu_and_mobile\\cpu-int4-rtn-block-32-acc-level-4\\";
// The path for Linux-based systems
// var modelPath = "../../models/cpu_and_mobile/cpu-int4-rtn-block-32-acc-level-4/";

// Verify that the model directory exists.
if (!Directory.Exists(modelPath)) {
    MessageBox.Show("Model files not found. Ensure that the model files exist at the specified path.");
    return;
}

// Create the model configuration.
using var config = new Config(modelPath);

// Initialize the ONNX model.
using var model = new Model(config);

// Create an ONNX Runtime chat client.
using var onnxChatClient = new OnnxRuntimeGenAIChatClient(model);

// Configure chat client options.
using var chat = onnxChatClient.AsBuilder().ConfigureOptions(
    x => x.MaxOutputTokens = 4096
).Build();

// Register the chat client.
AIExtensionsContainerDesktop.Default.RegisterChatClient(chat);

// Handle application exit and unload the model.
Application.ApplicationExit += (sender, e) => {
    chat?.Dispose();
    onnxChatClient?.Dispose();
    model?.Dispose();
    config?.Dispose();
};
Tip
- Set the model path to the directory containing ONNX model files (usually includes genai_config.json, model weights, and tokenizer files).
- Configure
MaxOutputTokensbased on the model’s capabilities and your application’s requirements. - ONNX models may have different configuration requirements. Refer to the model’s documentation on Hugging Face or the model source.
Popular ONNX Models for AI-powered Extensions
- microsoft/Phi-4-mini-instruct-onnx — Lightweight instruction-following model
- microsoft/Phi-3.5-mini-instruct-onnx — Compact and efficient model
- Browse more models at Hugging Face ONNX Models
See the following resources for additional information:
- ONNX Runtime GenAI Documentation
- Microsoft.ML.OnnxRuntimeGenAI NuGet Package
- Hugging Face CLI Documentation
AI-powered Extensions
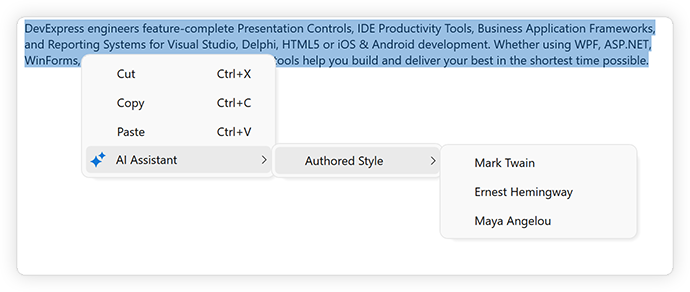
AI Assistant (Text Transform)
AI Assistant extensions allow you to enhance the way your users interact with and manage text content with AI-powered precision. These extensions leverage advanced natural language processing (NLP) technologies to give users automated, intelligent text manipulation capabilities within your WPF applications.
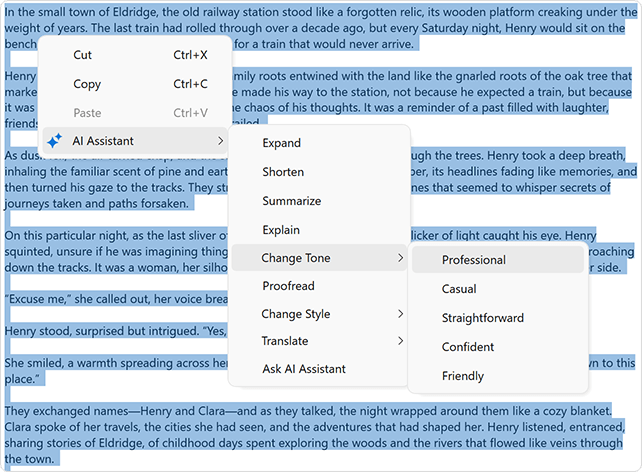
AI-powered options include:
- Change Style*
- Change Tone*
- Expand*
- Explain
- Proofread
- Shorten
- Summarize
- Translate
- Ask AI Assistant (allows users to interact with an AI-powered assistant directly within your application)
Applies to:
Note
The WPF Spreadsheet control does not support Change Style, Change Tone, and Expand extensions.
See the following help topic for additional information on how to activate and use AI Assistant extensions: AI Assistant Extensions.
Explain Formula
The AI-powered “Explain Formula” extension generates a detailed explanation of the formula used in a worksheet cell in the DevExpress Spreadsheet control.

See the following help topic for additional information: Explain Formula.
Generate Image Description
The AI-powered “Generate Image Description” extension generates the description for the image in DevExpress WPF Spreadsheet and Rich Text Edit controls.
Play the following animation to see how the AI-powered “Generate Image Description” extension in a WPF Rich Text Editor generates Alt text for an image:
Refer to the following help topic for additional information: Generate Image Description.
Prompt to Expression
The AI-powered Prompt to Expression extension converts natural language into valid filter and column expressions for data-aware WPF controls. Users describe the desired behavior using their natural language instead of writing complex expressions:
- Sample Filter Expression
- Display delayed shipments
- Sample Column Expression
- Display total cost
The system sends the prompt to the configured AI service that generates a valid expression for the control. The Expression Editor or Filter Editor displays and validates the result immediately.
Refer to the following help topic for additional information: Prompt to Expression.
Smart Autocomplete
The AI-powered “Smart Autocomplete” feature intelligently predicts and suggests words or phrases based on the user’s current input. As you type, the AI model analyzes the context of the text and makes relevant suggestions in real time.
Applies to:
See the following help topic for additional information: Smart Autocomplete.
Smart Paste
“SmartPaste” is an AI-powered feature that transforms the traditional copy-and-paste process into a smarter, more efficient tool. Designed to improve productivity, SmartPaste analyzes the content you copy and intelligently assigns the right values to the appropriate fields or row cells in the DevExpress WPF Data Grid, TreeList, and LayoutControl-driven forms.
Play the following animation to see how SmartPaste works:
Applies to:
- Data Grid (supported views: TableView, CardView, TreeListView)
- Layout Control
- TreeList
See the following help topic for additional information: Smart Paste.
Smart Search
Smart Search works alongside traditional search algorithms to offer a more powerful and user-friendly search experience. It offers results that are more aligned with what the user is seeking, even if the input contains spelling errors.
Applies to:
See the following help topic for additional information: Smart Search.
Semantic Search
Semantic search enables users to locate relevant data quickly and accurately within large datasets. Unlike standard keyword-based search, semantic search leverages Natural Language Processing (NLP) to analyze search queries beyond exact keyword matching.
Semantic search uses an embedding generator to convert text into numerical vector representations. Vectors are stored in a vector database. When a user enters a search query, the search engine computes similarity scores between the query vector and stored data vectors to return the most relevant results.

Applies to: Data Grid
See the following help topic for additional information: Semantic Search.
Custom Extensions
You can create custom extensions based on DevExpress AI-powered extensions. See the following help topic for additional information and examples: Create Custom AI-powered Extensions.
Security Considerations (Indirect Prompt Injection)
DevExpress text-based AI-powered extensions and the document-based Ask AI extension process user-provided content (documents, messages, or clipboard data) and pass this content to an LLM for analysis. This workflow introduces a class of attacks (indirect prompt injection) where malicious instructions are embedded in valid content. These instructions may attempt to override system behavior, extract sensitive information, or manipulate the model’s output.
DevExpress AI-powered extensions include automatic prompt-injection protection. Protection is enabled by default for all text and document-based AI-powered extensions. The system adds protective instructions to AI requests. The LLM interprets these instructions and determines the final response.
Refer to the following help topic for additional information: Prompt Injection Protection in AI-powered Extensions.
AI Chat Control
Note
The DevExpress AI Chat Control (AIChatControl) can only be used in WPF applications that target the .NET 8+ framework.
The AI Chat Control (AIChatControl) allows you to incorporate an interactive, Copilot-inspired chat-based UI within your WPF application. The DevExpress AI Chat Control can only be used in WPF applications that target the .NET 8+ framework.
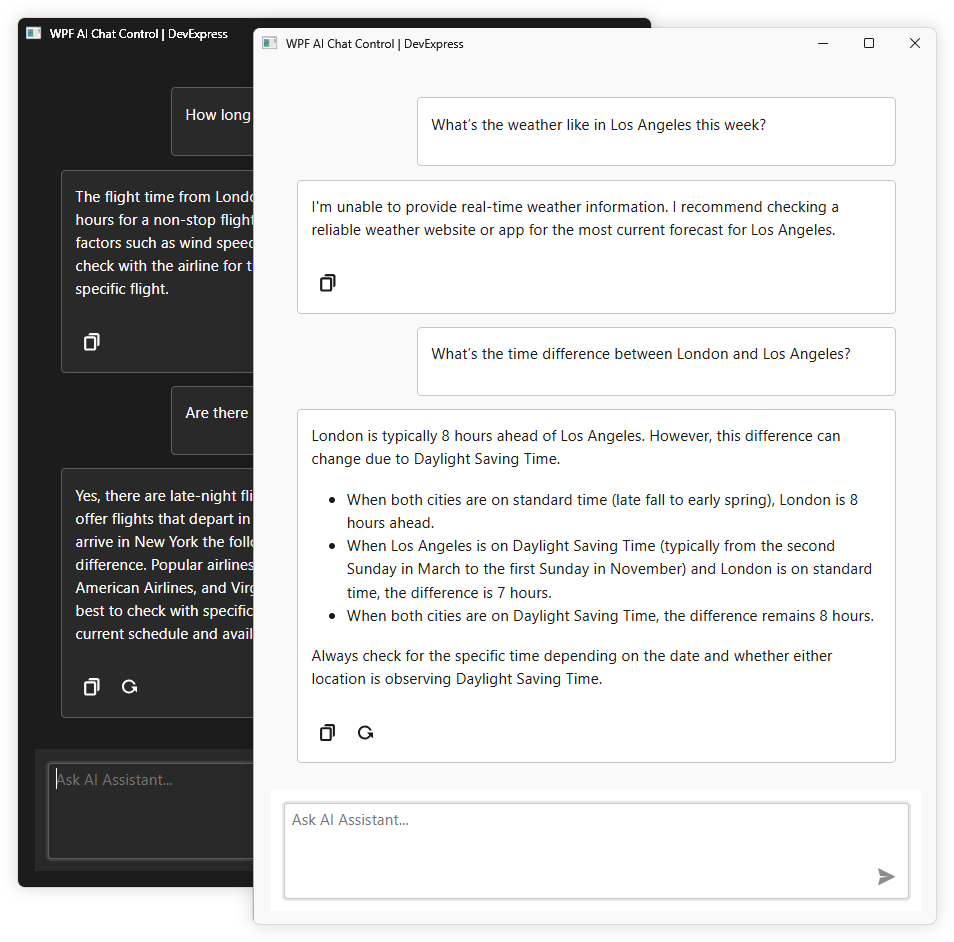
Features include:
- Seamless Integration with AI Services
- Markdown Message Rendering
- Copy and Regenerate Responses
- Manual Handling of Chat Messages
- Create an Assistant That Chats Using Your Own Data
- Save and Load Chat History
- Streaming
- DevExpress Light and Dark Themes
See the following help topic for additional information: AI Chat Control.