Create Your First App with DevExpress Mobile UI for .NET MAUI (VS Code)
- 5 minutes to read
DevExpress Template Kit ships with project templates that are based on DevExpress .NET MAUI components. Use the link below to download and install the DevExpress Template Kit extension to Visual Studio Code:
You can also use the standard project template to create a .NET MAUI project and integrate DevExpress components into it manually. Use this approach to add DevExpress components to an existing project. For more information, refer to the following section: Create a Project with DevExpress .NET MAUI Controls Using Standard.NET MAUI Extension.
Prerequisites
- Visual Studio Code
.NET Meteor or standard.NET MAUI extension for Visual Studio Code
Note: Due to compatibility reasons, we recommend not to enable .NET Meteor and standard.NET MAUI extensions simultaneously.
.NET MAUI workload
Use the dotnet workload install command in a terminal to install the .NET MAUI workload:
dotnet workload install maui
Create a Project with the DevExpress Template Kit Extension
In Visual Studio Code, open the Extensions tab, type DevExpress Template Kit for VS Code in the search box, and click Install. For more information about extension management, see Extension Marketplace.

You can also use the following link to download and install DevExpress Template Kit for Visual Studio Code:
Run Project Wizard and Configure Project
DevExpress Template Kit for VS Code ships with the Project Wizard that helps you to create and set up your project. To run the Project Wizard, follow the steps below:
In the Explorer tab, click the New DevExpress Project button:

Specify the project name and press Enter:

Select a project location and click the Select Folder button. This runs the DevExpress unified project wizard.
Once the Project Wizard appears, select .NET MAUI to proceed:
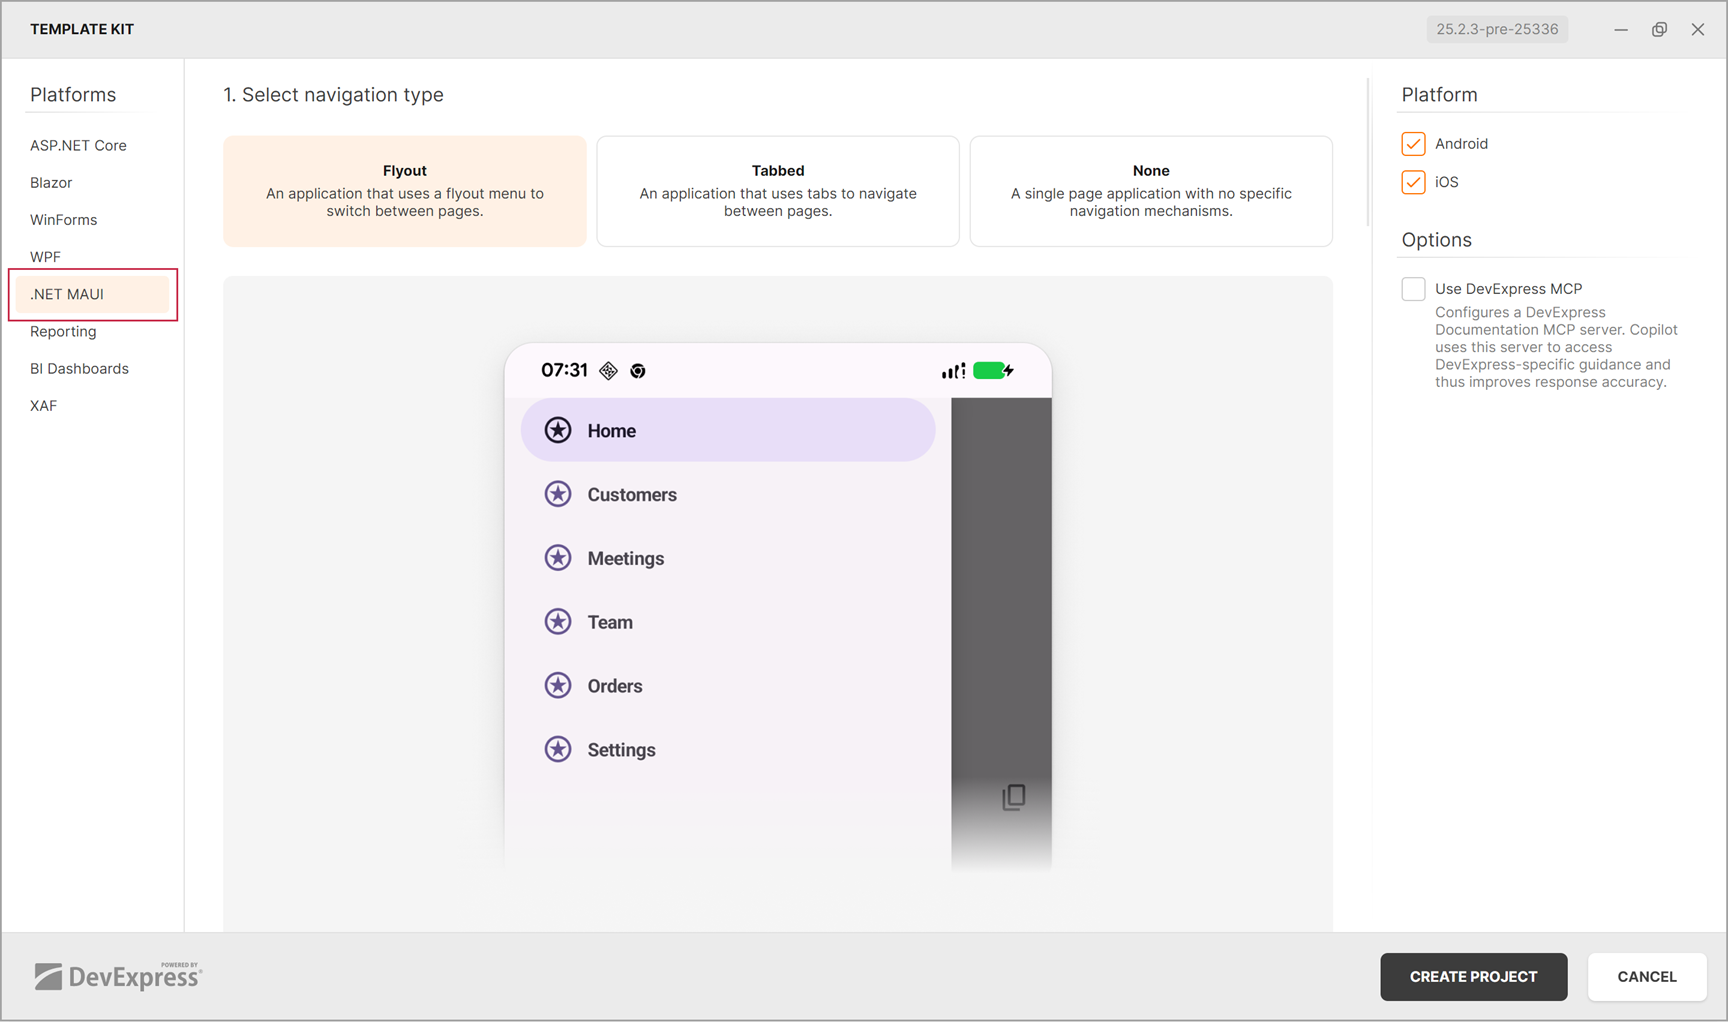
The Project Wizard will guide your through three project creation stages:
- 1. Select navigation type
Select the project navigation type and target platform.

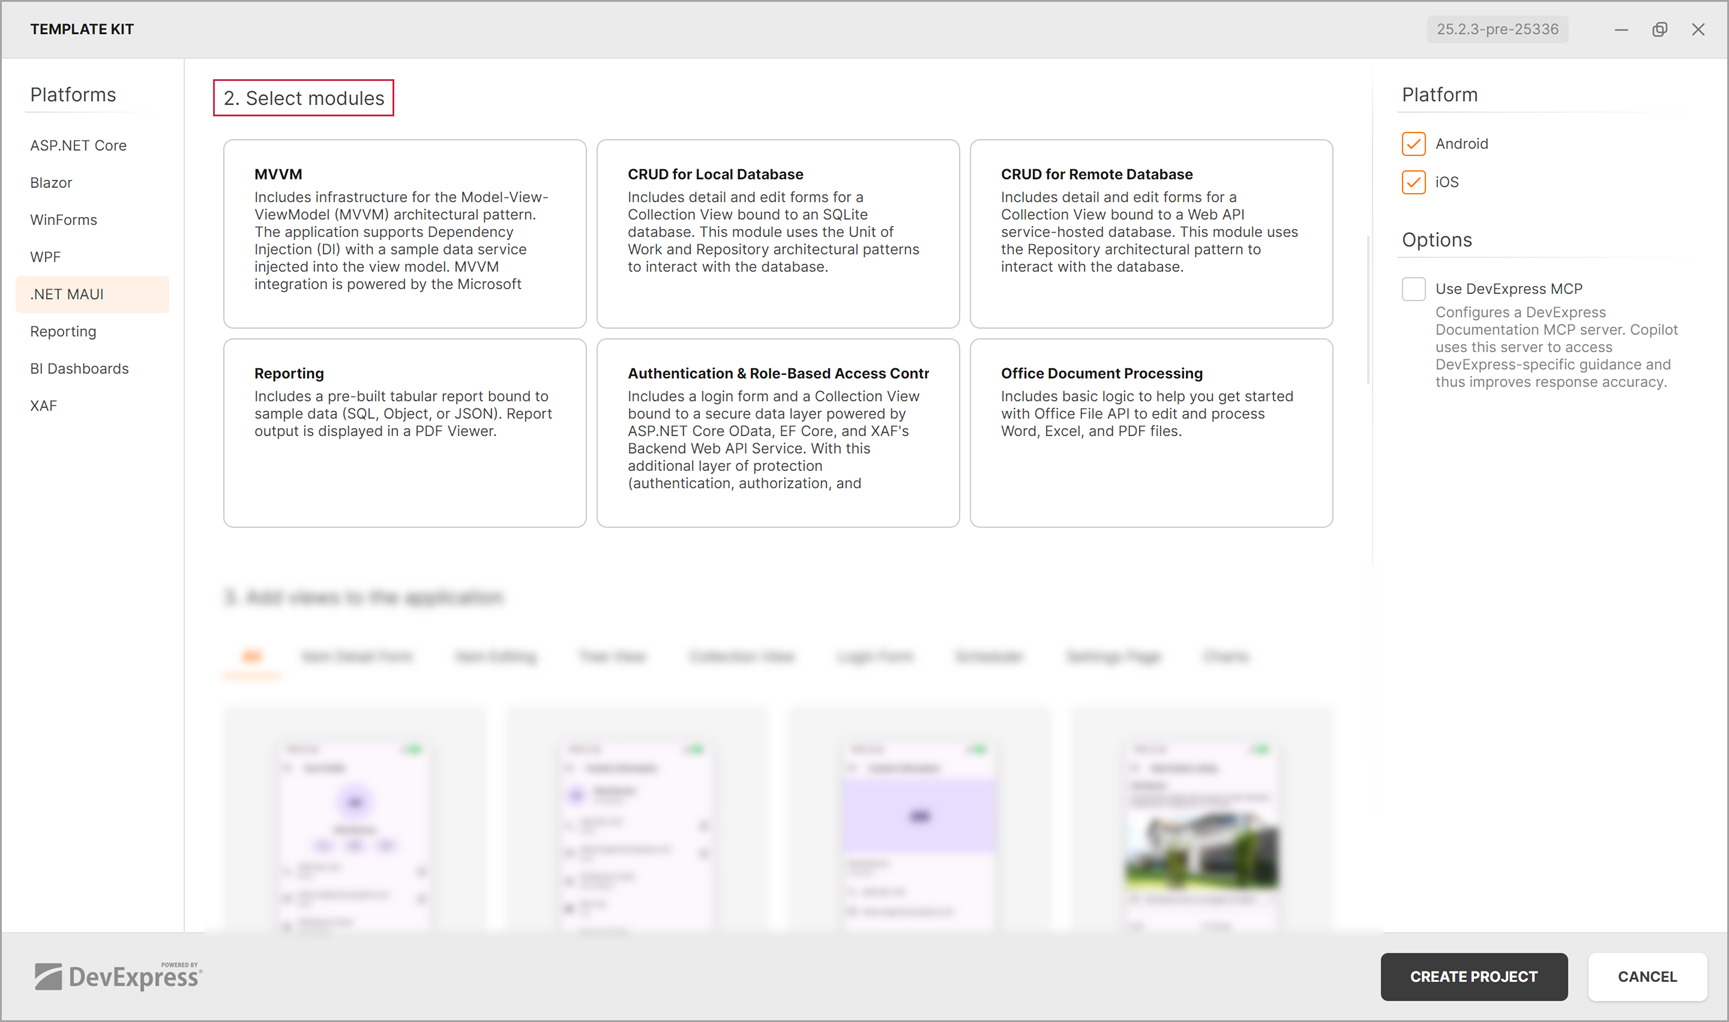
- 2. Select modules
Select modules to add to the app. Each independent module contains a predefined solution to implement one of popular usage scenario.
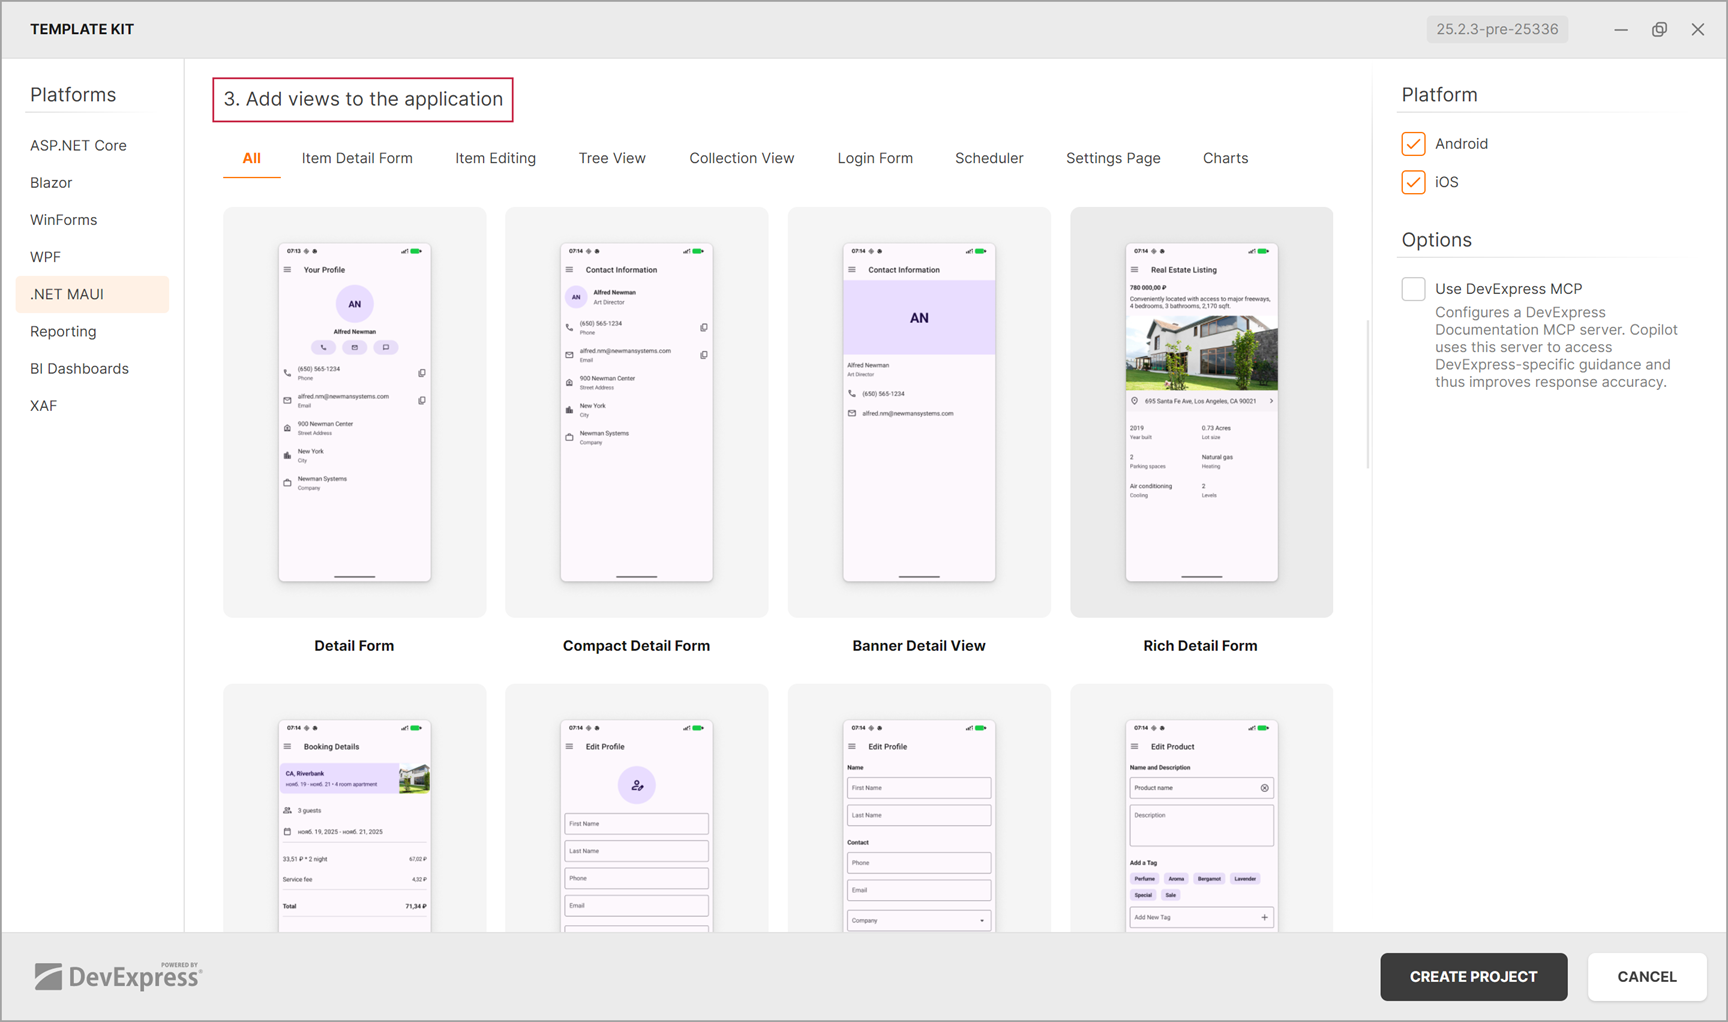
- 3. Add views to the application
Add one or multiple predefined views to the app and click CREATE PROJECT to finish the project creation.
Create a Project with DevExpress .NET MAUI Controls Using Standard.NET MAUI Extension
This section explains how to add DevExpress controls to the project created based on the standard .NET MAUI template. To get started, refer to the following page: Create your app.
After you create a project, you should install DevExpress NuGet packages, register handlers, and declare XAML namespaces. We also recommend that you remove unsupported platforms such as Windows and Mac Catalyst in the project file (.csproj).
...
<!--Default target frameworks-->
<!-- <PropertyGroup>
        <TargetFrameworks>net9.0-android;net9.0-ios;net9.0-maccatalyst</TargetFrameworks>
        <TargetFrameworks Condition="$([MSBuild]::IsOSPlatform('windows'))">$(TargetFrameworks);net9.0-windows10.0.19041.0</TargetFrameworks>
</PropertyGroup> -->

<!--Supported target frameworks-->
<PropertyGroup>
    <TargetFrameworks>net9.0-android;net9.0-ios</TargetFrameworks>
</PropertyGroup>
...
See the following help section for more information: Supported Platforms.
Install DevExpress NuGet Packages
DevExpress project templates and components are distributed using NuGet packages. To obtain those packages, follow the instructions described in the following help topic: CLI Templates (Windows and macOS).
Register Handlers for DevExpress Components
Use any of the DevExpress.Maui.MauiAppBuilderExtensions_* methods to register the assembly. The following table lists methods and assemblies that they register:
| Method | Assembly |
|---|---|
| UseDevExpress(MauiAppBuilder, Boolean) | DevExpress.Maui.Core.dll |
| UseDevExpressCharts(MauiAppBuilder) | DevExpress.Maui.Charts.dll |
| UseDevExpressCollectionView(MauiAppBuilder) | DevExpress.Maui.CollectionView.dll |
| UseDevExpressControls(MauiAppBuilder) | DevExpress.Maui.Controls.dll |
| UseDevExpressDataGrid(MauiAppBuilder) | DevExpress.Maui.DataGrid.dll |
| UseDevExpressDataGridExport(MauiAppBuilder) | DevExpress.Maui.DataGrid.Export.dll |
| UseDevExpressEditors(MauiAppBuilder) | DevExpress.Maui.Editors.dll |
| UseDevExpressGauges(MauiAppBuilder) | DevExpress.Maui.Gauges.dll |
| UseDevExpressHtmlEditor(MauiAppBuilder) | DevExpress.Maui.HtmlEditor.dll |
| UseDevExpressPdf(MauiAppBuilder) | DevExpress.Maui.Pdf.dll |
| UseDevExpressScheduler(MauiAppBuilder) | DevExpress.Maui.Scheduler.dll |
| UseDevExpressTreeView(MauiAppBuilder) | DevExpress.Maui.TreeView.dll |
When you reference a DevExpress .NET MAUI control, you need to register it in your application’s MauiAppBuilder (MauiProgram.cs file). For example, if your project references a DevExpress.Maui.DataGrid.dll, you should register this assembly and all assemblies that are referenced by the DataGrid:
using DevExpress.Maui;

namespace DXMauiApp1 {
    public static class MauiProgram {
        public static MauiApp CreateMauiApp() {
            var builder = MauiApp.CreateBuilder();
            builder
                .UseMauiApp<App>()
                .UseDevExpress(useLocalization: false)
                .UseDevExpressCollectionView()
                .UseDevExpressControls()
                .UseDevExpressEditors()
                .UseDevExpressDataGrid()
                .ConfigureFonts(fonts => {
                    fonts.AddFont("OpenSans-Regular.ttf", "OpenSansRegular");
                    fonts.AddFont("univia-pro-regular.ttf", "Univia-Pro");
                    fonts.AddFont("roboto-bold.ttf", "Roboto-Bold");
                    fonts.AddFont("roboto-regular.ttf", "Roboto");
                });

            return builder.Build();
        }
    }
}
You can use our code analyzer to reference all required assemblies.
Declare XAML Namespaces
You can declare the xmlns:dx="http://schemas.devexpress.com/maui" XAML namespace and than use it to access any of DevExpress .NET MAUI control:
<ContentPage ...
             xmlns="http://schemas.microsoft.com/dotnet/2021/maui"
             xmlns:dx="http://schemas.devexpress.com/maui"
             xmlns:ios="clr-namespace:Microsoft.Maui.Controls.PlatformConfiguration.iOSSpecific;assembly=Microsoft.Maui.Controls"
             ios:Page.UseSafeArea="true">

    <dx:DataGridView/>
    <dx:TextEdit/>
    <dx:PdfViewer/>
    <dx:HtmlEdit/>
</ContentPage>
Enable Theming Mechanism
DevExpress components for .NET MAUI support built-in themes and different color schemes including light and dark modes. DevExpress project templates include theming support for standard controls. If you use standard templates, you should manually enable theming mechanisms for standard controls. For detailed instructions, refer to the following help topic: Apply Color Theme Colors to a Standard Control.
Additionally, you can paint the system bar according to the theme. To do this, enable the ThemeManager.ApplyThemeToSystemBars option in the MauiProgram.cs file:
public static class MauiProgram {
    public static MauiApp CreateMauiApp() {
        ThemeManager.ApplyThemeToSystemBars = true;
        var builder = MauiApp.CreateBuilder();
Run the Project
If you use the .NET Meteor extension, select the device to run the project in the VS Code status bar. You can also use the .NET Meteor: Select Device command in the VS Code command palette to invoke a list of available devices. In the list, select a device to deploy the project.

Press F5 to run the project or click the Run button in the Run and Debug tab:

Note
You can also install DevExpress project templates and create a project with terminal commands. For more information, refer to the following help topic: CLI Templates (Windows and macOS).
For information on how to build and run the project with the standard extension for .NET MAUI, refer to the following help topic: Build your first app.