Appointments
- 12 minutes to read
Basic Appointment Information
Scheduler appointments are objects of the Appointment class. Appointments store the following data:
Stored Data | Description |
|---|---|
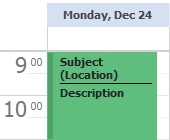
Start and end dates | DateTime values assigned to the Appointment.Start and Appointment.End properties. When you bind a Scheduler Control to a data source, these two mappings are mandatory. Ignored if the Appointment.AllDay property equals true. |
Title and description | String values stored in the Appointment.Subject and Appointment.Description properties. |
Location | String Appointment.Location property value displayed beneath the appointment subject.
|
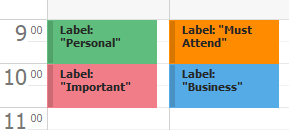
An object assigned to the Appointment.LabelKey property that specifies the appointment color and the related name (i.e., “Important” for red, “Business” for blue, etc.).
| |
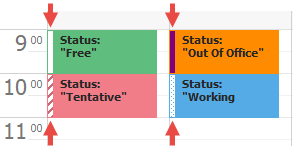
An appointment status (“Free”, “Tentative”, “Out Of Office”, etc.) represented as a thin stripe along an appointment edge. Assigned to the Appointment.StatusKey property.
| |
Resource that owns this appointment | Stored as an ID in the Appointment.ResourceId property. Important If you do not plan on using resources, make sure the AppointmentMappingInfo.ResourceId mapping is empty when you bind the Scheduler to an appointment data source. |
Appointment Time Zone | Specified by a string ID stored in the Appointment.TimeZoneId property. The Scheduler automatically adjusts appointments whose start and end dates are recorded in a time zone different from the current time zone. All-day appointments ignore time zones. |
Related reminders | Reminders notify users when an appointment is about to occur. Stored in the Appointment.Reminders collection. |
Recurrence data | Recurring appointments are appointments that occur more than once. Their recurrence rules are stored in the Appointment.RecurrenceInfo property. Use it to access and modify rule settings. For example, you can modify the Start and End properties to change the series duration. |
Custom data | Appointments can store data from data source fields that are not used by the Scheduler itself. To do this, modify the IAppointmentStorageBase.CustomFieldMappings collection to map the required data fields to custom appointment fields. Handle the SchedulerControl.InitAppointmentDisplayText to manually draw custom field data on appointment surfaces. |
Appointment Types
There are five appointment types available. The appointment type is stored in the Appointment.Type property.
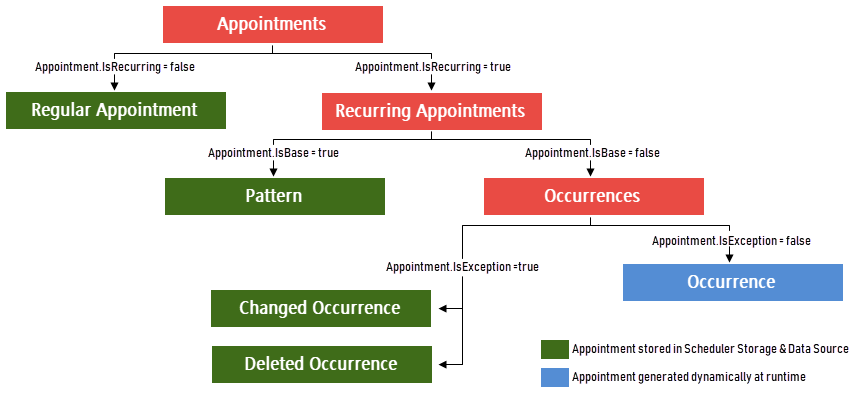
Regular appointments (Type: 0)
Appointments that last for the specific period of time and never occur again.
Pattern (Type: 1)
Stores the rule according to which visible (to users) recurring appointments are generated. Patterns themselves are not visible and stored in the SchedulerDataStorage.Appointments collection.
Occurrences (Type: 2)
All appointments in a series, visible to users “clones” of a pattern appointment. Occurrences are not kept in the SchedulerDataStorage.Appointments collection. To access appointments with this type, call the Appointment.GetOccurrence method for a pattern, or call the ISchedulerStorageBase.GetAppointments method, which returns all visible appointments for a given time interval.
To modify properties of all Occurrences in a series, edit the Pattern appointment (use the Appointment.RecurrencePattern property to access it).
Changed Occurrence (Type: 3)
A former series member (occurrence) whose data has been modified. Changed occurrences are marked with a crossed-out occurrence icon.
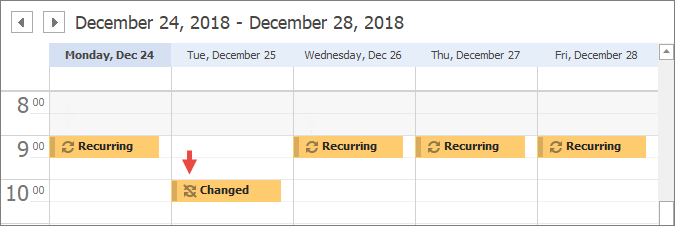
These appointments can be accessed directly through the SchedulerDataStorage.Appointments collection.
//The 2nd visible appointment on the figure above. Returns "9" int hour = schedulerControl.DataStorage.Appointments[1].OriginalOccurrenceStart.Hour; //same appointment. Returns "10" int hour2 = schedulerControl.DataStorage.Appointments[0].GetOccurrence(1).Start.Hour;Call the Appointment.RestoreOccurrence method to reset changed occurrence data and make it a regular occurrence again.
Important
It is not allowed to change a resource of a certain occurrence. The resource can be changed in all appointments in a recurrence series.
Deleted Occurrence (Type: 4)
A regular or edited occurrence that has been removed while the rest of the series still exists. Stored within the SchedulerDataStorage.Appointments collection.
Refer to the following help topic for more information on available recurrence types: Create Appointments with Various Recurrence Types.
Create Appointments
Use the following ways to populate a SchedulerControl with appointments (the Scheduler control requires an associated SchedulerDataStorage):
- Load appointments from a data source - see the Getting Started article for an example, and the Data Binding documentation section for more information.
- Import appointments from an existing calendar (iCalendar, Google Calendar, etc.) - see Import and Export for a list of supported calendars.
- Add unbound appointments in code - call methods listed in the table below.
Tip
AI-powered SmartPaste
SmartPaste allows you to create appointments in the WinForms Scheduler by pasting text content directly from the clipboard. SmartPaste recognizes common appointment-specific data (subject, dates, times, location, agenda) and fills corresponding fields in the Scheduler’s appointment editor.
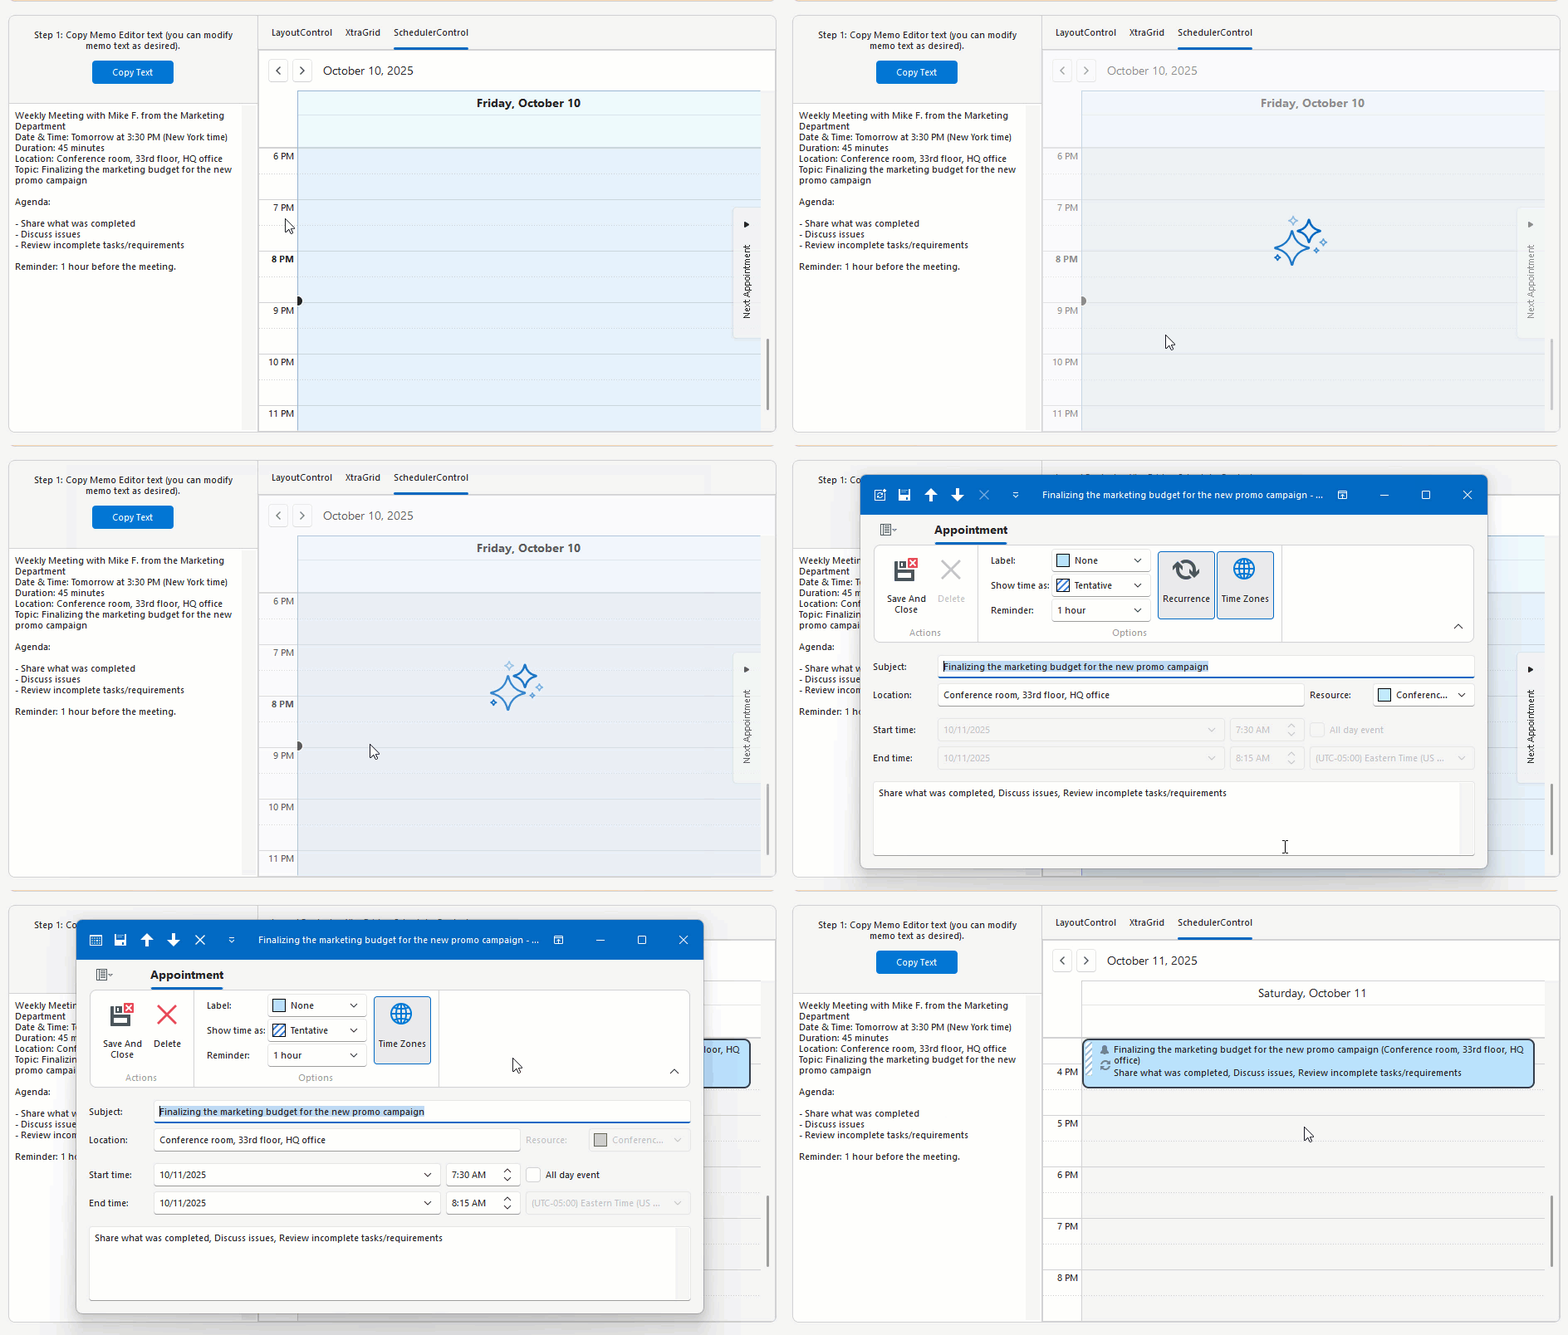
SmartPaste can detect and configure the following settings:
- Recurrence pattern (for example, every Monday at 10 AM until December)
- Time Zone
- Label
- Status
- Resources
See the following help topic for more information: Smart Paste AI-powered Extension.
Methods that add regular appointments
| Method | Additional Information |
|---|---|
| SchedulerControl.CreateNewAppointment | Creates a completely blank appointment, and opens an Appointment Edit Form (see the “Edit Appointments” section below) to edit this appointment. |
| SchedulerControl.CreateAppointment | Creates an empty appointment, and opens an Appointment Edit Form to edit this appointment. Allows you to create appointments that last for an entire day (or multiple days), and appointments that occur repeatedly |
| SchedulerDataStorage.CreateAppointment | Five overloads accessible through the “<_schedulerControl_name>.DataStorage” property. Allow you to specify appointment start and end dates, duration, type, and subject. |
| AppointmentDataStorage.CreateAppointment | Same overloads as above. Accessible through “<_schedulerControl_name>.DataStorage.Appointments”. |
Other methods that add appointments
| Method | Additional Information |
|---|---|
| SchedulerControl.CreateNewAllDayEvent | Creates an appointment that lasts for one or multiple days. |
| SchedulerControl.CreateNewRecurringEvent | Creates an appointment that lasts for one or multiple days, and occurs more than once. |
| SchedulerControl.CreateNewRecurringAppointment | Creates an appointment that occurs more than once. |
| Appointment.CreateException | Allows you to add, modify and remove occurrences in an existing series. |
Locate Appointments
To find required appointments in code, use the SchedulerDataStorage.GetAppointments method that returns all events that belong to the given time interval.
TimeInterval interval = new TimeInterval(new DateTime(2018, 12, 24), TimeSpan.FromDays(1));
Appointment target = schedulerControl.DataStorage.GetAppointments(interval)
    .Find(x => x.Subject.Contains("Dinner"));
You can also use the AppointmentDataStorage.GetAppointmentById method if you know the appointment’s ID, or retrieve appointments directly from the storage.
//retrieve an appointment by its ID
Appointment appt1 = schedulerControl.DataStorage.Appointments.GetAppointmentById("PK_0021");
//retrieve an appointment by its index in the Appointments collection
Appointment appt2 = schedulerControl.DataStorage.Appointments[25];
For pattern appointments, call the Appointment.GetOccurrence method to retrieve the N-th occurrence in the series.
//find a today's appointment that has "meet" in its subject
Appointment todayAppt = schedulerControl.DataStorage.GetAppointments(new TimeInterval(DateTime.Now.Date, TimeSpan.FromDays(1)))
    .Find(x => x.IsRecurring == true && x.Subject.Contains("meet"));
//retrieve this appointment's pattern, find its 3rd occurrence and remove it
if (todayAppt != null) schedulerControl.DeleteAppointment(todayAppt.RecurrencePattern.GetOccurrence(2));

//suppress the confirmation dialog that asks users whether this single occurrence or the entire series should be removed
SchedulerControl.DeleteRecurrentAppointmentFormShowing += SchedulerControl_DeleteRecurrentAppointmentFormShowing;

private void SchedulerControl_DeleteRecurrentAppointmentFormShowing(object sender, DeleteRecurrentAppointmentFormEventArgs e) {
    e.Appointment.Delete();
    e.Handled = true;
}
You can also call the Appointment.GetExceptions method to retrieve all changed occurrences in a series. To reset their changes and make them regular series appointments again, call the Appointment.RestoreOccurrence method.
//find a today's recurring appointment labeled as "Vacation"
Appointment pattern = schedulerControl.DataStorage.GetAppointments(new TimeInterval(DateTime.Now.Date, TimeSpan.FromDays(1)))
    .Find(x => x.IsOccurrence == true && (int)x.LabelKey == 4).RecurrencePattern;
//restore the recurring info for all appointments that belong to the same series
foreach (Appointment appt in pattern.GetExceptions()) appt.RestoreOccurrence();
Additional Settings and Custom Appointment Content
Scheduler Views provide multiple options that allow you to customize appointment layout and display options.
API | Description |
|---|---|
View.AppointmentDisplayOptions | Returns the AppointmentDisplayOptions object that provides access to appointment display settings. For instance, the AppointmentDisplayOptions.ShowRecurrence setting allows you to hide the recurrence icon. |
Allows you to stretch appointments along the View time ruler so that they occupy one or multiple cells entirely.
| |
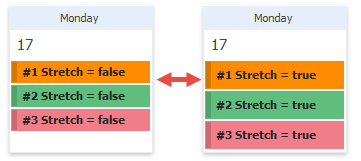
Specify whether appointments in Month and Timeline Views should stretch vertically to occupy entire time cells.
| |
Specifies if appointments can be scheduled at intersecting time intervals. If set to Custom, the SchedulerControl.AllowAppointmentConflicts event raises. You can handle this event to manually decide which appointments can occur simultaneously. | |
Allow you to display custom images and/or text strings within appointments. For instance, the code below removes a separator line drawn between appointment subject and description. | |
Grants access to paint methods that allow you to manually draw appointments. | |
Grants access to paint methods that allow you to manually draw appointment backgrounds. | |
Specifies the appointment text color | |
Enables you to customize visual parameters of Appointments like display text and Appearance settings. Refer to the following help topic for more information on how to customize the appearance of the entire application and/or individual UI elements: Application Appearance and Skin Colors. |
User Restrictions
The SchedulerControl.OptionsCustomization property provides access to a set of AllowAppointment… properties that prevent users from adding new and\or modifying existing appointments.
- SchedulerOptionsCustomization.AllowAppointmentCopy
- SchedulerOptionsCustomization.AllowAppointmentCreate
- SchedulerOptionsCustomization.AllowAppointmentDelete
- SchedulerOptionsCustomization.AllowAppointmentDrag
- SchedulerOptionsCustomization.AllowAppointmentDragBetweenResources
- SchedulerOptionsCustomization.AllowAppointmentEdit
- SchedulerOptionsCustomization.AllowAppointmentMultiSelect
- SchedulerOptionsCustomization.AllowAppointmentResize
If you set any of these settings to UsedAppointmentType.Custom, the Scheduler will fire related AllowAppointment… events. These events allow you to manually decide whether to allow or cancel a user action every time it takes place.
To limit the date range available to users, specify the LimitInterval property. Users are unable to browse dates outside this interval.
How to Track and Cancel Appointment Edits
When an appointment is about to be modified, the Scheduler fires the following events. You can set the e.Cancel property to true to cancel these upcoming modifications.
If you do not cancel appointment edits and they are applied, the following events occur. Call required data source methods inside these events’ handlers to push modified appointment data to an underlying source.
Group and Sort Appointments
The SchedulerControl.CustomAppointmentGroup event allows you to split appointments into groups. This event fires repeatedly for every encountered appointment; read the e.AppointmentLayoutInfo event parameter to obtain the information about the currently processed appointment, and assign the group index to the integer e.GroupIndex property. In the Timeline View module of the Scheduler Demo (available in DevExpress Demo Center), appointments are grouped by their Labels.
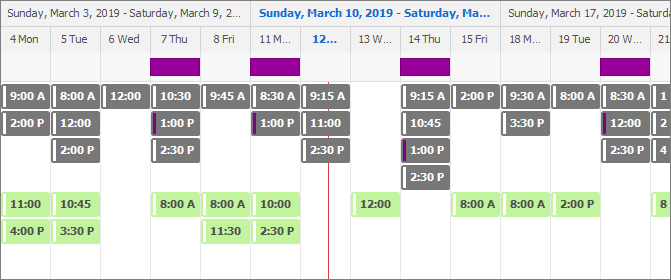
void SchedulerControl1_CustomAppointmentGroup(object sender, CustomAppointmentGroupEventArgs e) {
    e.GroupKey = (int)e.AppointmentLayoutInfo.Appointment.LabelKey;
}
To sort appointments, handle SchedulerControl.CustomAppointmentSort event. This event compares appointment pairs. The e.AppointmentLayoutInfo1 and e.AppointmentLayoutInfo2 event parameters store information about both appointments. Read these parameters to compare objects, and set the integer e.Result property to one of the following values:
- -1 if the appointment related to the e.AppointmentLayoutInfo1 parameter should go first;
- 1 if the appointment related to the e.AppointmentLayoutInfo2 parameter should go first;
- 0 if appointments are considered equal, and should be positioned according to default View layout rules.
The Timeline View demo module illustrates how to sort appointments by their Statuses: appointments with the “Out of Office” status are placed after appointments with no statuses. Note that you can sort appointments regardless of whether they have been grouped or not.
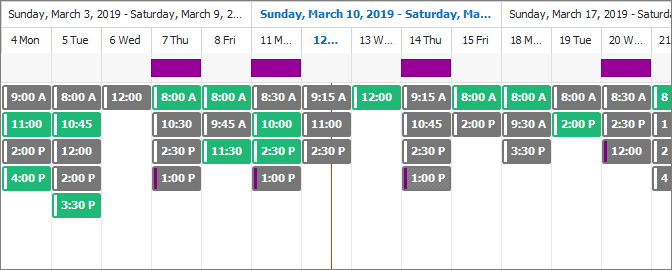
void SchedulerControl1_CustomAppointmentSort(object sender, CustomAppointmentSortEventArgs e) {
    Appointment apt1 = e.AppointmentLayoutInfo1.Appointment;
    Appointment apt2 = e.AppointmentLayoutInfo2.Appointment;
    //compare by statuses
    e.Result = ((int)apt1.StatusKey).CompareTo((int)apt2.StatusKey);
    if (e.Result != 0)
        return;
    //if statuses are the same, compare by dates
    e.Result = apt1.Start.CompareTo(apt2.Start);
    if (e.Result != 0)
        return;
    e.Result = -apt1.End.CompareTo(apt2.End);
}
Block Time Cells
The Scheduler allows users to create appointments in any time cells (including intersecting appointments; see the SchedulerControl.AllowAppointmentConflicts event). You can block specific time cells, so that users are unable to add appointments to these cells, or modify appointments that are already there. For instance, you can disable lunch hours or days off.
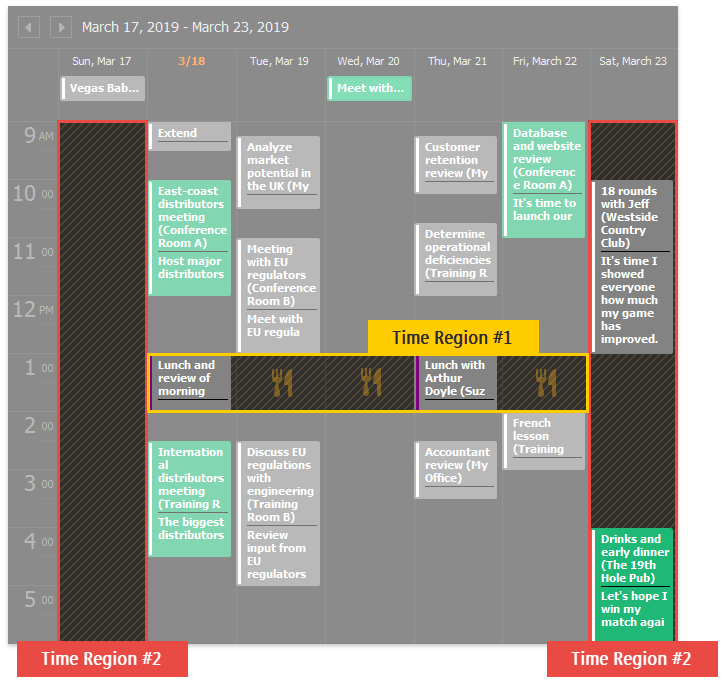
To do that, you need to create time regions. See the TimeRegion class to learn more.
Appearance Customization
- How to: Custom Paint Appointments
- How to: Custom Paint Day Headers
- How to: Hide Grid Lines in the View
- How to: Modify Captions of Navigation Buttons
- How to: Display Custom Images for Appointments
- How to: Display Custom Tooltips for Appointments
- How to: Display Custom Day Headers
- How to: Customize Appointment Flyouts
