Resources for Appointments
- 5 minutes to read
This document introduces the Resource concept and describes how appointments can be assigned to different resources. It contains some real-life resource examples, and demonstrates how to link appointments to resources.
What Is a Resource?
In real-life scheduling applications, an appointment is seldom processed simply “as is” and is usually assigned to different resources. There are different kinds of resources and the decision as to what should be a resource in a particular scheduling application depends upon the specifics of the task solved by the application. Here are some examples of scheduling tasks, illustrating what can be an appointment and a resource in these examples.
A Company.
Resource: Every employee in this company.
Appointment: Any time interval spent by an employee to perform a particular task.
A Car Rental Agency.
Resource: Every car that is owned by this firm and can be leased.
Appointment: Any time interval during which any of the firm’s cars are leased.
An Educational Center.
Resources: Every teacher who works at this center or every room in this center.
Appointment: Any time interval when any one of the teachers is delivering a lecture in any of the rooms at the center.
Assigning Appointments to Resources
A single resource is an object which implements the Resource interface. All of a scheduler’s resources are stored in the ResourceStorage (which is a part of the Scheduler Storage and is accessed via its SchedulerDataStorage.Resources property). The collection of all the resources is accessed via the ResourceStorageBase.Items property.
If a Resource Storage contains at least one resource, then it is possible to assign appointments to resources. This may be done in different ways, depending on whether resource sharing is enabled. A resource sharing means that an appointment can be associated with several resources.
Note
When multiple resources are associated with an appointment, i.e. the resource sharing is switched on, the data field to which the list of resource identifiers is mapped holds XML data. Resource identifiers starting from version 15.2 are stored Base64 encoded. Set the SchedulerCompatibility.Base64XmlObjectSerialization property to false to revert to the previous storage format. For more information, see the Data Sources section.
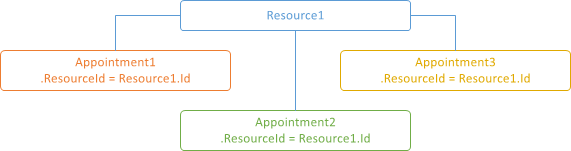
Resources are not shared, i.e. the AppointmentStorageBase.ResourceSharing property is set to false.
To assign an appointment to a particular resource, the appointment’s Appointment.ResourceId property should be set to the ID of an appropriate resource. Note that the resource’s ID is accessed via its IPersistentObject.Id property.
The image below demonstrates this concept.
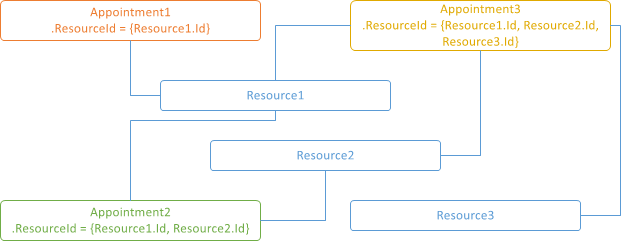
Resources are shared, i.e. the AppointmentStorageBase.ResourceSharing property is set to true.
To assign an appointment to several resources, it is necessary to add their IPersistentObject.Id property values to the appointment’s Appointment.ResourceIds collection.
The image below demonstrates this concept.
The following image illustrates the Appointment Editing form used to assign multiple resources to an appointment.

Grouping by Resources
A resource becomes visible in the SchedulerControl when its data is shown grouped by either dates (SchedulerControl.GroupType is set to SchedulerGroupType.Date) or by resources (SchedulerControl.GroupType is set to SchedulerGroupType.Resource).
Note
If the Resource.Visible property of any resource is set to false, and appointments grouping is enabled, then all the appointments that belong to this resource will be hidden.
The following image demonstrates the common look of the Day View when appointments are grouped by resources.

In the grouped Timeline View, resources are shown vertically on the left.

If grouping is enabled, the Resource Navigator is shown automatically unless it is hidden via the ResourceNavigator.Visibility property. It can be used by end-users to scroll through resources, and to change the number of resources shown at one time on screen. To hide the Resource Navigator, set its ResourceNavigator.Visibility property to ResourceNavigatorVisibility.Never.
You can manually set the number of resources visible at one time on a screen for every View via the SchedulerViewBase.ResourcesPerPage property of the appropriate view.
To obtain a list of currently visible resources, use the SchedulerViewInfoBase.VisibleResources property.
Resource navigation can be performed programmatically using the Resource Navigation Services.
Resource Appearance
The following table lists members which determine how resources are visualized.
| Member | Description |
|---|---|
| Resource.Caption | Speicies a text displayed in resource headers. |
| ResourceExtension.SetColor | Speicies background color for cells which belong to a certain resource. |
| SchedulerControl.ResourceColorSchemas | Provides access to color schemas used to paint time cells which belong to a certain resource. |
| ResourceExtension.SetImage | Assigns an image to the specified resource. |
| Resource.ImageBytes | Specifies an image for display in resource headers. |
| SchedulerOptionsView.ResourceHeaders | Gets the object which combines appearance options for a scheduler’s resource headers. |
Tip
You can use the WinForms Skin Editor to modify resource color schemas in skins.
Resource Filtering
You can let end-users specify resources to display only appointments that are associated with those resources. Apart form the mentioned Resource Navigator control, there are stand-alone controls that accomplishe a similar task. The ResourcesCheckedListBoxControl, ResourcesComboBoxControl or the ResourcesPopupCheckedListBoxControl controls serve this purpose.
To filter resources programmatically, handle the SchedulerDataStorage.FilterResource event.
Note
If the resource for an appointment is not specified, it is assumed that the appointment belongs to any resource. Use the SchedulerOptionsViewBase.ShowOnlyResourceAppointments property to specify its visibility. If the resource assigned to an appointment is not presented in a resource storage, this appointment is not loaded into the appointment storage. It means that a Scheduler without resources does not display appointments with resources.
Resource Hierarchy
Resources can be structured in hierarchical manner. To reflect resource organization, a tree structure can be implemented, in which each resource is linked to a parent resource (node). A node with a null parent link is a root node.
The tree structure requires an additional field in the resource data source. To learn more please refer to the Hierarchical Resource Specifics document.
The ResourcesTree control is implemented to display a tree of resources. It can be bound to a SchedulerControl to display resources for the grouped mode of the views such as the Timeline View or the Gantt View.
