Create a Windows UI Application Based on a Project Template
- 3 minutes to read
Create a Tile-based WinForms Application
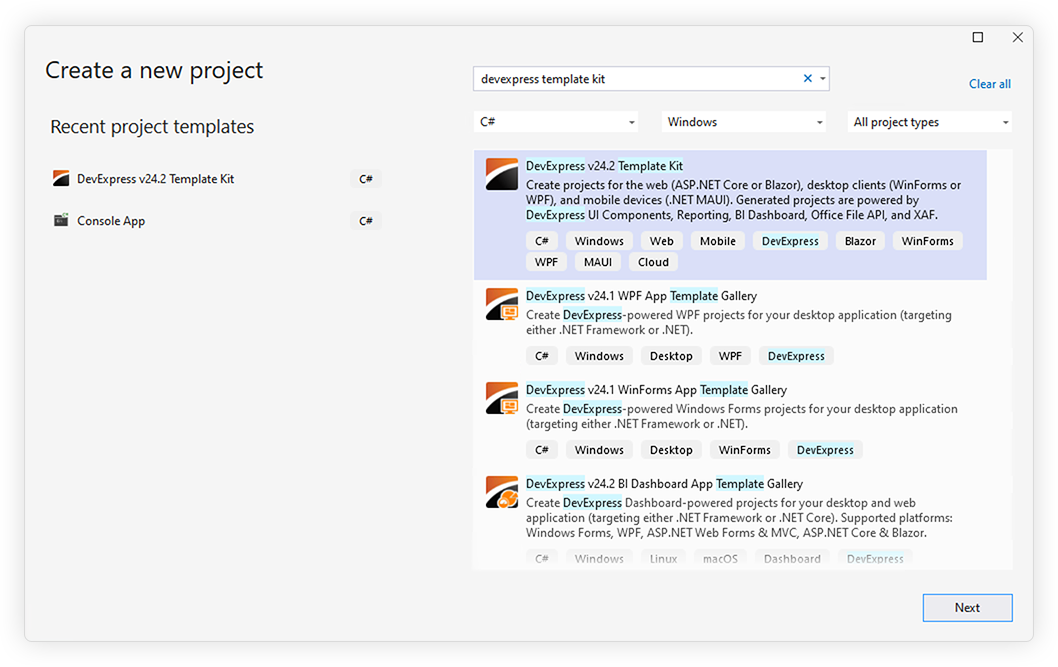
In Visual Studio, click “File | New | Project” to create a new project. Select DevExpress v26.1 Template Kit and click Next:
Tip
The application targets .NET 8+.
Refer to the following help topic for information on how to download and install the DevExpress Template Kit: Install DevExpress Template Kit.
Note
Use the DevExpress Project Template Gallery to create applications based on templates that target the .NET Framework.
- Specify project settings and click Create to run the DevExpress Project Wizard.
- Select the WinForms platform. Scroll down to the Navigation and Document Layout group and select Tile Application. Click Create Project.
- Run the application to see the result.

Tile-based UI/UX
Start Page
The start page is a Tile Container with 6 tile groups (TileGroup):

Tile Detail Page
Click a tile to display its details. Use buttons displayed at the top-right to navigate between detail pages of tiles contained in the group.

See /Views/ItemDetailPage.cs for implementation details.
Group Detail Page
The start page displays round buttons. Use these buttons to navigate to a group detail page. This page displays information about the group itself and its tiles. Click a tile to navigate to its details page.

See the /Views/GroupDetailPage.cs file for implementation details.
Page Navigation
Press Esc or right-click the page area to display the Navigation Bar. The Navigation Bar can display Back, Home, and Exit buttons.

Page navigation is implemented in BaseContentContainer.ButtonClick and BaseTile.Click event handlers:
void tile_Click(object sender, TileClickEventArgs e) {
    if ((e.Tile as Tile).ActivationTarget is PageGroup page) {
        page.Parent = tileContainer;
        page.SetSelected((e.Tile as Tile).Document);
    }
}

void buttonClick(object sender, DevExpress.XtraBars.Docking2010.ButtonEventArgs e) {
    if (e.Button.Properties.Tag is SampleDataGroup tileGroup) {
        windowsUIView.ActivateContainer(groupsItemDetailPage[tileGroup]);
    }
}
Implementation Details
The project template automatically generates boilerplate code.
Data
The /Data/SampleData.cs file contains the following classes:
SampleDataItem- A data item with a title, a subtitle, an image, a description, detailed content, and a group association.
SampleDataGroup- A group of related items (
SampleDataItem). SampleDataModel- Manages tile groups and items.
SampleDataSource- Generates sample data (five tile groups and a set of related items).
public partial class Form1 : XtraForm {
    SampleDataSource dataSource;

    public Form1() {
        InitializeComponent();
        dataSource = new SampleDataSource();
        CreateLayout();
    }
}
Create Layout
The CreateLayout method creates groups, tiles, and detail pages:
void CreateLayout() {
    foreach (SampleDataGroup group in dataSource.Data.Groups) {
        tileContainer.Buttons.Add(new DevExpress.XtraBars.Docking2010.WindowsUIButton(group.Title, null, -1,
            DevExpress.XtraBars.Docking2010.ImageLocation.AboveText, DevExpress.XtraBars.Docking2010.ButtonStyle.PushButton,
            null, true, -1, true, null, false, false, true, null, group, -1, false, false));
        PageGroup pageGroup = new PageGroup();
        pageGroup.Parent = tileContainer;
        pageGroup.Caption = group.Title;
        windowsUIView.ContentContainers.Add(pageGroup);
        groupsItemDetailPage.Add(group, CreateGroupItemDetailPage(group, pageGroup));
        foreach (SampleDataItem item in group.Items) {
            ItemDetailPage itemDetailPage = new ItemDetailPage(item);
            itemDetailPage.Dock = System.Windows.Forms.DockStyle.Fill;
            BaseDocument document = windowsUIView.AddDocument(itemDetailPage);
            document.Caption = item.Title;
            pageGroup.Items.Add(document as Document);
            CreateTile(document as Document, item).ActivationTarget = pageGroup;
        }
    }
    windowsUIView.ActivateContainer(tileContainer);
    tileContainer.ButtonClick += new DevExpress.XtraBars.Docking2010.ButtonEventHandler(buttonClick);
}