Get Started with DevExpress Data Form for .NET MAUI
- 7 minutes to read
The DataFormView component allows you to quickly generate an edit form for your data object. This document includes step-by-step instructions on how to add a DevExpress Data Form to your .NET MAUI application and an overview of the component’s features.
Prerequisites
Refer to the following pages before you proceed with this Getting Started lesson:
- Microsoft .NET Multi-platform App UI documentation
- .NET MAUI and DevExpress Mobile UI Supported Platforms
- Requirements for .NET MAUI and DevExpress Mobile UI
- Get Started with DevExpress Controls for .NET Multi-platform App UI (.NET MAUI)
Create a Project
Do the following to create a new project:
Create a new .NET MAUI project. Name it DataFormExample.
If the wizard does not propose a template for .NET MAUI projects, you can call the following command in a CLI to create a new .NET MAUI project:
dotnet new maui -n DataFormExampleRegister your personal NuGet package source in Visual Studio. See the following topic for information on how to add the DevExpress NuGet feed to Visual Studio: Register DevExpress NuGet Gallery to Access Mobile UI for .NET MAUI.
If you are an active DevExpress Universal customer, DevExpress Controls for .NET MAUI are available in your personal NuGet feed.
- Install the DevExpress.Maui.Editors package from this feed.
Note
DevExpress Data Form for .NET MAUI supports iOS and Android. The project should contain only these platforms.
Add a Data Form View to the Main Page
In the MauiProgram.cs file, call the following UseDevExpress* methods to register handlers for the DataFormView class.
using DevExpress.Maui;
using Microsoft.Maui.Controls.Hosting;
using Microsoft.Maui.Hosting;

namespace DataFormExample {
    public static class MauiProgram {
        public static MauiApp CreateMauiApp() {
            var builder = MauiApp.CreateBuilder();
            builder
                .UseDevExpress(useLocalization: false)
                .UseDevExpressCollectionView()
                .UseDevExpressControls()
                .UseMauiApp<App>()
                .ConfigureFonts(fonts =>
                {
                    fonts.AddFont("OpenSans-Regular.ttf", "OpenSansRegular");
                });
            return builder.Build();
        }
    }
}
Do the following in the MainPage.xaml file:
- Define the dx XAML namespace that refers to the DevExpress.Maui.DataForm CLR namespace.
- Remove the default content and add an instance of the DataFormView class to the page. Remove the default content’s event handlers in the code-behind. We recommend that you remove the default styles (fonts, colors, and other settings) in the App.xaml file.
<ContentPage xmlns="http://schemas.microsoft.com/dotnet/2021/maui"
             xmlns:x="http://schemas.microsoft.com/winfx/2009/xaml"
             xmlns:dx="http://schemas.devexpress.com/maui"
             x:Class="CollectionViewGetStarted.MainPage"
             BackgroundColor="{DynamicResource PageBackgroundColor}">
    <dx:DataFormView x:Name = "dataForm"/>
</ContentPage>
Populate the View With Data
Declare the PersonalInfo sample class that defines data to be edited in a data form.
namespace DataFormExample {
    public class PersonalInfo {
        public string FirstName { get; set; }
        public string LastName { get; set; }
        public DateTime BirthDate { get; set; }
        public virtual Gender Gender { get; set; }
        public string Password { get; set; }
        public string Email { get; set; }
        public string Phone { get; set; }
    }
    public enum Gender { Female, Male, RatherNotSay }
}
In the MainPage.xaml.cs file, assign a PersonalInfo object to the DataFormView.DataObject property.
public MainPage() {
    InitializeComponent();
    dataForm.DataObject = new PersonalInfo();
}
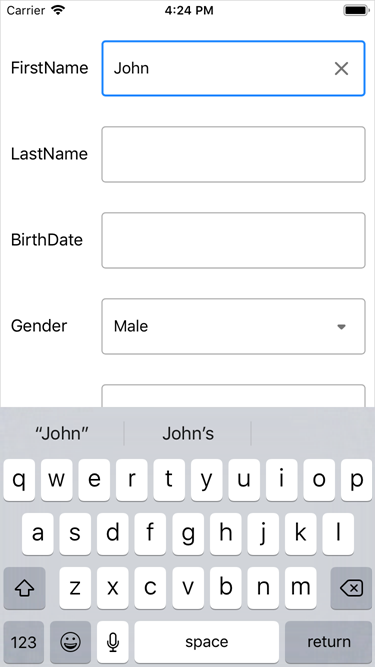
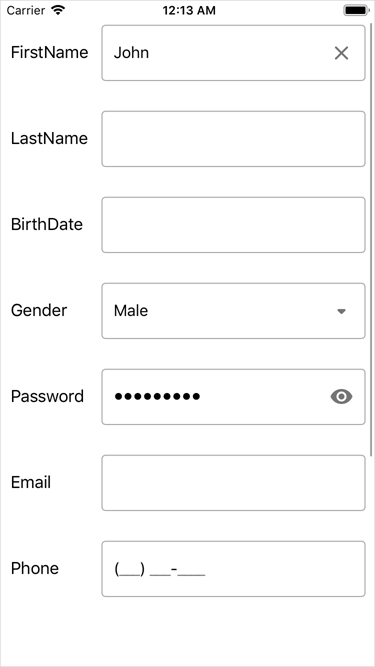
The data form detects all property types for the bound data object. It then displays the appropriate editor (based on each type) with the property name as the label.

Assign Data Editors
Assign the following editors to PersonalInfo object properties:
- PasswordEdit—to the
Passwordproperty. - TextEdit with a specified input mask and
Telephonekeyboard—to thePhoneproperty.
To do this, you can apply attributes to the PersonalInfo class properties in C# code, or set up data form item objects in XAML markup.
Use Attributes
- Place the DataFormPasswordEditor attribute before the
Passwordproperty declaration. - Place the DataFormMaskedEditor attribute with the specified Mask and Keyboard parameters before the
Phoneproperty declaration.
using DevExpress.Maui.DataForm;
// ...

namespace DataFormExample {
    public class PersonalInfo {
        public string FirstName { get; set; }
        public string LastName { get; set; }
        public DateTime BirthDate { get; set; }
        public virtual Gender Gender { get; set; }

        [DataFormPasswordEditor]
        public string Password { get; set; }

        public string Email { get; set; }

        [DataFormMaskedEditor(Mask = "(000) 000-0000", Keyboard = "Telephone")]
        public string Phone { get; set; }
    }
    public enum Gender { Female, Male, RatherNotSay }
}
Set Up Data Form Items
Add the following items to the data form’s Items collection:
- The DataFormPasswordItem object with the FieldName property set to
Password. - The DataFormMaskedItem object with the FieldName property set to
Phone, and specified Mask and Keyboard settings.

<dx:DataFormView x:Name="dataForm">
    <dx:DataFormPasswordItem FieldName="Password"/>
    <dx:DataFormMaskedItem
            FieldName="Phone"
            Keyboard="Telephone"
            Mask="(000) 000-0000"
            MaxCharacterCount="10"
            CharacterCounterVisibility="Never"/>
</dx:DataFormView>
When you add data form items to the Items collection, specify the RowOrder property for these items to set their position. Otherwise, corresponding editors are located at the top of the data form.
See the following topic for more information: Data Editors in DevExpress Data Form for .NET MAUI.
Arrange Data Editors
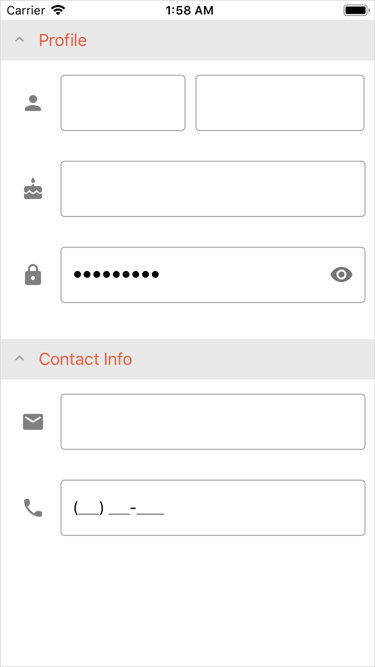
Arrange data form editors and labels as follows:
- Place editors bound to the data object’s
FirstNameandLastNameproperties in the first row. - Hide the
Gendereditor. - Replace text labels with icons. You can download images from Google Fonts or from the DevExpress Data Form for .NET MAUI example available on GitHub (Android: ../CS/Platforms/Android/Resources/drawable; iOS: ../CS/Platforms/iOS/Assets.xcassets).
- Organize editors into two groups:
ProfileandContact Info. - Specify the same header appearance for both groups.

In XAML markup, use DataFormView properties to set the width and color of editor labels and specify group header appearance.
<dx:DataFormView x:Name="dataForm"
                EditorLabelWidth="40"
                EditorLabelColor="Gray"
                GroupHeaderBackgroundColor="#e9e9e9"
                GroupHeaderTextColor="#f05b41">
    <!-- ... -->
</dx:DataFormView>
To specify the position, label icon, and group name for each editor, apply attributes to the PersonalInfo class properties in C# code or set up data form item objects in XAML markup.
Use Attributes
- Use the DataFormItemPositionAttribute with the specified RowOrder and ItemOrderInRow parameters to arrange editors.
- Use the DataFormDisplayOptionsAttribute with the specified LabelIcon and GroupName parameters to set an editor label icon and place an editor in a group.
- For the
PersonalInfo.Genderproperty, set the DataFormDisplayOptionsAttribute.IsVisible parameter to false to hide the corresponding editor on the form.
using DevExpress.Maui.DataForm;
// ...

namespace DataFormExample {
    public class PersonalInfo {
        [DataFormItemPosition(RowOrder = 1, ItemOrderInRow = 1)]
        [DataFormDisplayOptions(LabelIcon = "name", GroupName="Profile")]
        public string FirstName { get; set; }

        [DataFormItemPosition(RowOrder = 1, ItemOrderInRow = 2)]
        [DataFormDisplayOptions(IsLabelVisible = false, GroupName="Profile")]
        public string LastName { get; set; }

        [DataFormDisplayOptions(LabelIcon = "birthdate", GroupName="Profile")]
        public DateTime BirthDate { get; set; }

        [DataFormDisplayOptions(IsVisible =false)]
        public virtual Gender Gender { get; set; }

        [DataFormPasswordEditor]
        [DataFormDisplayOptions(LabelIcon = "password", GroupName="Profile")]
        public string Password { get; set; }

        [DataFormDisplayOptions(LabelIcon = "email", GroupName="Contact Info")]
        public string Email { get; set; }

        [DataFormMaskedEditor(Mask = "(000) 000-0000", Keyboard = "Telephone")]
        [DataFormDisplayOptions(LabelIcon = "phone", GroupName="Contact Info")]
        public string Phone { get; set; }
    }
    public enum Gender { Female, Male, RatherNotSay }
}
Set Up Data Form Items
- Populate the Items collection with data form items that correspond to the
PersonalInfoclass properties. - Specify RowOrder/ItemOrderInRow, LabelIcon, and GroupName properties for each data form item.
- To hide the form’s Gender input field, set the IsVisible property to false for the data form item that corresponds to the
PersonalInfo.Genderproperty.
<dx:DataFormView x:Name="dataForm"
                   EditorLabelWidth="40"
                   GroupHeaderBackgroundColor="#e9e9e9"
                   GroupHeaderTextColor="#f05b41"
                   EditorLabelColor="Gray">
    <dx:DataFormTextItem FieldName="FirstName"
                           RowOrder="1"
                           ItemOrderInRow="1"
                           LabelIcon="name"
                           GroupName="Profile"/>
    <dx:DataFormTextItem FieldName="LastName"
                           RowOrder="1"
                           ItemOrderInRow="2"
                           IsLabelVisible="False"
                           GroupName="Profile"/>
    <dx:DataFormDateItem FieldName="BirthDate"
                           RowOrder="2"
                           DisplayFormat="d"
                           LabelIcon="birthdate"
                           GroupName="Profile"/>
    <dx:DataFormComboBoxItem FieldName="Gender"
                               IsVisible="False"/>
    <dx:DataFormPasswordItem FieldName="Password"
                               RowOrder="3"
                               LabelIcon="password"
                               GroupName="Profile"/>
    <dx:DataFormTextItem FieldName="Email"
                           RowOrder="4"
                           LabelIcon="email"
                           GroupName="Contact Info"/>
    <dx:DataFormMaskedItem FieldName="Phone"
                             RowOrder="5"
                             Mask="(000) 000-0000"
                             Keyboard="Telephone"
                             LabelIcon="phone"
                             GroupName="Contact Info"/>

</dx:DataFormView>
See the following topic for more information: Customize Layout and Appearance in DevExpress Data Form for .NET MAUI.
Data Validation
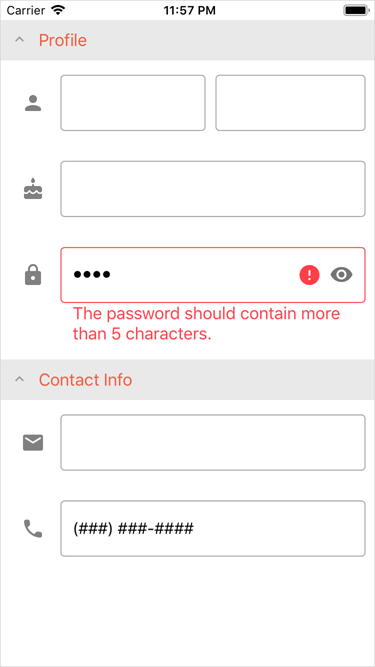
Use the code below to check if a user entered a valid email address, check if a password meets a security policy, and make both of these fields required.
using System.ComponentModel.DataAnnotations;
// ...

namespace DataFormExample {
    public class PersonalInfo {

        [EmailAddress(ErrorMessage = "Not valid email address")]
        [Required(ErrorMessage = "Required")]
        public string Email { get; set; }

        // ...
    }
}
To check whether the entered password is valid, handle the DataFormView.ValidateProperty event:
<dx:DataFormView ...
                   ValidateProperty="dataForm_ValidateProperty"/>
void dataForm_ValidateProperty(System.Object sender, DataFormPropertyValidationEventArgs e){
    if (e.PropertyName == "Password") {
        if (e.NewValue.ToString().Length < 6) {
            e.HasError = true;
            e.ErrorText = "The password should contain more than 5 characters.";
        }
    }
}
Enable the data form to validate the user input when an editor loses focus.

<dx:DataFormView x:Name="dataForm"
                   ValidationMode="LostFocus">
    <!-- ... -->
</dx:DataFormView>
See the following topic for more information: Validate User Input in Data Form for .NET MAUI.