Confirmation Dialog Based on DevExpress Blazor Message Box
- 6 minutes to read
This topic demonstrates how to use Blazor Message Box alongside our Grid and Scheduler components to create a custom confirmation dialog.
Implementation includes the following key steps:
- Add dialog service functionality to the page
- Add a custom action button in the base component. Display the confirmation dialog when a user clicks the button.
- Process the Ok and Cancel dialog button clicks.
Grid: Edit Cancellation Dialog
The Grid component discards unsaved changes when a user starts editing another row without first saving changes. Follow the steps below to display a confirmation dialog to inform users of unsaved changes.
Inject IDialogService with the [Inject] attribute into the page. Declare the DxDialogProvider component on the page.
<DxDialogProvider />
@code {
    [Inject] IDialogService DialogService { get; set; }
}
Configure the Grid component to allow users to edit grid data.
<DxGrid @ref="Grid" Data="Forecasts"
        EditMode="GridEditMode.EditRow" EditModelSaving="Grid_EditModelSaving">
     @* ... *@
</DxGrid>

@code {
    List<WeatherForecast> Forecasts { get; set; }
    IGrid Grid { get; set; }

    protected override async Task OnInitializedAsync() {
        Forecasts = await ForecastService.GetForecastAsync(DateTime.Now.AddDays(-2));
    }
    void Grid_EditModelSaving(GridEditModelSavingEventArgs e) {
        e.CopyChangesToDataItem();
    }
}
Add a custom Edit button in the command column’s CellDisplayTemplate.
<DxGridCommandColumn >
    <CellDisplayTemplate>
        <DxButton Click="() => GridEditButton_Click(context)"
                  Text="Edit"
                  RenderStyle="ButtonRenderStyle.Link" />
    </CellDisplayTemplate>
</DxGridCommandColumn>
Handle the button’s Click event to display a confirmation dialog if Grid has unsaved data.
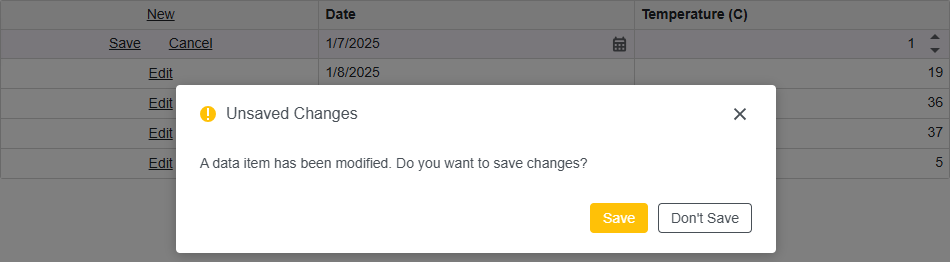
async Task GridEditButton_Click(GridCommandColumnCellDisplayTemplateContext context) {
    if (context.Grid.IsEditing() && context.Grid.GetEditContext().IsModified()) {
        SavedDataItem = context.DataItem;
        await DisplayConfirmDialogAsync();
    } else
        await context.Grid.StartEditDataItemAsync(context.DataItem);
}
Call the ConfirmAsync method to display the DxMessageBox component. If a user clicks the Ok (Save) button, the method returns
true; otherwise it returnsfalse. Save data changes if a user clicks the Save button.async Task DisplayConfirmDialogAsync() { Result = await DialogService.ConfirmAsync(new MessageBoxOptions() { Title = "Unsaved Changes", Text = "A data item has been modified. Do you want to save changes?", RenderStyle = MessageBoxRenderStyle.Warning, OkButtonText = "Save", CancelButtonText = "Don't Save", }); if (Result == true) { await Grid.SaveChangesAsync(); } await Grid.StartEditDataItemAsync(SavedDataItem); SavedDataItem = null; }
@inject WeatherForecastService ForecastService
<DxDialogProvider />
<DxGrid @ref="Grid" Data="Forecasts"
EditMode="GridEditMode.EditRow"
EditModelSaving="Grid_EditModelSaving"
CssClass="mw-1100">
<Columns>
<DxGridCommandColumn >
<CellDisplayTemplate>
<DxButton Click="() => GridEditButton_Click(context)" Text="Edit" RenderStyle="ButtonRenderStyle.Link" />
</CellDisplayTemplate>
</DxGridCommandColumn>
<DxGridDataColumn Caption="Date" FieldName="Date" />
<DxGridDataColumn Caption="Temperature (C)" FieldName="TemperatureC" />
</Columns>
</DxGrid>
@code {
[Inject] IDialogService DialogService { get; set; }
List<WeatherForecast> Forecasts { get; set; }
IGrid Grid { get; set; }
private bool? Result { get; set; } = null;
object SavedDataItem { get; set; }
protected override async Task OnInitializedAsync() {
Forecasts = await ForecastService.GetForecastAsync(DateTime.Now.AddDays(-2));
}
void Grid_EditModelSaving(GridEditModelSavingEventArgs e) {
e.CopyChangesToDataItem();
}
async Task GridEditButton_Click(GridCommandColumnCellDisplayTemplateContext context) {
if (context.Grid.IsEditing() && context.Grid.GetEditContext().IsModified()) {
SavedDataItem = context.DataItem;
await DisplayConfirmDialogAsync();
} else
await context.Grid.StartEditDataItemAsync(context.DataItem);
}
async Task DisplayConfirmDialogAsync() {
    Result = await DialogService.ConfirmAsync(new MessageBoxOptions() {
        Title = "Unsaved Changes",
        Text = "A data item has been modified. Do you want to save changes?",
        RenderStyle = MessageBoxRenderStyle.Warning,
        OkButtonText = "Save",
        CancelButtonText = "Don't Save",
    });
    if (Result == true) {
        await Grid.SaveChangesAsync();
    }
    await Grid.StartEditDataItemAsync(SavedDataItem);
    SavedDataItem = null;
}
}
Grid: Custom Delete Confirmation Dialog
The DevExpress Blazor Grid displays a built-in delete confirmation dialog when a user deletes a row.

Follow the steps below to implement a custom confirmation dialog:
Inject IDialogService with the [Inject] attribute into the page. Declare the DxDialogProvider component on the page.
<DxDialogProvider />
@code {
    [Inject] IDialogService DialogService { get; set; }
}
Add a custom Delete button in the command column’s CellDisplayTemplate.
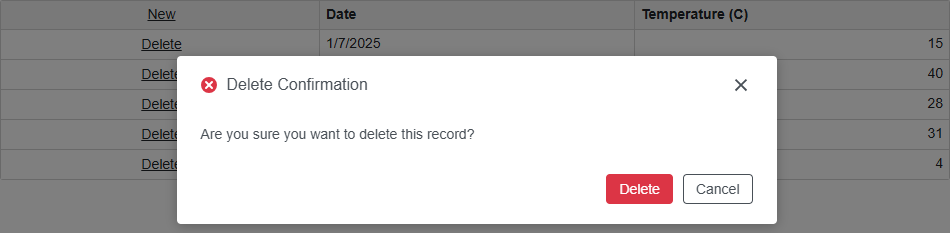
<DxGridCommandColumn >
    <CellDisplayTemplate>
        <DxButton Click="() => GridDeleteButton_Click(context)"
                  Text="Delete"
                  RenderStyle="ButtonRenderStyle.Link" />
    </CellDisplayTemplate>
</DxGridCommandColumn>
Handle the button’s Click event and call the ConfirmAsync method to display the confirmation dialog (DxMessageBox component). If a user clicks the Ok (Delete) button, the method returns
true; otherwise it returnsfalse. Remove the data item if a user clicks the Delete button.IGrid Grid { get; set; } Int32 id { get; set; } private bool? Result { get; set; } = null; async Task GridDeleteButton_Click(GridCommandColumnCellDisplayTemplateContext context) { id = (context.DataItem as WeatherForecast).ID; Result = await DialogService.ConfirmAsync(new MessageBoxOptions() { Title = "Delete Confirmation", Text = "Are you sure you want to delete this record?", RenderStyle = MessageBoxRenderStyle.Danger, OkButtonText = "Delete" }); if (Result == true) { Forecasts.Remove(Forecasts.Find(m => m.ID == id)); Grid.Reload(); } }
@inject WeatherForecastService ForecastService

<DxDialogProvider />
<DxGrid @ref="Grid" Data="Forecasts" CssClass="mw-1100">
   <Columns>
       <DxGridCommandColumn >
           <CellDisplayTemplate>
               <DxButton Click="() => GridDeleteButton_Click(context)" Text="Delete" RenderStyle="ButtonRenderStyle.Link" />
           </CellDisplayTemplate>
       </DxGridCommandColumn>
       <DxGridDataColumn Caption="Date" FieldName="Date" />
       <DxGridDataColumn Caption="Temperature (C)" FieldName="TemperatureC" />
   </Columns>
</DxGrid>

@code {
   [Inject] IDialogService DialogService { get; set; }
   List<WeatherForecast> Forecasts { get; set; }
   IGrid Grid { get; set; }
   Int32 id { get; set; }
   private bool? Result { get; set; } = null;

   protected override async Task OnInitializedAsync() {
       Forecasts = await ForecastService.GetForecastAsync(DateTime.Now.AddDays(-2));
   }

   async Task GridDeleteButton_Click(GridCommandColumnCellDisplayTemplateContext context) {
       id = (context.DataItem as WeatherForecast).ID;
       Result = await DialogService.ConfirmAsync(new MessageBoxOptions() {
           Title = "Delete Confirmation",
           Text = "Are you sure you want to delete this record?",
           RenderStyle = MessageBoxRenderStyle.Danger,
           OkButtonText = "Delete"
       });
       if (Result == true) {
           Forecasts.Remove(Forecasts.Find(m => m.ID == id));
           Grid.Reload();
       }
   }
}
Scheduler: Delete Confirmation Dialog
Inject IDialogService with the [Inject] attribute into the page. Declare the DxDialogProvider component on the page.
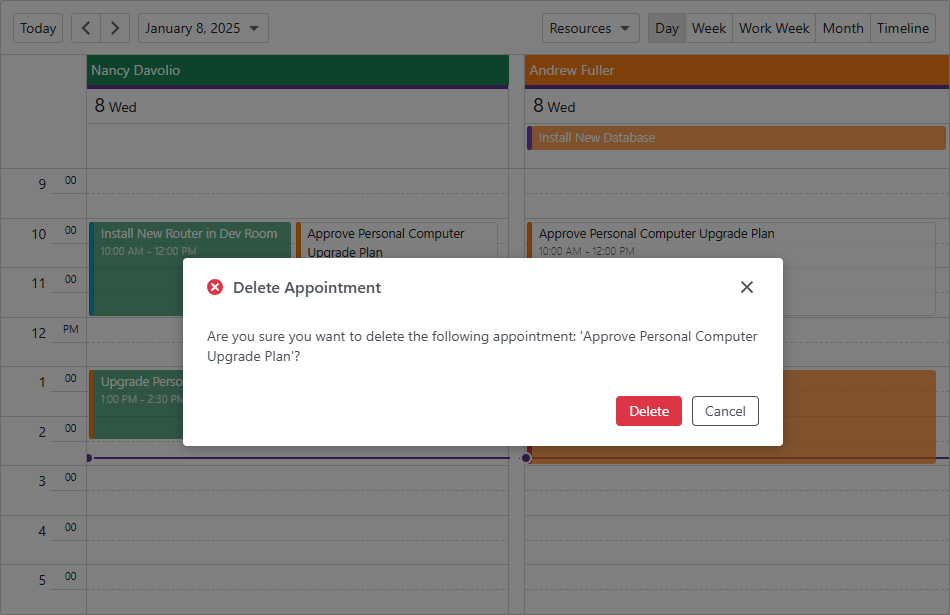
<DxDialogProvider />
@code {
    [Inject] IDialogService DialogService { get; set; }
}
Handle the AppointmentRemoving event to call the ConfirmAsync method to display the confirmation dialog (DxMessageBox component). If a user clicks the Ok (Delete) button, the method returns
true; otherwise it returnsfalse. Cancel the remove operation if a user clicks the Cancel button.<DxScheduler AppointmentRemoving="@OnAppointmentRemoving" .../> @code { async Task OnAppointmentRemoving(SchedulerAppointmentOperationEventArgs e) { e.Cancel = !(await DialogService.ConfirmAsync(new MessageBoxOptions() { Title = "Delete Appointment", Text = "Are you sure you want to delete the following appointment: '" + e.Appointment.Subject + "'?", RenderStyle = MessageBoxRenderStyle.Danger, OkButtonText = "Delete" })); } }
Popup-Based Confirmation Dialog
The DxMessageBox component can include a title, text, and Ok and Cancel buttons. If you need a more complex dialog, use the DevExpress Blazor DxPopup component instead. Refer to the following GitHub examples for implementation details: