Binding to SQL Data
- 4 minutes to read
Binding via the Data Source Configuration Wizard
Online Video
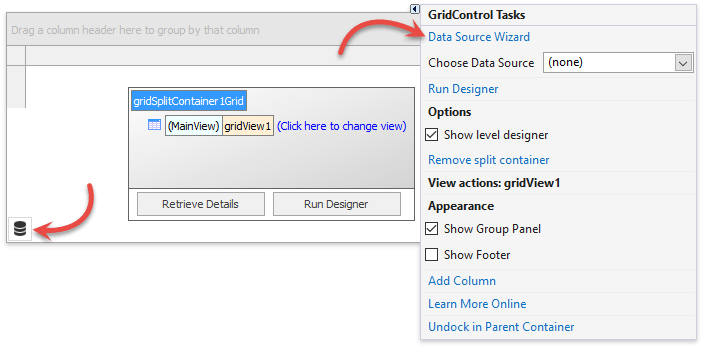
The most convenient way to bind your control to a SQL data source is using the Data Source Configuration Wizard. To invoke this wizard, click the corresponding link in the control’s smart-tag or click the wizard icon. The figure below illustrates how to invoke the wizard for the GridControl.

The first wizard page asks you to choose the technology you would like to use. Select the ‘SQL Data Connection’ option and click the ‘New Data Source’ button on the wizard’s right, as shown below.

The message box that will appear tells you that the SqlDataSource component will be added automatically. If you need to modify the data source later, you can use the SqlDataSource‘s smart-tag. For now, the Data Source Configuration Wizard will automatically open the required dialog.
- Utilize the invoked Data Source Wizard to set up the connection and configure query parameters.
Configuration Wizzard automatically adds the required piece of code to your project and you can run the application to see the result.

Manually Binding via the SqlDataSource Component
Note
The following approach assumes manually adding and customizing the SqlDataSource component mentioned above. This method has a few drawbacks, since you will need to perform more operations, such as dropping the component onto your form from the Visual Studio toolbox, setting several required properties of your control and manually calling the Fill/FillAsync method. Other than that, the two approaches are identical. So unless you have a strong necessity to use this approach, we recommend using the Data Source Configuration Wizard instead.
To bind your GridControl to data with the SqlDataSource component, follow the simple steps below.
- Locate the SqlDataSource component on the toolbox (the ‘Data and Analytics’ tab) and drop it onto the form.
Immediately after the component is dropped, the Data Source Wizard appears.
Tip
To invoke this wizard manually, click the ‘Configure Connection’ link within the component’s smart-tag.

Follow these tutorials to set up the connection.
You now have a SqlDataSource component bound to the required data. Next, set this component as the grid control’s data source (the GridControl.DataSource property) and the Products table as its data member (the GridControl.DataMember property).

The final step is calling the SqlDataSource.Fill/SqlDataSource.FillAsync method to retrieve your data. In the code below, the method is called on the FormLoad event.
Launch your application to see the result.

Binding to SQL Data in Code
The following code illustrates how to bind the GridControl to SQL data at runtime using the SqlDataSource component.
In this example, a CustomSqlQuery is used. To learn about other query types, see the SelectQuery and StoredProcQuery classes’ descriptions.
To learn about supported database engines, see the inheritance hierarchy of the DataConnectionParametersBase.
using DevExpress.DataAccess.ConnectionParameters;
using DevExpress.DataAccess.Sql;
// . . .
// Create a data source.
Access97ConnectionParameters connectionParameters = new Access97ConnectionParameters("D:\\Work\\nwind.mdb", "", "");
SqlDataSource ds = new SqlDataSource(connectionParameters);

// Create an SQL query to access the Products table.
CustomSqlQuery query = new CustomSqlQuery();
query.Name = "customQuery1";
query.Sql = "SELECT [Products].[ProductID], [Products].[ProductName], [Products].[QuantityPerUnit], [Products].[UnitPrice], "
    + "[Products].[UnitsInStock], [Products].[UnitsOnOrder], [Products].[ReorderLevel], [Products].[Discontinued] "
    +"FROM [Products] [Products]";

ds.Queries.Add(query);
ds.Fill();

//Assign the data source for the grid and retrieve fields.
gridControl1.DataSource = ds;
gridControl1.DataMember = "customQuery1";
Note that specific controls may need additional customization after the control is bound to a data source. For more information, refer to the documentation of the corresponding control.