Get Started with Blazor TreeList
- 6 minutes to read
This tutorial describes how to create a simple Blazor application that uses a DevExpress TreeList component.

Video Tutorial
AI Skills
Tip
DevExpress AI Skills help your AI assistant generate code that uses TreeList API in accordance with DevExpress best practices:
Add a TreeList to a Page
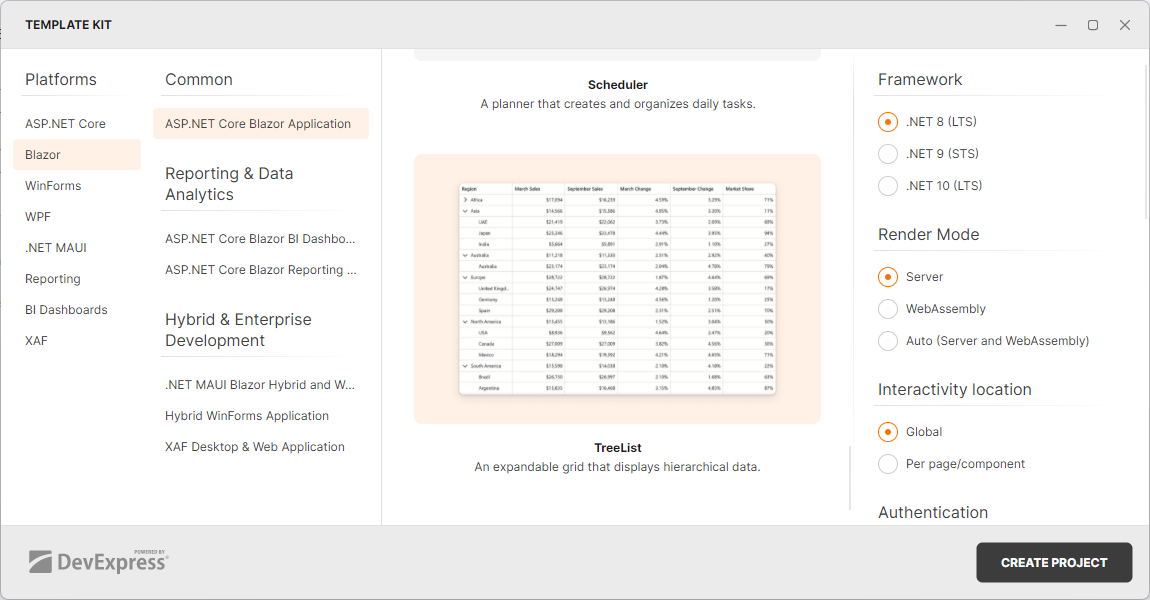
Create a New Project (DevExpress Template Kit)
- Use the DevExpress Template Kit to create a Blazor application.
- In the Add views to the application section, choose the TreeList group and select the TreeList tile. The Template Kit automatically registers component packages, adds required static resources, and populates the control with mock data.
Run the application to see the result:
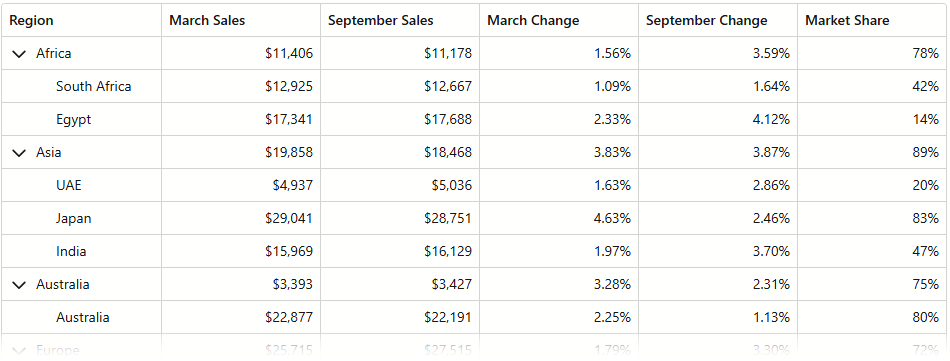
If you want to understand how to reproduce the code generated by the Template Kit and what it does, see Configure an Existing Project. Otherwise, continue to the configuration sections below:
Configure an Existing Project
Register Common DevExpress Resources
Create an application as described in the following topic: Get Started With DevExpress Components for Blazor.
Enable Interactivity on a Page
The TreeList component responds to data updates and supports user interaction when you enable interactive render mode. In static render mode, the TreeList can display only static data.
@rendermode InteractiveServer
Prepare a Data Source
The following code snippet populates a List with data in the OnInitialized lifecycle method:
@rendermode InteractiveServer

@code {
    List<SalesByRegion>? TreeListData { get; set; }

    protected override void OnInitialized() {
        int id = 0;
        TreeListData = Regions
            .Select(region => new { region.Key, region.Value, RegionId = ++id })
            .SelectMany(region => new[] { GetSales(region.RegionId, 0, region.Key) }
                .Concat(region.Value.Select(country => GetSales(++id, region.RegionId, country))))
            .ToList();
    }

    SalesByRegion GetSales(int id, int regionId, string region) {
        decimal march = Random.Shared.Next(2000, 30000);
        decimal september = march * Random.Shared.Next(90, 110) / 100;
        return new SalesByRegion {
            ID = id,
            RegionID = regionId,
            Region = region,
            MarchSales = march,
            SeptemberSales = september,
            MarchChange = Random.Shared.Next(100, 500) / 10000m,
            SeptemberChange = Random.Shared.Next(100, 500) / 10000m,
            MarketShare = Random.Shared.Next(10, 95) / 100.0
        };
    }

    class SalesByRegion {
        public int ID { get; set; }
        public int RegionID { get; set; }
        public required string Region { get; set; }
        public decimal MarchSales { get; set; }
        public decimal SeptemberSales { get; set; }
        public decimal MarchChange { get; set; }
        public decimal SeptemberChange { get; set; }
        public double MarketShare { get; set; }
    }

    static readonly Dictionary<string, string[]> Regions = new() {
        ["Africa"] = ["South Africa", "Egypt"],
        ["Asia"] = ["UAE", "Japan", "India"],
        ["Australia"] = ["Australia"],
        ["Europe"] = ["United Kingdom", "Germany", "Spain"],
        ["North America"] = ["USA", "Canada", "Mexico"],
        ["South America"] = ["Brazil", "Argentina", "Chile"]
    };
}
Add a TreeList and Bind It to Data
Add
<DxTreeList></DxTreeList>tags.@page "/" @rendermode InteractiveServer <DxTreeList> </DxTreeList> @code { List<SalesByRegion>? TreeListData { get; set; } // ... }Bind the Data property to the list.
<DxTreeList Data="@TreeListData">
</DxTreeList>

@code {
    List<SalesByRegion>? TreeListData { get; set; }
    // ...
}
Specify KeyFieldName and ParentKeyFieldName properties to build a tree structure.
<DxTreeList Data="@TreeListData"
            KeyFieldName="ID"
            ParentKeyFieldName="RegionID">
</DxTreeList>
Refer to the following topic for additional information: Bind Blazor TreeList to Data.
Add Columns
- Add six DxTreeListDataColumn objects to the Columns collection.
- Use the FieldName property to bind columns to data source fields. Note that the FieldName property value must be unique for each data column.
Optional. Specify the following settings to customize columns:
- Caption
- Specifies the column’s caption.
- DisplayFormat
- Specifies the format of column and summary values calculated for this column.
- Width
- Specifies column width in CSS units.
- FixedPosition
- Allows you to anchor the column to the TreeList’s left or right edge.
<DxTreeList Data="TreeListData"
            KeyFieldName="ID"
            ParentKeyFieldName="RegionID">
    <Columns>
        <DxTreeListDataColumn FieldName="Region" />
        <DxTreeListDataColumn FieldName="MarchSales" DisplayFormat="c0" />
        <DxTreeListDataColumn FieldName="SeptemberSales" DisplayFormat="c0" />
        <DxTreeListDataColumn FieldName="MarchChange" DisplayFormat="p2" />
        <DxTreeListDataColumn FieldName="SeptemberChange" DisplayFormat="p2" />
        <DxTreeListDataColumn FieldName="MarketShare" DisplayFormat="p0" />
    </Columns>
</DxTreeList>
Apply Layout Options
The DevExpress Template Kit applies the following options to the TreeList component to improve user experience when working with large amounts of data:
- ShowAllRows
- Specifies whether the TreeList displays all rows on one page.
- AutoExpandAllNodes
- Specifies whether to automatically expand all nodes when the TreeList loads data.
- ColumnResizeMode
- Specifies whether and how users can resize TreeList columns. The Template Kit uses the
NextColumnoption that preserves the total component width.
<DxTreeList Data="TreeListData"
            KeyFieldName="ID"
            ParentKeyFieldName="RegionID"
            ColumnResizeMode="TreeListColumnResizeMode.NextColumn"
            AutoExpandAllNodes="true"
            ShowFilterRow="true">
    @* ... *@
</DxTreeList>
You have now replicated the code generated by the Template Kit. Run the application to see the result:
Shape Data
Sort Data
The TreeList component is preconfigured to allow users to sort data against multiple columns without additional setup. You can use the SortOrder and SortIndex properties to configure the initial sort settings.
<DxTreeList Data="TreeListData"
            KeyFieldName="ID"
            ParentKeyFieldName="RegionID"
            ShowAllRows="true"
            ColumnResizeMode="TreeListColumnResizeMode.NextColumn"
            TextWrapEnabled="false"
            AutoExpandAllNodes="true">
    <Columns>
        <DxTreeListDataColumn FieldName="Region" />
        <DxTreeListDataColumn FieldName="MarchSales" DisplayFormat="c0" />
        <DxTreeListDataColumn FieldName="SeptemberSales" DisplayFormat="c0" />
        <DxTreeListDataColumn FieldName="MarchChange" DisplayFormat="p2" />
        <DxTreeListDataColumn FieldName="SeptemberChange" DisplayFormat="p2" SortIndex="1" SortOrder="TreeListColumnSortOrder.Ascending" />
        <DxTreeListDataColumn FieldName="MarketShare" DisplayFormat="p0" SortIndex="0" SortOrder="TreeListColumnSortOrder.Descending" />
    </Columns>
</DxTreeList>
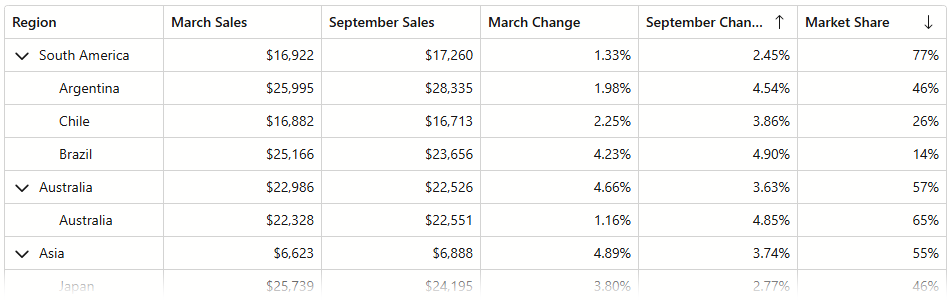
Refer to the following topic for additional information: Sort Data in Blazor TreeList.
Filter Data
Set the ShowFilterRow property to
trueto display a filter row that allows users to filter data.Set the FilterTreeMode property to
ParentBranch. In this mode, the component displays nodes that meet the filter criteria and all their parent nodes, even if they do not meet the criteria.Optional. Specify FilterRowValue and FilterRowOperatorType properties to configure initial filter row values.
<DxTreeList Data="TreeListData"
            KeyFieldName="ID"
            ParentKeyFieldName="RegionID"
            ShowFilterRow="true"
            FilterTreeMode="TreeListFilterTreeMode.ParentBranch"
            ...>
    <Columns>
        <DxTreeListDataColumn FieldName="Region" />
        <DxTreeListDataColumn FieldName="MarchSales"
                              DisplayFormat="c0"
                              FilterRowValue="12000M"
                              FilterRowOperatorType="TreeListFilterRowOperatorType.Greater" />
        @* ... *@
    </Columns>
</DxTreeList>

Add a Total Summary
Follow the steps below to display a total summary in the TreeList component:
- Add a DxTreeListSummaryItem object to the TotalSummary collection.
- Specify the item’s SummaryType and FieldName properties.
- Optional. Specify other summary settings (FooterColumnName, DisplayText, and so on).
<DxTreeList Data="@Data" ... >
    <Columns>
        @* ... *@
    </Columns>
    <TotalSummary>
        <DxTreeListSummaryItem FieldName="Region" SummaryType="TreeListSummaryItemType.Count" />
        <DxTreeListSummaryItem FieldName="MarketShare" SummaryType="TreeListSummaryItemType.Avg" />
    </TotalSummary>
</DxTreeList>

Edit Data
Follow the steps below to enable data editing:
- Declare a DxTreeListCommandColumn object in the
Columnscollection. The command column displays buttons that allow users to add, edit, and delete rows. - Handle the CustomizeEditModel event to initialize an edit model for new data rows.
- Handle EditModelSaving and DataItemDeleting events to post changes to the data source.
<DxTreeList Data="@Data"
            KeyFieldName="Id"
            ParentKeyFieldName="ParentId"
            EditModelSaving="TreeList_EditModelSaving"
            DataItemDeleting="TreeList_DataItemDeleting"
            CustomizeEditModel="TreeList_CustomizeEditModel"
            ...>
    <Columns>
        <DxTreeListCommandColumn Width="150px" />
        @* ... *@
    </Columns>
</DxTreeList>

@code {
    List<SalesByRegion>? TreeListData { get; set; }

    void TreeList_CustomizeEditModel(TreeListCustomizeEditModelEventArgs e) {
        if (e.IsNew) {
            var newTask = (SalesByRegion)e.EditModel;
            newTask.ID = TreeListData.Max(x => x.ID) + 1;
            if (e.ParentDataItem != null)
                newTask.RegionID = ((SalesByRegion)e.ParentDataItem).ID;
        }
    }
    async Task TreeList_EditModelSaving(TreeListEditModelSavingEventArgs e) {
        if (e.IsNew)
            TreeListData.Add((SalesByRegion)e.EditModel);
        else
            e.CopyChangesToDataItem();
    }
    async Task TreeList_DataItemDeleting(TreeListDataItemDeletingEventArgs e) {
        TreeListData.Remove((SalesByRegion)e.DataItem);
    }
}
Refer to the following topic for additional information: Editing and Validation in Blazor TreeList.
Helpful Resources
Refer to the following topics for additional information on Blazor TreeList: