Set Up Text Wrapping
- 2 minutes to read
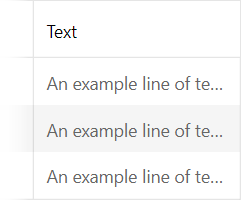
1. Disable Text Wrapping
Disable text wrapping to display column cell text in one line. To achieve this, set a column’s CellStyle.Wrap property to False:
<dx:GridViewDataColumn FieldName="C1" Width="100">
    <CellStyle Wrap="False"></CellStyle>
</dx:GridViewDataColumn>
Result:
You can also set the white-space CSS property to nowrap to achieve the same result:
.disableWrapping {
    white-space: nowrap;
}
<dx:GridViewDataColumn FieldName="C2" Width="100">
    <CellStyle CssClass="disableWrapping"></CellStyle>
</dx:GridViewDataColumn>
Note
When text wrapping is disabled, the column’s Width property has no effect.
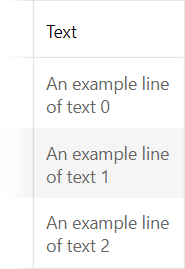
2. Enable Text Wrapping
Enable text wrapping if you require a fixed column width. To achieve this, explicitly specify the column’s Width property and set the CellStyle.Wrap property to True:
<dx:GridViewDataColumn FieldName="C3" Width="100">
    <CellStyle Wrap="True"></CellStyle>
</dx:GridViewDataColumn>
Result:
You can also set the white-space CSS property to normal to achieve the same result:
.enableWrapping {
    white-space: normal;
}
<dx:GridViewDataColumn FieldName="C4" Width="100">
    <CellStyle CssClass="enableWrapping"></CellStyle>
</dx:GridViewDataColumn>
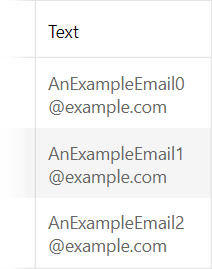
3. Wrap Text at Any Character
The technique described in the previous section only works if the cell text contains whitespaces. If you need to wrap text that does not contain whitespaces (for example, an email address), use the word-break CSS property:
.wrapEmail {
    word-break: break-all;
}
<dx:GridViewDataColumn FieldName="C5" Width="100">
    <CellStyle CssClass="wrapEmail"></CellStyle>
</dx:GridViewDataColumn>
Result:
4. Truncate Cell Text
The Grid View control allows you to truncate text if it does not fit the cell. The following properties control the availability of this feature:
At the control level - ASPxGridView.SettingsBehavior.AllowEllipsisInText
At the column level - GridViewDataColumn.Settings.AllowEllipsisInText
Result: