DevExpress Presentation API Library: Work with Shapes
- 10 minutes to read
The Presentation API library supports the following operations that involve shapes:
- Add shapes to a slide (predefined or custom shape types)
- Specify shape fill and outline settings
- Add text to a shape
- Connect and group shapes
- Remove a shape from a document
Shape API Basics
Slide masters, layouts, and slides store shapes in the Shapes collection. This collection can contain Shape (presets and custom), PictureShape, GroupShape, and ConnectorShape objects.
Shape shape = (Shape)slide.Shapes[0];
ConnectorShape connector = (ConnectorShape)slide.Shapes[2];
PictureShape picture = (PictureShape)slide.Shapes[3];
Add a Shape
To add a shape to a slide, add a Shape object to a slide’s Shapes collection. Pass the shape type as a constructor parameter. The ShapeType enumeration lists available shape presets.
Use the following properties to customize the shape:
- X | Y
- Specify the top-left corner position of the shape bounding box, in Document units (1/300 inch). The original point (0, 0) is the slide’s top-left corner.
- Width | Height
- Specify the shape bounding box width and height, in Document units (1/300 inch).
- Outline
- Specifies shape outline parameters.
- Fill
- Specifies shape fill parameters.
The following code snippet adds a star shape to a slide:

Shape shape = new Shape(ShapeType.Star12);
shape.Outline = new LineStyle { Fill = new SolidFill(Color.DarkRed), Width = 4 };
shape.Fill = new SolidFill(Color.Coral);
shape.X = 30;
shape.Y = 30;
shape.Width = 800;
shape.Height = 800;
slide.Shapes.Add(shape);
Add a Picture Shape
To add a picture to a slide, add a PictureShape object to a slide’s Shapes collection.
Specify the PictureShape.Image property to set the source image.
To specify picture outline, position, and size settings, use the properties described in Add a Shape.

PictureShape picture = new PictureShape();
string imagePath = "D:\\AirbusA318.png";
Stream stream = new FileStream(imagePath, FileMode.Open, FileAccess.Read);
picture.Image = DXImage.FromStream(stream);
picture.Width = 700;
picture.Height = 500;
picture.Outline = new LineStyle { Fill = new SolidFill(Color.DarkGreen), Width = 4 };
slide.Shapes.Add(picture);
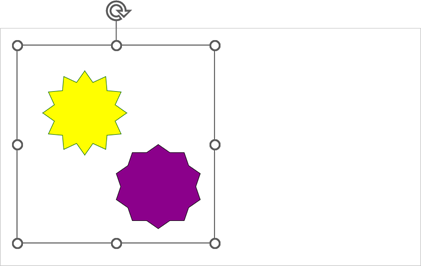
Group Shapes
You can group shapes to apply transformations and visual effects to all shapes in the group simultaneously.
To create a shape group, initialize a GroupShape instance and add shapes to its Shapes collection.
If you want a shape to obtain its fill from the group shape, assign a GroupFill instance to the shape’s Fill property.
Shape shape1 = new Shape(ShapeType.Star12);
shape1.Outline = new LineStyle { Fill = new SolidFill(Color.DarkGreen), Width = 4 };
shape1.Fill = new SolidFill(Color.Yellow);
shape1.X = 200;
shape1.Y = 200;
shape1.Width = 800;
shape1.Height = 800;

Shape shape2 = new Shape(ShapeType.Star10);
shape2.Outline = new LineStyle { Fill = new SolidFill(Color.Black), Width = 4 };
shape2.Fill = new GroupFill();
shape2.X = 900;
shape2.Y = 900;
shape2.Width = 800;
shape2.Height = 800;

GroupShape group = new GroupShape();
group.Fill = new SolidFill(Color.DarkMagenta);
group.X = 200;
group.Y = 200;
group.Width = 1800;
group.Height = 1800;

group.Shapes.Add(shape1);
group.Shapes.Add(shape2);
slide.Shapes.Add(group);
To ungroup shapes in a group, remove the shapes from the group’s Shapes collection:
GroupShape group = slide.Shapes[0] as GroupShape;
foreach(var gr_shape in group.Shapes)
    slide.Shapes.Add(gr_shape);
slide.Shapes.Remove(group);
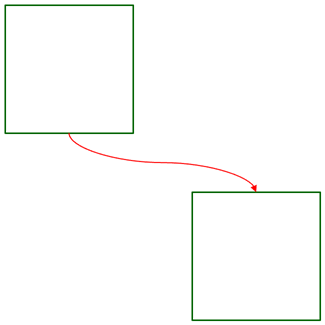
Add Connectors
To add a connector between shapes, create a ConnectorShape object and add it to the Slide.Shapes collection. Specify the following connector properties:
- StartShape | EndShape
- Specify start and end shapes to connect.
- StartShapeSiteIndex | EndShapeSiteIndex
- Specify connection point indexes of connected shapes. The index starts with the top side (0) and increases counterclockwise. Use the
shape.Type.Geometry.ConnectionSites.Countproperty to obtain the number of connection sites for the current shape. - Type
- Specifies the connector type.
- Outline
- Specifies connector appearance.
The following code snippet adds a connector between two shapes:
using DevExpress.Docs.Presentation;
using System.Drawing;

namespace PresentationApiSample;

public class Program {
    public static void Main(string[] _) {
        //...

        Shape shape1 = new Shape(ShapeType.Rectangle);
        shape1.Outline = new OutlineStyle { Fill = new SolidFill(Color.DarkGreen), Width = 8 };
        shape1.X = 30;
        shape1.Y = 30;
        shape1.Width = 800;
        shape1.Height = 800;
        slide.Shapes.Add(shape1);

        Shape shape2 = new Shape(ShapeType.Rectangle);
        shape2.Outline = new OutlineStyle { Fill = new SolidFill(Color.DarkGreen), Width = 8 };
        shape2.X = 1200;
        shape2.Y = 1200;
        shape2.Width = 800;
        shape2.Height = 800;
        slide.Shapes.Add(shape2);

        ConnectorShape connector = new ConnectorShape();
        connector.StartShape = shape1;
        connector.EndShape = shape2;
        connector.StartShapeSiteIndex = 2;
        connector.EndShapeSiteIndex = 0;
        connector.Type = ConnectorShapeType.Curved;

        connector.Outline = new LineStyle {
            Fill = new SolidFill(Color.Red),
            Width = 6,
            EndArrowType = ArrowType.TriangleArrow,
            EndLength = ArrowSize.Large,
            EndWidth = ArrowSize.Large
        };
        slide.Shapes.Add(connector);
    }
}
Reorder Shapes
The following methods allow you to rearrange shapes within the Shapes collection. The shape order within the collection affects the shape stacking order (z-index) on a slide:
- SendToBack
- Places a shape behind all other shapes on the slide.
- SendBackward
- Moves a shape down one level in the shape plot order.
- BringToFront
- Places a shape in front of all other shapes on the slide.
- BringForward
- Moves a shape up one level in the shape plot order.
- Move
- Moves a shape to a specified position.
slide.Shapes.SendToBack(shape1);
slide.Shapes.SendToBack(0);

slide.Shapes.SendBackward(shape2);
slide.Shapes.SendBackward(1);

slide.Shapes.BringForward(shape3);
slide.Shapes.BringForward(2);

slide.Shapes.BringToFront(shape4);
slide.Shapes.BringToFront(3);

slide.Shapes.Move(shape2, 0);
slide.Shapes.Move(1, 0);
Add a Custom Shape
You can create custom shapes - build the geometry you need from basic elements, such as lines and arcs.
To create a custom shape, pass a ShapeGeometry instance to the Shape constructor. Populate geometry Paths with ShapePath objects. Each shape path should consist of simple building blocks:
The following code snippet adds a custom shape to a slide:

ShapeGeometry shapeGeometry = new ShapeGeometry();
ShapePath path = new ShapePath(400, 400, true);
path.Segments.Add(new PathMove(new AdjustCoordinate(0), new AdjustCoordinate(0)));
path.Segments.Add(new PathLine(new AdjustCoordinate(0), new AdjustCoordinate(400)));
path.Segments.Add(new PathLine(new AdjustCoordinate(400), new AdjustCoordinate(400)));
path.Segments.Add(new PathLine(new AdjustCoordinate(400), new AdjustCoordinate(0)));
path.Segments.Add(new PathClose());
path.FillMode = FillMode.Normal;
shapeGeometry.Paths.Add(path);
Shape shape = new Shape(new ShapeType(shapeGeometry), 500, 1800, 400, 400);
shape.Fill = new SolidFill(Color.DarkGreen);
shape.Outline.Fill = new SolidFill(Color.LimeGreen);
slide.Shapes.Add(shape);
Add Effects to Shapes
You can apply different visual effects to shapes. Use the shape’s Effects property to access effect settings. The following effects are available:
The following code snippet adds a shadow to a shape:

Shape shape = new Shape(ShapeType.Rectangle);

shape.Outline = new LineStyle { Fill = new SolidFill(Color.DarkRed), Width = 4 };
shape.Fill = new SolidFill(Color.LightGreen);
shape.X = 30;
shape.Y = 30;
shape.Width = 800;
shape.Height = 800;

ShapeEffectProperties effects = new ShapeEffectProperties();
effects.OuterShadow = new OuterShadowEffect { BlurRadius = 50, Color = new OfficeColor(Color.Gray), HorizontalScale = 120, VerticalScale = 120 };
shape.Effects = effects;

slide.Shapes.Add(shape);
Remove Shapes
Call the following methods to remove a shape from a presentation:
- Remove - Removes the given shape object.
- RemoveAt - Removes the shape with the given index.
- Clear - Removes all shapes from the collection.
Configure Lock Settings
In presentations, locks are settings that restrict user operations or hide visual elements. The DevExpress Presentation API library ships with individual lock settings for regular shapes, group shapes, picture shapes, and connectors. Use the following properties to access lock settings:
The following code snippet locks all user operations for shapes:
using DevExpress.Docs.Presentation;
using System.Drawing;

namespace PresentationApiSample;

public class Program {
    public static void Main(string[] _) {
        // ...
        shape.LockSettings.DisableArrowheadsChange = true;
        shape.LockSettings.DisableAspectRatioChange = true;
        shape.LockSettings.DisableGrouping = true;
        shape.LockSettings.DisableHandles = true;
        shape.LockSettings.DisableMoving = true;
        shape.LockSettings.DisablePointsEdit = true;
        shape.LockSettings.DisableResize = true;
        shape.LockSettings.DisableRotation = true;
        shape.LockSettings.DisableSelection = true;
        shape.LockSettings.DisableShapeTypeChange = true;
        shape.LockSettings.DisableTextEdit = true;

        group.LockSettings.DisableAspectRatioChange = true;
        group.LockSettings.DisableGrouping = true;
        group.LockSettings.DisableMoving = true;
        group.LockSettings.DisableRotation = true;
        group.LockSettings.DisableSelection = true;
        group.LockSettings.DisableUngrouping = true;
        group.LockSettings.DisableResize = true;

        picture.LockSettings.DisableSelection = true;
        picture.LockSettings.DisableArrowheadsChange = true;
        picture.LockSettings.DisableAspectRatioChange = true;
        picture.LockSettings.DisableCropping = true;
        picture.LockSettings.DisableGrouping = true;
        picture.LockSettings.DisableHandles = true;
        picture.LockSettings.DisableMoving = true;
        picture.LockSettings.DisablePointsEdit = true;
        picture.LockSettings.DisableResize = true;
        picture.LockSettings.DisableRotation = true;
        picture.LockSettings.DisableSelection = true;
        picture.LockSettings.DisableShapeTypeChange = true;

        connector.LockSettings.DisableArrowheadsChange = true;
        connector.LockSettings.DisableAspectRatioChange = true;
        connector.LockSettings.DisableGrouping = true;
        connector.LockSettings.DisableHandles = true;
        connector.LockSettings.DisableMoving = true;
        connector.LockSettings.DisablePointsEdit = true;
        connector.LockSettings.DisableResize = true;
        connector.LockSettings.DisableRotation = true;
        connector.LockSettings.DisableSelection = true;
        connector.LockSettings.DisableShapeTypeChange = true;
    }
}
Inherit Shapes from Masters and Layouts
Slides can inherit shapes from slide masters and layouts. You can also populate placeholder shapes obtained from layouts with content.
For more information, refer to the following help topic: Configure Slide Masters and Layouts.
Format Shape Text
For information on how to add and format text within shapes, refer to the following help topic: Work with Text in Shapes.