Add a Standalone Report Parameters Panel to a Blazor Web App (Interactive WebAssembly) with an ASP.NET Core Backend
- 4 minutes to read
This tutorial adds a Standalone Report Parameters Panel (DxWasmReportParametersPanel) to the application created with the Blazor Web App (Interactive WebAssembly) template.
Create a New Project from a Template
This section describes how to create a new Blazor project. If you wish to start this tutorial using an existing application, go to Step 2.
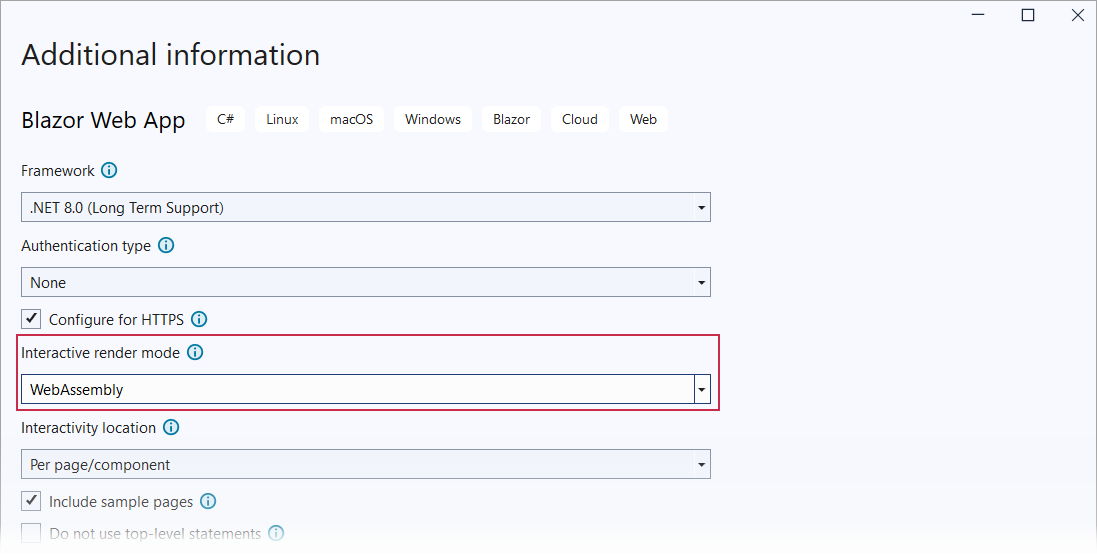
Click Create a new project on Visual Studio’s start page and select the Blazor Web App template. Select WebAssembly from the Interactive Render Mode drop-down list.
Click Next.
Specify the project name and location, and click Next.
Specify additional options and click Create.
You can use this tutorial to integrate the Standalone Report Parameters Panel into a Blazor WebAssembly Hosted (available in ASP.NET Core 7.0 or earlier) template.
For additional information on available Blazor templates, refer to the following help topic: Tooling for ASP.NET Core Blazor.
Install NuGet Packages
Install the following NuGet packages to the projects:
Project Package BlazorWasmReportingApp DevExpress.AspNetCore.Reporting BlazorWasmReportingApp.Client DevExpress.Blazor.Reporting.JSBasedControls.WebAssembly For additional information on how to install NuGet packages for DevExpress components, review the following help topic: How to Install DevExpress Products.
Build the project.
Register DevExpress Resources
In the Program.cs file of the main project, add the following code:
using DevExpress.AspNetCore;
//...
var builder = WebApplication.CreateBuilder(args);
// ...
// Add services to the container.
builder.Services.AddMvc();
builder.Services.AddDevExpressControls();
// ...
var app = builder.Build();
// ...
app.MapControllers();
// ...
In the App.razor file, call the RegisterScripts(Action<ResourcesConfigurator>) method to register DevExpress client resources:
<head>
@*...*@
@DxResourceManager.RegisterScripts()
Implement Controllers
- Create a Controllers folder.
In the created folder, add a new ReportingControllers.cs class file with the following content:
using DevExpress.AspNetCore.Reporting.WebDocumentViewer; using DevExpress.AspNetCore.Reporting.WebDocumentViewer.Native.Services; public class CustomWebDocumentViewerController : WebDocumentViewerController { public CustomWebDocumentViewerController(IWebDocumentViewerMvcControllerService controllerService) : base(controllerService) { } }- In the App.razor file, call the RegisterScripts(Action<ResourcesConfigurator>) method to register DevExpress client resources:
Add a Sample Report
The Standalone Parameters Panel works with REPX files.
Create a new report with several parameters.
Review the following topic for more information: Add a New Report in Visual Studio.
Tip
To edit a report without Microsoft Visual Studio, you can use Visual Studio Code with the dedicated Report Designer extension:
Create a Reports folder in the project.
Save the created report as a
TestReport.repxfile (XML format) in the created Reports folder.
Add a Report Resolution Service
You need to register a report resolution service that translates report identifiers to report instances in your applications. To do this, follow the steps below:
Implement the IReportProvider interface in the CustomReportProvider.cs file as follows:
using DevExpress.XtraReports.Services;
using DevExpress.XtraReports.UI;

public class CustomReportProvider : DevExpress.XtraReports.Services.IReportProvider {
    public XtraReport GetReport(string id, ReportProviderContext context) {
        var reportNameToOpen = id ?? "TestReport";
        string path = $"Reports\\{reportNameToOpen}.repx";
        if (!System.IO.File.Exists(path)) return new XtraReport();
        return XtraReport.FromXmlFile(path);
    }
}
Register the created service at application startup:
using DevExpress.XtraReports.Services;
// ...
builder.Services.AddDevExpressControls();
builder.Services.AddScoped<IReportProvider, CustomReportProvider>();
// ...
var app = builder.Build();
Configure Data Connections
If the report uses data from a database, add a connection string to the appsettings.json file and reference the libraries to interact with the database.
For example, if a sample report retrieves data from the nwind.db SQLite database (a database file from DevExpress demos), do the following:
- Install the System.Data.SQLite.Core NuGet package.
- Copy the nwind.db file to the Data folder and specify that the file should be copied to the output directory.
Add the connection string to the appsettings.json file:
"ConnectionStrings": {
    "NWindConnectionString": "XpoProvider=SQLite;Data Source=Data/nwind.db"
}
Add a Page with the Parameters Panel
Create a new Razor page (Panel.razor) in the Client/Pages folder. Use the code below to generate a page with a Standalone Report Parameters Panel component.
Enable interactivity for DevExpress components:
Make sure the required interactive services are registered.
Add an appropriate render mode attribute to a component’s page.
@page "/panel/"
@rendermode InteractiveWebAssembly

@using DevExpress.Blazor.Reporting

<DxWasmReportParametersPanel ReportName="TestReport" Height="1000px" Width="650px">
    <DxWasmReportParametersPanelRequestOptions InvokeAction="DXXRDV"></DxWasmReportParametersPanelRequestOptions>
</DxWasmReportParametersPanel>
Add Navigation Links
Add navigation links to the NavMenu.razor page:
Run the Project
The Panel page contains the Standalone Report Parameters Panel control that displays parameters from the TestReport report:
Next Steps
- Use Parameter Values from the Standalone Report Parameters Panel
- Apply parameter values obtained from the Standalone Parameters Panel to the report.