Create a Template for a Selected Code
- 4 minutes to read
You can use the code editor’s context menu to create a template for your selected code.
Important
Visual Studio IntelliSense has priority over CodeRush templates. For information on how to prioritize a CodeRush template over Visual Studio IntelliSense, refer to the following topic section: Expand a Template Instead of Visual Studio IntelliSense.
How to Use
Select code.
Right-click the selection and choose Selection to Template… from the context menu.

CodeRush shows the Create Template From Selection dialog. This dialog contains the template expansion code and options. These options allow you to choose identifiers and code elements for which CodeRush should create links and text fields.

Enable “Link together all references to i local” and “Generate text fields for all references to count parameter” options as shown in the screenshot below.

CodeRush adds the following text commands to the template expansion code:
“Caret” - places the code editor’s caret at the point where this text command appears in the template expansion code.
“BlockAnchor” - marks the end of a text selection that starts from the caret position.
“FieldStart” and “FieldEnd” - marks the start and end of a text field accordingly.
“Link(i)” - links i identifiers from different locations. If you change a linked identifier after template expansion, CodeRush changes the associated identifiers.
“Field(count)” - creates the “count” text field.
“FinalTarget” - specifies the caret’s final location after the last text field is accepted through the Enter key.
Click Next to proceed to the next page.
Select a template’s category and right-click it to add the new one.
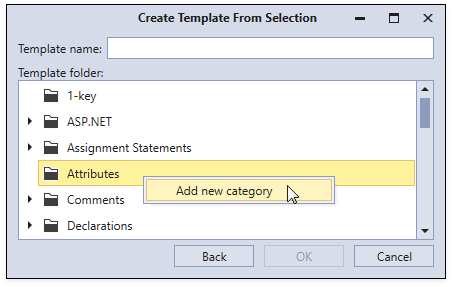
Enter the category name and enable the Make this a top level folder option in the New Category dialog.

Click OK to create the category and close the dialog.
Select the created folder. Enter the template name that corresponds to template mnemonics, for example “fi”, and click OK.

CodeRush opens the Templates options page.

Make changes in your new template (optional). Click OK to create the template and close this options page.
Focus the code editor and expand the created template.
See the Expand a Template section of the Code Templates topic for more details.
Other Customization Options
Link Different Kinds of Identifiers
You can link different kinds of identifiers, for example, a method parameter’s name and a string with the same name when you create a template. If you expand this template and change the name of the linked identifier in one code place CodeRush changes other identifier names simultaneously.
For example, to link the “myName” parameter and “myName” string in the code template above, ensure the “Allow links between different kinds of identifier” option is enabled in the Create Template From Selection dialog. This allows CodeRush to add the “myName” parameter and “myName” string” option to the “Link together all references to:” list. Check this option and create the template as described in the previous section.

Add Links between Camel Case Parts of Identifiers
To enable this functionality:
Check the “Allow links between camel case parts of identifiers” option in the Create Template From Selection dialog.
CodeRush analyzes the selected code and adds required options to the “Link together all references to” and “Generate text field for all references to:” lists.
Check options for the camel case parts of identifiers which you want to link. For example, enable the “result” part in resultBuilder local” option for the “sb” template shown in the screencast above:

Simplify Types Inside Links and Fields
This option simplifies the template expansion code in the Create Template From Selection dialog.
Perform the following actions to see this option in action:
Select the following code, open the context menu, and choose Selection to Template…:
public class CellPosition
  {
      List<int> row;
      List<int> column;

      public CellPosition(List<int> row, List<int> column)
      {
          this.row = row;
          this.column = column;
      }
      public List<int> Row => this.row;
      public List<int> Column => this.column;
  }
Check the “List<T> type” option in the Create Template From Template dialog.

Enable the “Simplify types inside links and fields (trims everything but type name)” option. CodeRush simplifies the List<T> type in the template expansion code.

Generate Text Fields for First Elements in Links
CodeRush allows you to cancel text field generation for the first element in links.
Uncheck the following options in the Create Template From Selection dialog:
- The “Generate text field for first element in all links” option.
- Checkboxes for linked identifiers.

Multi-Select Code Parts before Template Creation
Select code parts and press Ctrl+Alt+Enter to mark them before you create a template for the selected code. CodeRush creates Text Fields and links all references for marked text parts in the Template From Selection dialog.
Expand the created template to see the result.
Refer to the Multi-Select topic for more information.