Change the Crosshair Cursor Layout
- 2 minutes to read
This topic explains how to change the crosshair cursor snap mode and the crosshair’s common label position.
Layout Customization
Specify the Crosshair Cursor Snap Mode
You can use the CrosshairOptions.SnapMode property to specify the crosshair snap mode. This property defines how a crosshair cursor should detect the series point to which to snap.
Two snap modes are available: NearestArgument (the default mode) and NearestValue.
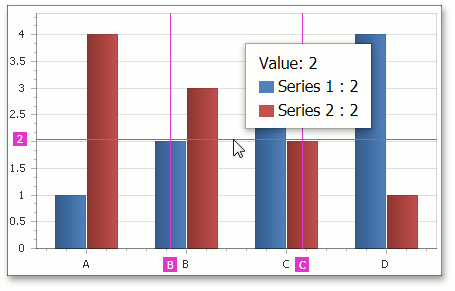
The following image shows the NearestValue snap mode in action:
Set the Crosshair Cursor Position
A common crosshair cursor label is displayed for all series in a multiple series chart. You can specify its position in two modes:
- The CrosshairMousePosition mode where a crosshair label is placed near a mouse pointer.
- The CrosshairFreePosition mode where a crosshair label has a free position on a chart.
Use the CrosshairOptions.CommonLabelPosition property to get access to one of the listed modes.
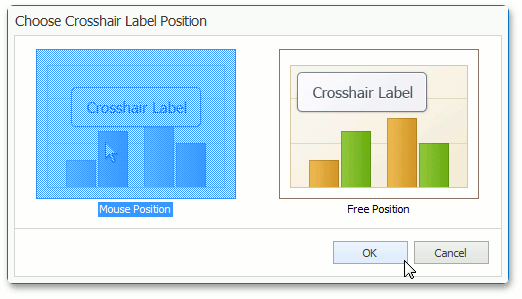
In the Properties window, you can click the ellipsis button for this property to invoke the Choose Crosshair Label Position dialog.
You can change the current offset for both common crosshair label modes with the CrosshairLabelPosition.OffsetX and CrosshairLabelPosition.OffsetY properties.
For instance, the following image shows a common crosshair label in crosshair free mode with the CrosshairLabelPosition.OffsetX and CrosshairLabelPosition.OffsetY properties set to (120,120).
Moreover, you can specify the position of a common crosshair label within its parent element with CrosshairFreePosition.DockCorner and CrosshairFreePosition.DockTarget properties in CrosshairFreePosition mode.
The image below demonstrates a common crosshair label docked to the RightTop chart corner.

Show the Crosshair Cursor on All Panes
The Chart initially displays the crosshair cursor only on the focused pane. Set the showOnlyInFocusedPane property to false to show the crosshair cursor on all panes:
