Bind a Report to a MongoDB Instance
- 3 minutes to read
This topic describes how to bind a report to a MongoDB instance in the Visual Studio Report Designer.
Create a new project and add a blank report to this project. Follow the steps below to bind the report to a MongoDB instance.
Invoke the Data Source Wizard
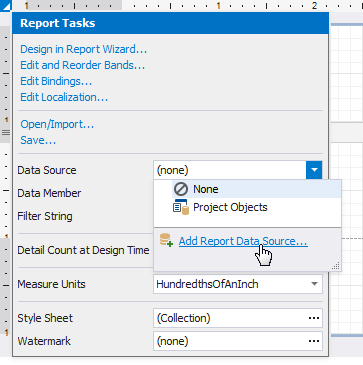
Click the report’s smart tag, expand the drop-down menu for the Data Source property in the “Report Tasks” list, and click Add Report Data Source.

Select the MongoDB Data Source
Select MongoDB in the invoked Data Source Wizard and click Next.

A reporting application uses the MongoDB.Driver package to supply MongoDB data at runtime. If the driver is not installed in your project, the following wizard page appears:

Use this page to install the driver.
Specify Connection Properties
Paste the entire string or enter connection fields individually. Refer to the following topic for information on connection string format and options: Connection String URI Format.

Save the Connection String
Check the Yes, save a connection as option on the next Data Source Wizard page and specify the name of the connection string to save it. Otherwise, click Next.

The string is saved to the project’s configuration file and you can use this string when you create a new MongoDB connection.

Note
For .NET projects, install Microsoft.Extensions.Configuration and Microsoft.Extensions.Configuration.Json to obtain a data connection string from appsettings.json when you select a predefined data connection in the Data Source Wizard.
Specify Data Queries
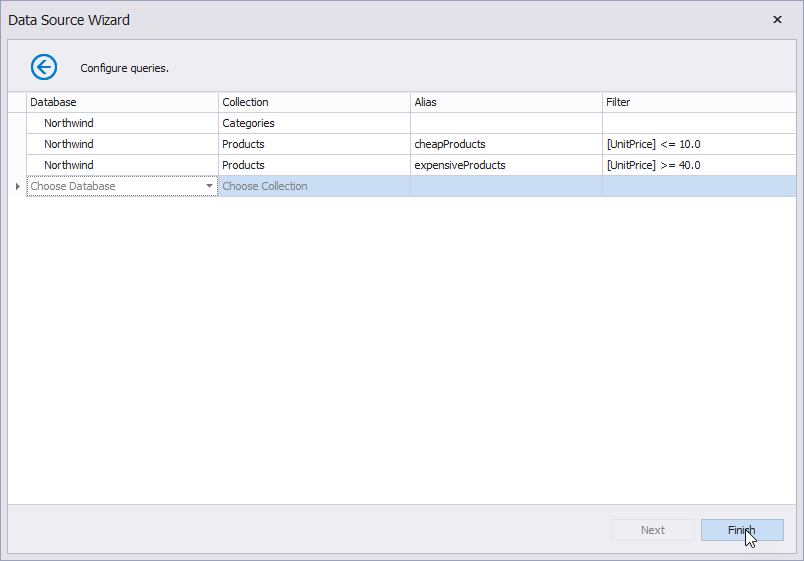
On the next page, choose database collections that you want to load from the MongoDB instance. Specify the name of the database and database collection in the Database and Collection columns. You can use the Filter column to specify filter conditions for items of the database collections.
The names of queries to database collections should be unique. A string stored in a query’s Collection column is the default name for this query. To create several queries to the same database collection, use the Alias column to specify different names for these queries.

Select Data Fields
This wizard page allows you to select data fields that you want to include in a MongoDB collection and also change their display names.

Use the drop-down menu to select a collection whose data fields you want to configure.

Enable or disable a checkbox in the Field Name column to include or remove a field from a collection.

Use editors in the Field Display Name column to change the default field name.
The MongoDB Data Source Wizard analyzes only the first 100 documents to generate field types. If your MongoDB collection contains more than 100 documents, you can use all of them for type generation. For this, click the Analyze all records button.

Use the Created MongoDB Data Source
The created data source appears in the Field List and Report Explorer.

You can bind report controls to fields from this data source. Refer to the following topic for more information: Bind Report Controls to Data.
Modify the Created MongoDB Data Source
You can change connection parameters and modify queries for the created data source. Right-click the data source node in the Field List or Report Explorer and select Configure Connections or Manage Queries.

Reconfigure the connection parameters or queries in the invoked Connection Editor and click Finish.

Right-click the data source node and select Rebuild Result Schema to apply the changes.
