Customize the Document Viewer Tab Panel
- 3 minutes to read
Remove the Tab Panel
Handle the client-side CustomizeElements event, get the Tab Panel element by its PreviewElements ID and remove the Tab Panel from the collection of UI elements:
 <script type="text/javascript">
    function onCustomizeElements(s, e) {
        var panelPart = e.GetById(DevExpress.Reporting.Viewer.PreviewElements.RightPanel);
        var index = e.Elements.indexOf(panelPart);
        e.Elements.splice(index, 1);
    }
</script>
@Html.DevExpress().WebDocumentViewer(settings => {
    settings.Name = "WebDocumentViewer1";
    settings.ClientSideEvents.CustomizeElements = "onCustomizeElements";
}).Bind("XtraReport1").GetHtml()
Hide the Preview Parameters Tab
When you add a parameter to a report, it is visible (its Parameter.Visible property is true) and forces the Document Viewer to display the Preview Parameters panel that prompts users to enter parameter values.
You can set the parameter’s Visible property to false. This removes the parameter from the Preview Parameters panel and assigns a default value to it. If you set the Visible property to false for all report parameters, the Preview Parameters panel is not shown.
To hide the Preview Parameters tab and automatically submit default values to all parameters, set the Parameter.Visible property to false for all report parameters.
For more information on parameters, review the following article: Use Report Parameters.
Hide the Export Tab
Handle the client-side CustomizeExportOptions event and call the ASPxClientCustomizeExportOptionsEventArgs.HideExportOptionsPanel method:
 <script type="text/javascript">
    function onCustomizeExportOptions(s, e) {
        e.HideExportOptionsPanel();
    }
</script>
<dx:ASPxWebDocumentViewer ClientInstanceName="WebDocumentViewer1" ID="ASPxWebDocumentViewer1" runat="server">
    <ClientSideEvents CustomizeExportOptions ="onCustomizeExportOptions" />
</dx:ASPxWebDocumentViewer>
Add a New Tab
Create a new tab and add it to the tab collection in the Document Viewer’s View Model. The tab content is defined in a template specified in the tab constructor.
Handle the client-side BeforeRender event. In the event handler, you can access the Document Viewer’s View Model (the event argument).
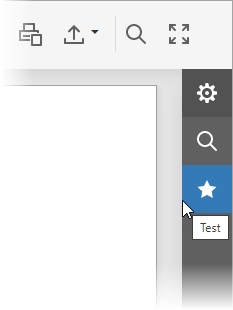
The view model’s tabPanel property allows you to access a tab collection in the Tab Panel. Create a new tab (an instance of the TabInfo<T> class) and add it to the collection.
In the TabInfo constructor, specify the template used to render the tab content and the template used to render the tab image.
The customized tab panel is shown in the image below:

<script type="text/javascript" id="script">
    function onBeforeRender(s, e) {
        e.tabPanel.tabs.push(new DevExpress.Analytics.TabInfo({
            text: "Test",
            template: "my-test-panel",
            imageTemplateName: "fivestar",
            model: null
        }));
    }
</script>
<script type="text/html" id="my-test-panel">
    <asp:Button Text="Button" runat="server" />
</script>
<script type="text/html" id="fivestar">
    <svg viewBox="-3.4 -4 32 32" xmlns="http://www.w3.org/2000/svg"
         xmlns:xlink="http://www.w3.org/1999/xlink">
        <g id="Layer_1" transform="translate(-3.4, -4)"
           style="enable-background:new 0 0 32 32">
            <g id="Rating_1_">
                <polygon class="dxd-icon-fill"
                         points="16,4 19.9,11.9 28.6,13.2 22.3,19.3 23.8,28 16,23.9 8.2,28 9.7,19.3 3.4,13.2 12.1,11.9  " />
            </g>
        </g>
    </svg>
</script>
@Html.DevExpress().WebDocumentViewer(settings =>
{
    settings.Name = "WebDocumentViewer1";
    settings.ClientSideEvents.BeforeRender = "onBeforeRender";
}).Bind("XtraReport1").GetHtml()
A custom template can contain standard ASP.NET Web Forms components or custom controls. If you wish to use the DevExpress client-side controls, see the following help section: DevExtreme Widgets.
You can use our SVG Icon Builder tool to create custom icons. For more information, review the following help topic: How To: Draw and Use SVG Images.